Wednesday, January 8, 2014

Never Lost Data with Newly Released Pavtube iOS Data Recovery


Summary: Pavtube iOS Data Recovery is newly released for iOS Device users to recover lost data from iPhone, iPad, iPod Touch and iTunes Backup files.

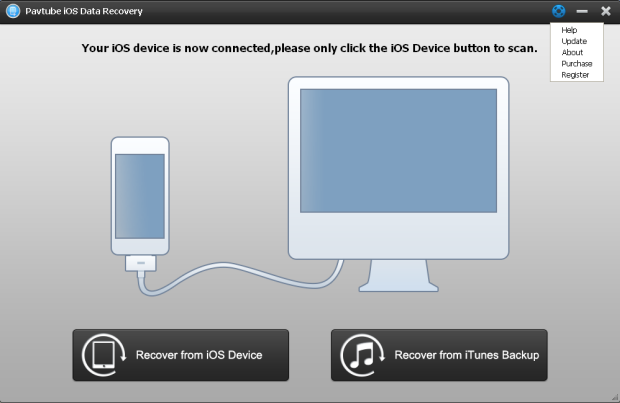
Pavtube iOS Data Recovery 1.0.0 (Windows Version) is newly released for the new coming year. iOS Device users with any generations of iPhone, iPad, and iPod Touch can now recover lost data either directly from iOS device or from iTunes Backup file on Windows or Mac.
  Price: $59.95

iOS remains more popular than Android for holiday shopping in the US according to MacRumors. And iOS attracts Apple lovers of all over the world with its stability, no crapware, well-designed & intuitive user-interface, etc. But one still may encounter data loss by false configuration, device stolen, water damage, factory settings restoration, failure to update or jailbreak, etc. which are all frustrating. Pavtube developers found solution to help people who want to recover lost contacts, photos, videos, call history, SMS, iMessage, notes, reminders, and more.

"I have many friends using iPhone and other iOS devices. Some of them asked me for help when they deleted data unexpectedly," said Anda Wu, the software developer, "After some research, I finally found that the deleted data are actually stored in other ways on the device and in iTunes Backup files and can be recovered. And then it comes to my mind that we can develop an easy tool to recover lost data and help those who felt depressed on this."
Pavtube iOS Data Recovery is thus developed and released at a special point of time to help users in the fresh new year of 2014.

"It not only recovers 7 types of data, like lost contacts, notes, call history, and Safari bookmark directly from the device, but also recovers 11 types of data including images and videos from iTunes Backup files," continued by Anda. "And we minimized the process into only three steps: connect (or choose iTunes Backup file), scan, and recover."

"Pavtube iOS Data Recovery will be a wonderful saving for iOS device users to recover or backup data. And we are preparing for future updates to make it be able to recover more data."
 concluded Anda.

To learn more about Pavtube iOS Data Recovery, please visit


Safe Free Download Pavtube iOS Data Recovery for Windows or Mac 1.0.0:


Some Related Tutorials:

Thursday, January 2, 2014

Top 5 Windows Media Player Alternatives

Here I just list top 5 best free media player software which can be the alternatives of Windows media player. Read on and pick up one to get the best video experience. 
Windows Media Player is a media player and media library software created by Microsoft, which is available for Windows operating system. It supports playback of audio and video, as well as viewing of images.


However, as for the limited video formats and lack of certain features of built-in windows media player, you might want to find the third-party media player for windows as the alternative of WMP. There are a variety of different players out there to suit your own personal interests and needs. Now this article will introduce five free alternatives to Windows Media Player that support multiple file formats.

1. VLC media player


Hands-down one of the best multi-format media players out there, VLC supports a wide range of file formats. Beginner users will appreciate the simplicity of VLC's interface. More advanced users can take advantage of the player's hotkey support, as well as the ability tointegrate VLC with web channel streaming services. Channels.com is a good example, which will give you access to a variety of different channels and programming such as ESPN and National Geographic. The player also plays BluRay and HD.

VLC Media Player is available for both PC and Mac.

2. UMPlayer


UMPlayer is based on another solid multimedia player, MPlayer. It's a player with a minimalist interface that's arguably more stylish than the player it was based on, which makes for a great user experience when listening to audio or watching videos. UMPlayer can play online TV and radio stations and offers a built-in search feature that lets you find videos in YouTube and stream music via Shoutcast. It's unlikely you'll have difficulties playing any media file, as this player includes more than 200 codecs. UMPlayer can also take screenshots of video files and supports subtitle downloads for foreign language movies.

UMPlayer is also available for both PC and Mac.

3. KMPlayer


Another multimedia player that supports a large range of formats, KMPlayer is also incrediblylight on resources. This makes it the perfect player for PC users with little space to spare. KMPlayer boasts a minimalist interface with subtle aesthetic touches. One of these involves the player's color changing with every new track played.

KMPlayer is highly customizable as well, with the ability to choose skins, add plug-ins and change playback options. You can even change picture properties, sharpen video images, apply filters and take video captures through the processing tools KMPlayer provides.

KMPlayer is only available for both PC, no Mac version (or you can get KMPlayer Mac Alternative).

4. QuickTime


This is another option that you can use for playing media files on your computer. QuickTime was developed by Apple but it is not just available for Mac but for Windows users as well. The good thing about this program is that is supports wide selections of media formats so you are most likely be able to play audio and video, as well as view images without problems or without having to install codec.

QuickTime is also available for both PC & Mac.

5. RealPlayer


RealPlayer comes with a basic free version and a pro paid version with the latter having more features than the free one. If you want the basic media player feature, which is to play media files, the basic versions would be a good free alternative to Windows Media Player. It supports the most common media formats, though you can install plug-ins to play other formats, as well as get additional features such as audio enhancements, skin creators and visualizations.

RealPlayer is also available for both PC and Mac. 

How to play videos by Windows Media Player

However, if you still prefer to use Windows Media Player but the video you are trying to watch is not supported; a work around would be to convert the video into a supported format. With this, you can use Pavtube Video Converter.


This is an easy to use video converter that let you convert various videos to proper format for playing and editing with fast speed and high video quality. It supports adding *.srt and *.ass subtitle, and allows you to edit video files by trimming (set starting time and ending time), cropping (set aspect ratio) and adjusting video effect (brightness, contrast and saturation) and setting (Resolution, Bit Rate, Frame Rate and Encoder). Simply add the video file, select a format supported by Windows Media Player and start the conversion.

Having viewed the five listed functional and easy-to- use free Windows Media Player Alternatives, do you have your own choice? Do you think they actually outperform some of the expensive premium media players out there on the market? Now get the best one to perform your perfect video playback!

Related Guide:

Reviews ByteCopy for Mac- An Alternative to Mac MakeMKV
Get the Best Handbrake Equivalent for Win/Mac
iMovie Alternative for Mavericks: How to Edit Videos on OS X Mavericks
WinFF Alternative for Mac: Convert Any Video or Audio Files on Mac
Any Recommended ClipWrap Alternative?

Monday, December 30, 2013

Enjoy Galaxy Note 3 Video files on Sony PS3 Via Allshare/DLNA

Most of people may be confused about how to stream videos from Galaxy Note 3 onto PS3 via Allshare/DLNA. This article introduces the way to enjoy Galaxy Note 3 Video files on Sony PS3 with ease.
I want to connect my Samsung Galaxy Note 3 to my PS3. Also i want watch movies and music which is in my ps3 frm my Galaxy Note....is it possible?Thanks!

If you are a Galaxy Note 3 user, you may find Samsung Galaxy Note 3 features the DLNA media sharing support. With its AllShare service, you could easily and quickly share media files between all DLNA-enabled devices in your home over a WLAN.


The post is to show you how to stream and transmit videos and audios from Galaxy Note 3 to PS3 via the media sharing application – AllShare. First of all, you should know that the PS3 takes a role of DLNA player but DLNA server, so it can play movies from Galaxy Note 3 in your digital home but can not stream Galaxy Note 3 videos to other players within DLNA protocols.

To allow PS3 to access media files(movies, videos, music, etc) on your Galaxy Note 3, you must activate media sharing. And before that you need to activate the WLAN feature and add a WLAN profile (which is necessary if you want to use the Samsung Galaxy Note 3's AllShare function.).

If you have ensured all the media files(movies, videos, music, etc) stored on Galaxy Note 3 are supported by PS3 and DLNA, just follow the steps to successfully steam Galaxy Note 3 videos on PS3 via AllShare (DLNA).

Step 1: Activate the WLAN feature and add a WLAN profile

(1) How to activate the WLAN feature?
In Idle mode, open the application list and select Settings

(2) How to Find and connect to a WLAN?
1 In Idle mode, open the application list and select Settings

Step 2: Activate AllShare and customize its DLNA feature.

Follow the steps:

1. In Idle mode, open the application list and select AllShare.
2. Press → Settings.
3. Adjust the following settings to customize the DLNA feature:

  • Device name - Enter a name for your device as a media server.
  • Share video - Turn on video sharing with other DLNA-enabled devices.
  • Share picture - Turn on image sharing with other DLNA-enabled devices.
  • Share audio - Turn on music sharing with other DLNA-enabled devices.
  • Upload from other devices - Set whether or not to accept the upload from other devices.
  • Default memory - Select the default memory location for saving downloaded media files.
  • Subtitles - Set to display subtitles.
Step 3: Play Galaxy Note 3 videos on PS3 via AllShare.

(1)
Select Galaxy Note 3 as the media server (the one that contains media files) and select a media category and a file. After that you can select PS3 as the media player (the one that will play the media files.)

(2) Control playback using icons of Galaxy Note 3 or PS3.

While some files may not play on the PS3 because of the limited supported media formats. If in that case, you can use an easy-to-use yet comprehensive Galaxy Note 3 Video to PS3 Converter to help you transcode the unsupported files to a more friendly video format for PS3 and DLNA. It has the user-friendly and easy interface and superfast conversion speed especially with CUDA acceleration. Moreover, it will get conversion done in few clicks. 


Tips:

PS3 Formats: MPEG, DivX, Xvid, MPG, MP3, WAV, WMA, MP4, JPEG, JPG, BMP, GIF, WMV.

DLNA Video/Audio Formats: Audio LPCM AAC, AC-3, ATRAC 3plus, MP3, WMA9.
AV MPEG2 MPEG-1, MPEG-4*, AVC, WMV9.


How to convert  MKV, MOV, AVI, FLV, MTS, M2TS, MPEG, MPG Video to MP4 for Galaxy Note 3 and stream for PS3 viewing?Step 1. Import the source.

Download Video to Galaxy Note 3 Converter onto your computer and purchase it. Install and start it up. Click "Add Video" to load source videos.


Step 2. Choose "Samsung Galaxy Note(*.mp4)" as the target format.

Click the drop-down list and choose "Samsung -> Samsung Galaxy Note(*.mp4)" as the best format. Note that you can click "Settings" beside the list to customize target video size, bitrate, frame rate, sample rate(Hz), etc., such as:


Step 3. Edit the video files (optional).

This wonderful flash Video to Galaxy Note 3 Converter provides us powerful edit function. The basic video editing features include subtitle attaching, video length

trimming, frame cropping, text & image watermark attaching and video image effect adjusting, etc.

Trim, Crop, Edit Audio/subtitles before conversion (Optional)

Click the pencil-like icon on the top to open Video Editor window; we can trim, crop, add watermark, deinterlacing or edit audio/subtitles before conversion here.

Step 4. Start the video to Galaxy Note 3 conversion.

After finishing all the steps above, the final step is to start the conversion. Click the "Convert" icon to start converting 1080p/720p Videos (MKV, MOV, AVI, FLV, MTS, M2TS, MPEG, MPG, etc) to MP4 format.

Wait for moments till the conversion complete, then click "Open output folder" to quick locate the converted video.

Now you can sync it and playing on Samsung Galaxy Note 3 and PS3 Via Allshare/DLNA  without any format issue and device limitation.

See also:

Thursday, December 26, 2013

Convert WMV files for playback with Nook HD Tablet

This article mainly shows how to convert WMV to Nook HD Tablet supported file format so that you can watch WMV videos on Nook HD Tablet with ease.
American book-selling giant Barnes and Noble has unveiled two new Android tablets (7-inch Nook HD and 9-inch Nook HD+) as part of its Nook range, aimed at the lower end of the market to take on Amazon’s and Google’s offerings. As the smaller of the two, the Nook HD offers up a stunning 7-inch HD display – packing a 1440 x 900 resolution, at 243ppi, which blows the 1280 x 800, 216ppi Nexus 7 and Kindle Fire HD out of the water.

You can easily buy or rent and start watching movies & TV Shows in seconds on your Nook HD Tablet. The built-in Web browser works well and offers Flash support. Thus, it’s a good gadget for you to have entertainment. While, some users prefer to put video files to Nook HD Tablet from computer for free enjoyment. To meet the needs of so many users who have the intention, here we give you some Nook HD Tablet Video Tips.
If you’ve taken a galance on the main spec of the new Nook, it’s easy to find that Nook HD video format is limited as other Tablets like Google Nexus 7. Thus, when you wanna watch movies formatted in WMV, MKV, VOB, TiVo, FLV, etc on Nook HD Tablet, first you need to do is to convert the videos to a playable format like MP4, 3GP, or AVI. Here I’d like to show you the guide on how to put and play WMV video on Nook HD Tablet as an example.
Requirements
Converting WMV files for playback with Nook HD Tablet
Step 1. Launch the WMV to Nook Converter and You can click “Add video” button to browse and import your source materials in .wmv format.. You can also simply drag and drop media files to the source pane to add. The software supports batch conversion so that you can add several files to convert at one time.

Step 2. According to my multiple tests, MP4 format is of the best compatibility with the Nook HD Tablet. Click on the dropdown menu of Format > Android > Nook HD(*.mp4). It’s the particular format pre-set for Nook HD Tablet. And then you can select a destination folder to save the converted files.
Tips:
Once you’ve mastered these basics, you may consider exploring more powerful and complex methods of manipulating video. For example you can further compress video file size, or choose specific output resolutions using the software
( You can click “Settings” button to set the video/audio parameters for the best Nook HD Video format)
Step 3. When all the settings are OK, hit “Convert” on the right bottom to start converting WMV to MP4 for Nook HD Tablet. After the conversion, you can import the WMV videos to Nook HD Tablet for playback. Have fun!
Download Nook Tablet Video Converter:

 
Read more:

Wednesday, December 25, 2013

Copy 2D/3D Blu-ray contents to iPad Air on Mac

Want to copy 2D/3D Blu-ray contents to iPad Air on Mac? This Mac Blu-ray to iPad Air converter is highly recommended to help easily remove commercial 2D/3D Blu-ray protection and output MP4 videos for freely playback.

Perhaps the biggest surprise is that the new iPad has gotten a new name. It’s not the iPad 5; instead, it’s called the iPad Air. The new tablet is 7.5mm thin versus 9.4mm (20 percent thinner) and the screen bezels are 43 percent smaller. The new iPad Air gives high resolution screen-If you'll be looking at a tablet all day it should be a visually stunning experience.


The iPad Air is perfect for viewing HD movies. Maybe you are a 2D or 3D movie fans, you would ask the question to either get your Blu-ray movies free from physical disks or prepare for watching on iPad Air on the go.

Given that iPad Air lacks a Blu-ray drive for uploading files, there does seem to be one big question. To sovle iPad Air Blu-ray movie playback issue, here I will show you how to easily convert 2D/3D Blu-ray to iPad Air supported video format for watching.

What we need:

  • An external Blu-ray Disc drive
  • Blu-ray Ripper tool – Blu-ray Ripper for Mac (Windows users: Pavtube Blu-ray Ripper) - a top and all-in-one Blu-ray Ripping program to help you remove Blu-ray protection and convert Blu-ray to iPad Air support format on Mac. ( now is 30% off)
Learn more: Top 5 Best Blu-ray Ripper Review | Best Blu-ray Ripper for Mac Review

System requirements:

Mac

  • 1G Hz or above Intel processor.
  • Mac OS X Leopard (10.5), Snow Leopard (10.6), Lion (10.7), Mountain Lion (10.8), Mavericks (10.9)
  • 512 MB physical RAM (memory) or more.
  • 1024*768 or higher resolution display.
  • Optical Drive: DVD drive(BD drive is required for ripping Blu-ray disc)
Windows

  • Operating System: Windows XP/2003/Vista/Windows 7/Windows 8
  • DirectX Version: 9.0 or above
  • Memory: 64MB at least
  • Processor: 500MHz Intel or 500MHz AMD CPU
  • Hard Disc Space: 512MB or above
  • Optical Drive: DVD drive(BD drive is required for ripping Blu-ray disc)

Follow this guide to quick learn:

How to convert 2D/3D Blu-rays to iPad Air on Mac?

Step 1: Load 2D/3D Blu-ray movie to the Mac Blu-ray to iPad Air Converter.

Insert your 2D/3D Blu-ray movie to disc drive, and click “Load Disc” button on Pavtube Blu-ray Ripper for Mac interface to load Blu-ray from ROM; it also support importing Blu-ray ISO and Blu-ray folder.


Step 2: Select video format.

Here we select MP4 with H.264 codec for iPad Air. Click the Format drop-down list, and select “iPad HD Video(*.mp4)” from iPad category.


Tips: If you have special requirements on target video, click “Settings” to customize video size, bitrate, frame rate and sample rate.

Step 4. Ripping 2D/3D Blu-ray to MP4 for iPad Air on Mac.

Click the red “Convert” button to start ripping 2D/3D Blu-ray to H.264/MPEG-4 MP4 for iPad Air. When it finishes, click the “Open Output Folder” icon to quick locate the converted video.

Once get the converted videos, just copy and dump them to iPad Air via USB. Then you are ready to play blu-ray movies on iPad Air on Mac freely.


Related Articles

View Hottest Christmas DVD Movies on iPad Air
Transfer MKV, AVI, VOB, Tivo, MPG, WMV, FLV videos onto iPad Air
Converting DVD ISO/IFO files to Multi-track MP4 for iPad Air

Tuesday, December 24, 2013

Movies Coming Out on Christmas Day 2013

Christmas Day is like the Sophie’s Choice of movies—which one are possibly you going to choose? Here’s your 60 second rundown of each of the films coming out on December 25, what they’re about, and whether or not you should see ‘em, with trailers conveniently embedded for each. Ready? Go…


The Wolf of Wall Street.
Leonardo DiCaprio plays a high-rolling stock broker who ends up committing crime and getting in trouble with the government. Jonah Hill and Matthew McConaughey co-star.

Should You See It?:
It’s nominated for tons of Golden Globes and Leo is in it, so yes.


The Secret Life of Walter Mitty.

Ben Stiller plays a guy who’s about to lose his job at Life magazine, so he goes on an adventure around the world to try to save it. Kristen Wiig is his love interest.

Should You See It?:
It’s a bit weird at times and probably not as comical as you’d expect, but you’ll probably really, really enjoy the ending—and no, that doesn’t spoil it.


Lone Survivor.
Based on a true story of a mission where soldiers were ordered to kill the leader of the Taliban, it’s basically Mark Wahlberg, Taylor Kitsch, and other hot dudes in uniform.

Should You See It?
Hello. Mark Wahlberg, Taylor Kitsch, and other hot dudes in uniform.


Grudge Match.
Stallone and DeNiro play boxing rivals who meet up for one last match 30 years later.

Should You See It? Flashbacks to Stallone as Rocky will ensue, so yes, definitely. Always.


47 Ronin.
Keanu Reeves leads a pack of samurai who set out to kill their master.

Should you See It? I mean, I guess, if you’re into that kinda stuff.


Labor Day.
Single mother Kate Winslet falls in love with Josh Brolin, an escaped convict, not realizing he’s an escaped convict. It’s a classic love story, really.
Should You See It?
It’s got a solid 66 percent on Rotten Tomatoes, but this film has surprisingly not gotten any awards show buzz despite the caliber of its stars. So it’s a toss-up.


Justin Bieber’s Believe.

The follow-up to 2011′s Never Say Never, following JB on his Believe tour and showing him as way more grown-up than little 16-year-old Biebs.

Should You See It? Yes.


And let’s not forget, there’s also Anchorman 2 and American Hustle, which both came out last week, as options, too! It’s ok to be overwhelmed. It’ll all be over soon.

What movie are you going to see this Christmas? Please comment to let me know! Have a good time with your family members and friends.

Merry Christmas and Happy New Year to all of you!

Thursday, December 19, 2013

Reviews: ByteCopy for Mac- An Alternative to Mac MakeMKV?

To backing up your favourite Blu-rays, we need the help of Blu-ray ripping software. Still have no idea about which one is suitable for you? This article will introduce you Pavtube ByteCopy for Mac- as an Alternative to Mac MakeMKV. 

MakeMKV for Mac has been considered as one of the best Mac Blu-ray Ripper apps. It converts the video clips from proprietary (and usually encrypted)DVD and Blu-ray disc into a set of MKV files, preserving most information but not changing it in any way. The MKV format can store multiple video/audio tracks with all meta-information and preserve chapters. A most preferable feature of MakeMKV is fast conversion – it converts as fast as your drive can read data, and takes about only 1 hour to copy a Blu-ray to Mac HDD comparing with 2-8 hours with other Mac Blu-ray rippers/transcoders. 

The MakeMKV for Mac, by any means, is a nice choice for BD ripping on Mac. Can we expect a more considerable Mac Blu-ray ripper than MakeMKV ? 

Well, YES. The release of Pavtube ByteCopy for Mac lets us see alternative to MakeMKV for Mac- it has all the features MakeMKV has and does even more with less steps. 

Good News on May 15th, 2015! Pavtube upgraded BteCopy for Mac to version 4.8.5.1, which features strong and perfect support for Blu-ray/DVD to H.265/HEVC MP4 encoding on Mac. 

New features of ByteCopy for Mac v4.8.5.1: 

1. Supported to encode H.265/HEVC codec 
2. Optimize coding parameters 
3. Fix some bugs 

Overview: 

Pavtube ByteCopy for Mac is an integrated tool with Pavtube Blu-ray Ripper for Mac, the old ByteCopy for Mac, and more favorable features. 

It's an easy-to-use Mac tool to backup files from Blu-ray discs and standard DVDs to MKV container format with multiple audio tracks and subtitles included . More than lossless output, Pavtube ByteCopy for Mac is possible to recode the source movie into MKV/MP4/MOV/M4V video with certain video/audio codecs. It provides hundreds of preset output formats for you to convert the BD/DVD movies to compatible format for iPad, iPad Air, iPhone, iPod, Apple TV, Samsung Galaxy Tab, Kindle Fire HDX, Microsoft Surface RT/Pro, Surface 2/Pro 2, WDTV, etc. In a word, it's an all-in-one Blu-ray and DVD ripper and converter to save. Give it a try and you will be in love with it. 

Screenshots: 


Trial and Download 

ByteCopy for Mac OS X 

Requires x86 Mac OS X 10.5 or later. (including the Mac Mountain Lion, Mavericks 10.9 and Yosemite 10.10) 

ByteCopy for Windows 

Requires Windows XP, Vista or Win7 (32bit and 64bit), Windows 8, Windows 8.1, Windows 10 

Pavtube ByteCopy for Mac rips Blu-ray in 2 ways, lossless copy and lossy conversion. In trial version lossless backup runs 7 times only; for loss conversion, a watermark is put on the screen. A full version is offered at $42 USD. The purchase includes a lifetime license and unlimited upgrades. 

Note: Currently you can't edit videos by merging, splitting, trimming, cropping, adding .srt, .ass subtitle files, etc if choosing multi-track output formats. 

Now you see the difference between MakeMKV for Mac and ByteCopy for Mac. 

MakeMKV does lossless Blu-ray/DVD to MKV backup only while ByteCopy not only copy BD/DVD to MKV, but also allows for transcoding. The best part is that it transcodes video stream, audio track and subtitle stream separately . You can keep original video quality and meanwhile convert the TrueHD audio to Dolby Digital 5.1 audio when/if your device does not support 7.1 channels, or shrink the BD contents to videos with lower bitrate to ensure they are played properly on a slow computer or older media player. 

Like MakeMKV, the ByteCopy is also easy of use. Converting a DVD/ Blu-ray Disc is a simple 3-step process. And you can make it a 2-step process by a settled preference. 

Sounds even better than a MakeMKV alternative? Go ahead to try it out then! 

Here is the Online Help of ByteCopy for Mac 

More Guides for you: