Tuesday, June 26, 2018

3 Best GoPro Alternatives Action Cameras 2018

Action cameras are unlike any other kind of camera. They're designed to be attached to helmets, surfboards, cars and other objects, and they're small, tough and simple to operate, with a lens that captures the world in high-definition video and in a wide-angle fish-eye perspective. Among the action cameras, GoPro stands out for its iconic box-shaped Hero cameras and become the market leader. But some users find the GoPro action camera too expensive and do not have enough budget to afford it? Don't worry, there are plenty of top action cameras in the market today, many of which feature much lower prices than GoPro. Here we list 3 best GoPro alternatives action cameras in 2018, which are more affordable than the pricey GoPro and you can consider buying.

3 Best GoPro Alternatives 2018

Here we list 6 more affordable GoPro alternatives for you to lower your expenses.

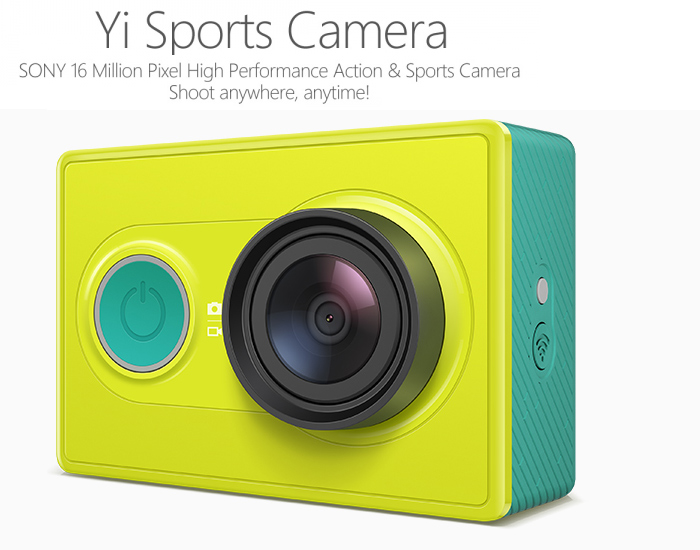
Best GoPro Alternative #1: Xiaomi Yi Camera

Xiaomi Yi action camera is known for lightweight, compact and durable. The YI action camera is just half the price of a base GoPro camera and it's recognized as the best camera in market for its price. It equips a 16 MP Sony camera sensor with a 155-degree wide-angle lens, which supports recording 1080p HD videos at up to 120fps. The camera includes a 1010mAh removable battery and supports for WiFi, Bluetooth 4.0 and microSD support up to 64GB. Thanks to the WiFi connectivity, users can easily share the pictures and videos from the camera to your computer. What's more, the camera supports Bluetooth remote control, app and also includes a micro HDMI port that supports live video previews while recording, which is very cool. This best cheap alternative to GoPro also supports different capture modes like Time-lapse mode, Timed photo, Timed video and more. But the camera lacks water-proof ability and users have to buy a separate water resistance cases if they want to take underwater photos or videos. (Reference price: $63)

Xiaomi Yi Camera

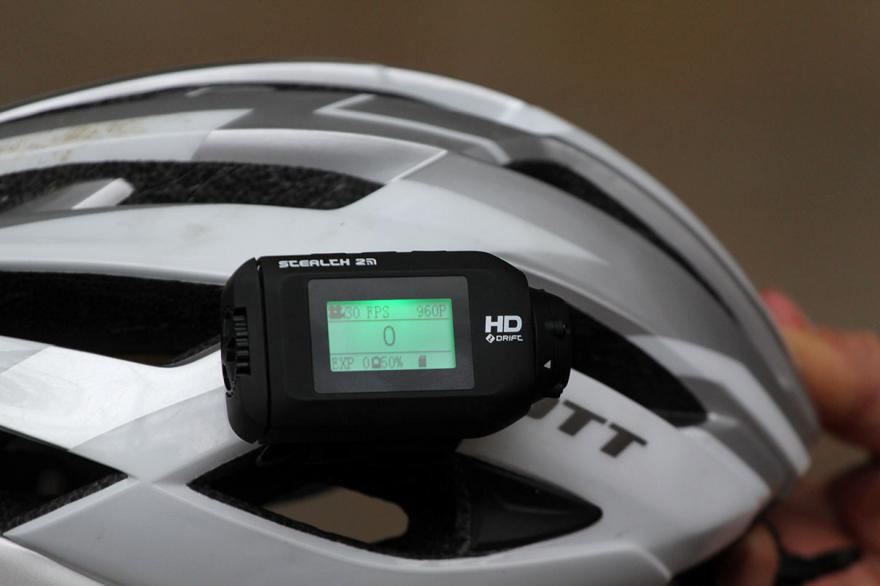
Best GoPro Alternative #2: Drift Stealth 2

Another top recommended alternative to GoPro is Drift Stealth 2 which is also a compact, mount-anywhere action camera. People like Stealth 2 because it's incredibly small and can be mounted almost anywhere, as well as its 300-degree rotating lens and its more affordable price. It has a 12 MP camera with a 7-element lens that captures videos in up to 1080p. Moreover, The Stealth 2 features a 1.3-inch mono graphic LCD display for camera status and modes. You can even use the Drift app to control the camera remotely from your smartphone and the WiFi connect to share media easily. This action camera features a big 1500mAh non-removable battery that allows you to record videos for up to 3 hours. At last, the Stealth 2 isn't waterproof and you also require a separate casing for it. (Reference price: $84.99)

Drift Stealth 2

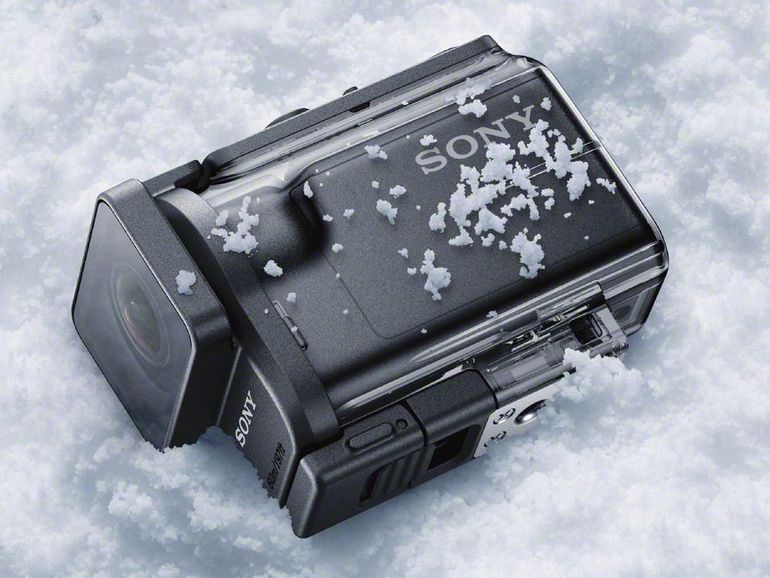
Best GoPro Alternative #4: Sony HDR-AS50 Action Camera

Tough compact Sony HDR-AS50 Action Cam lets you enjoy playful POV movie shooting with supplied Underwater Housing. Its casual style and advanced features encourage everyday movie-making. It features an 11 MP Exmor R BSI CMOS sensor with Zeiss 170-degree lens and SteadyShot image stabilization. The camera shoots videos in 1080p Full HD at 60fps and makes high-speed 720p HD movie capture at 120fps/100fps, and there's also support for 4K time-lapse videos. WiFi and Bluetooth are supported. This action camera is waterproof (up to 60 meters), dustproof and shockproof with its supplied case. ((Reference price: $199)

Sony HDR-AS50 Action Camera

Take Full Use of the Action Camera Recordings: Best Video Converter

Even though you can take the best 4K/HD videos form the camera, when you watching the 4K videos on TV, you may meet some troubles, for example: The TV screen is black or you get the error message shows that your TV can't recognize your 4K/HD videos. In addition, for some people who want to upload the wonderful videos to Youtube. Facebook or Vimeo, you may meet some troubles due to the video codec, video frame, video bitarte, video size, video length, etc. All these troubles can be solved by one 4K/HD video converter.

From the market, we find the video encoding/decoding assistant: Pavtube Video Converter Ultimate which is eay to use, install and upgrade, professional video converer. You can import any 4K/HD video recordings you like, at the same time, you can choose any video format you want to convert, like the MP4, AVI, H.264, H.265, MOV, etc. Best of all, this software allows you to adjust the 4K/HD video related parameter for better compatibility. Big surprise: You also can edit hte videos in this software, like the video cutting, trimming, adding subtitles, watermark, text, etc.

Quick Guide: Getting The Desired Video Format

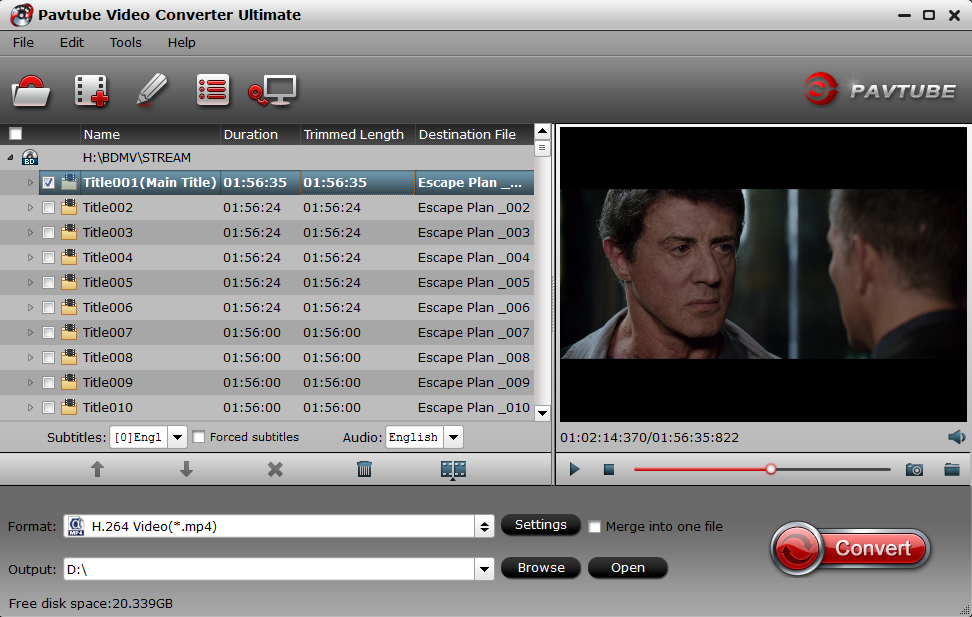
Step 1. First, you need to transfer the 4K/HD/SD video to your PC. Then launch the video converter on your PC, then click the "Folder" or "Video" icon to load source video files from your local computer to the program.

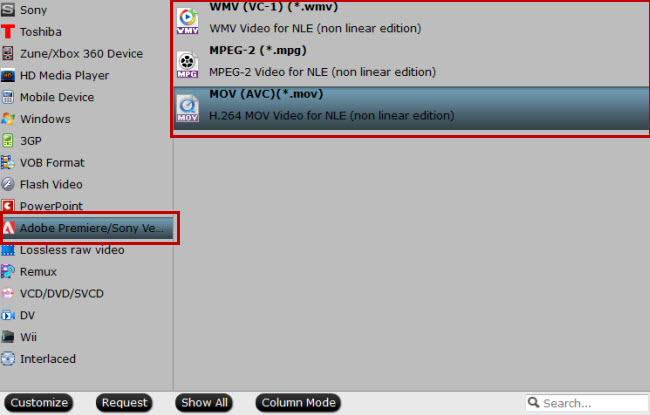
Step 2. Click the "Format" bar and open the drop-down list, select one video format you want. You can choose one video from the "HD Video" main category. You also can choose video format from the Common Video, TVs, Apple TV, NLE software, Android devices, etc.

Load Blu-ray/DVD/video source files

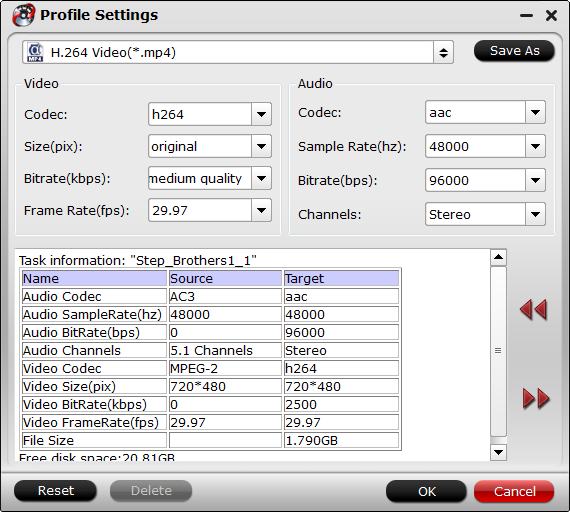
Optional Step: Click "Settings" to open "Profile Settings" window, here you can choose or specify the video parameters such as video/audio codecs, file size, bit rates, frame rates, etc as you like. You also can compress the 4K video to HD video by adjusting the 4K video resolution, gframe, etc without much quaity loss.

set the video

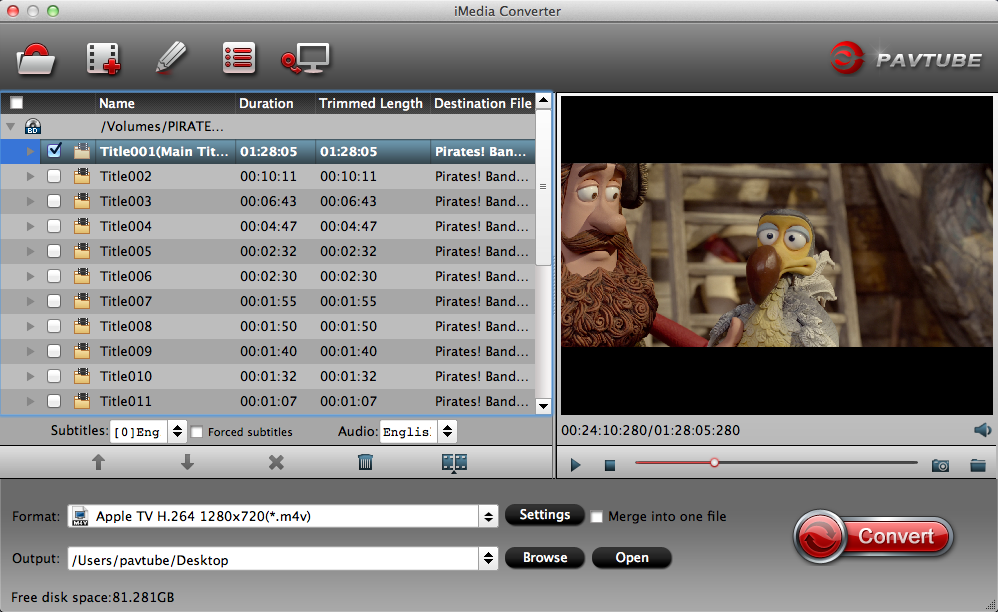
Step 3. Press the Convert button to begin the video conversion, Just wait for a while, this software will finish the complicated video conversion. Click Open to get the generated files.

Monday, June 11, 2018

Premiere Pro CC 2018 Supported Video Formats

The new features coming to Premiere Pro CC take new aim at collaborative editing and motion graphics workflows. In Premiere Pro CC 2018, video creators will find new ways of sharing projects, new ways of VR/360 video storytelling, and new ways to adapt motion graphics to fit project requirements. We all know to the first thing to edit the video in Premiere Pro CC 2018 is to import the videos to it smoothly, at the first step, most editors will meet the trouble, how to import the videos to Premiere Pro CC 2018 and do the happy video editing? You can get the effective solutions in this post.

5 MUST-KNOW NEW FEATURES IN PREMIERE PRO CC 2018

After exploring Premiere Pro CC 2018, here are the 5 new features we're most excited about:

  1. Multiple Open Projects
  2. Shared Projects
  3. Immersive Video Effects and Transitions
  4. Responsive Design tools (Timing and Position)
  5. 8 New Label Colors

Premiere Pro CC 2018 Supported Video and Audio Formats

Formats 3GP, 3G2 (.3gp) AAC  Advanced Audio Coding Apple ProRes M2T
Details Multimedia container format Advanced Audio Coding Audio Interchange File Format Apple video compression format  Sony HDV
Formats ASF   ASND AVC-Infra AVI (.avi) M2TS
Details NetShow (Windows only) Adobe Sound Document Panasonic codec DV-AVI, Microsoft AVI Type 1 and Type 2 Blu-ray BDAV MPEG-2 Transport Stream, AVCHD
Formats BWF DNxHD DNxHR DV  VOB
Details Broadcast WAVE format Supported in native MXF and QuickTime wrappers DNxHR LB, DNxHR SQ, DNxHR TR, DNxHR HQ, and DNxHR HQX Raw DV stream, a QuickTime format Container format in DVD media
Formats GIF H.264 AVC HEVC (H.265) M1V WAV
Details Animated GIF Various media that use H.264 encoding H.265 media with resolutions up to 8192x4320 MPEG-1 Video File Windows Waveform
Formats WMV OMF OpenEXR MXF
Details Windows Media, Windows only Audio Project Format Files in .EXR, .MXR, and .SXR formats Media eXchange Format. MXF is a container format that supports
  • ARRIRAW 
  • P2 Movie: Panasonic OP1b variant of MXF video in AVC-Intra LT and AVC-LongG, Panasonic Op-Atom variant of MXF video in DV, DVCPRO, DVCPRO 50, DVCPRO HD, AVC-Intra
  • Sony XDCAM HD 18/25/35 (4:2:0)
  • Sony XDCAM HD 50 (4:2:2)
  • AVC-LongGOP
  • XAVC Intra
  • XAVC LongGOP
  • JPEG2000
  • IMX 30/40/50
  • XDCAM EX

Premiere Pro CC 2018 Supported Native Camera Formats

Usually we take the video with camera, Premiere Pro CC 2018 can support the following native camera formats

Camera ARRI AMIRA camera Canon XF, Canon RAW Phantom Cine media Sony cameras
Details Premiere Pro provides built-in support for the ARRI AMIRA camera, with appropriate color LUTs applied as master clips on import. Canon XF and Canon RAW footage, including footage from Canon Cinema EOS C300 and C500 cameras. Import and edit Phantom Cine media shot on Vision Research Phantom cameras.
  • Sony XDCAM
  • Sony XDCAM 50
  • Sony XAVC
  • Sony XAVC LongGOP (Group of Pictures)
  • Sony XAVC-S
  • Sony SStP
  • Sony RAW (F65, F55, F5, FS700 cameras)  
Camera CinemaDNG Panasonic AVC, P2 cameras RED support
Details
  • Blackmagic Cinema Camera
  • Blackmagic Pocket Cinema Camera
  • Convergent Design Odyssey7Q
  • Panasonic AVC Ultra
  • Panasonic AVCi 200
  • Panasonic AVC Ultra Long GOP (Group of Pictures)
  • Panasonic P2 cameras and across multiple P2 cards
  • Color Science like REDcolor2, REDgamma2, and REDlogFilm
  • RED ONE
  • RED EPIC
  • RED Scarlet-X cameras with support for RED Rocket
  • Red Dragon including RED Dragon 6K

How to Import Any Videos into Premiere Pro CC 2018 for Editing

You may met this situation: fail to import some video to Premiere Pro CC, how to do? Most reasons are the video format incompatibility issue, you just need one video converter and convert the video to Premiere Pro CC 2018 friendly video formats, that's all. I highly recommend you  Pavtube Video Converter Ultimate (to get Mac version) which is an excellent video converter with the high stability and fast video conversion speed, you can import the multiple videos with different video formats and video size, for example: You can load the MP4, AVI, FLV, VOB, even including the DVD and Blu-ray disc, disc images and folder, you also can load the 4K , 8K videos to it, and output the Premiere most compatible video format - "MPEG-2".

Apart from ouput the Premiere presets with the best settings, this software also supplies massive optimized device presets for Apple devices, Android devices, non-linear editing software, game console, and others. This software also allows you to adjust the video parameters, like the video codec, audio codec, you can solve the codec incompatibility issue. For better video compatibility, you also can adjust the video frame, video resolution, video bitrate, audio sample rate, etc.

Even though this video converter is not a professional video editor, you still can so some simple video editing with the built-in video editor, you can add the funny subtitles to video which can support the SRT, ASS, SSA subtitles, you also can replace the music in video, trim the videos to clips, etc. More features, you can download it and have a try.

pc try pc buy

mac try mac buy

Quick Guide: Convert video to Premiere Pro CC 2018 supported videos

Step 1. Load the videos

You can open this software and load the videos by clicking File, you also can drag the videos to it directly. If you want to save much time and energy, you can add the folder which holds multiple videos and do batch video conversion, you only can output the same video formats when you choose the batch video conversion.

Load the videos

Step 2. Choose output videos

Click Format button to start the output video list, you can choose one videos from different category, like the Common Video, HD Video, 3D Video, or the NLE preset.

Output Youtube best uploading format

To output the best video format for Premiere, you can navigate your cursor to "Adobe Premiere/Sony Ve..." and select "MPEG-2 (*.mpg)".

for premiere

If necessary, you can enter the video setting window and adjust the video related parameters, you also can compress the videos by adjusting the video resolution, for example: You can compress the 4K to HD video by adjusting the video resolution from the 3840p to 1080p, or compress the HD video to SD videos, you also can adjust the video frame and bitrate for uploading to YouTube, Facebook, Vimeo, etc.

H.264 MP4

Step 3. Start the video conversion

Final step is coming, you just need to press the Convert button to start the video conversion. This software will finish this task with lighting fast speed.

When you get the perfect videos, you can import it to Premiere Pro CC 2018 and have a happy video editing.

Monday, June 4, 2018

How to Edit Sony 4K XAVC S with FCP

You can get high bit rate of 4K 100Mbps through use of the XAVC S format via Sony/Panasonic/Canon camcoders. As for post shooting, the 4K video content from the camcorder can be played back directly on a compatible 4K television through the supplied HDMI cable, or in super-sampled Full HD when connected to an HD TV. How about working them with Final Cut Pro?

Import Sony XAVC S to FCP with Sony Plug-in

As we all know that the XAVC S format record by Sony UHD camcoders is mainly designed to deliver 4K video signals with a resolution of 3840x2160, it is not an the native video editing codec for Final Cut Pro. To fix the workflow of XAVC S with FCP, sony has created a special plug-in for Mac which helps to provide support for XAVC S in FCP allowing viewing and editing capability. However, most people complain that the process to install plug in is very complicated, more worse, the plug-in some times don't even work at all.

Alternative way to ingest 4K XAVC S to FCP

If you are looking for a fast and fluid workflow of 4K XAVC S with FCP, the best way is transcoding 4K XAVC S to Final Cut Pro professional editing codec - Apple Prores 422 codec, a post-production format designed for pristine quality and high-performance Final Cut Pro real-time editing. In addition, if you Mac is very old or not has the capability to handle 4K video, it would be much better for you to compress 4K Prores to 1080p prores to fix video play backs choppy issues.

There is professional solution in hand called Pavtube iMedia Converter for Mac (to get Windows version), which enables you to directly wrap Sony 4K XAVC S to FCP  Apple Prores Codec in different file types.

If you computer is old or slow, or you just want to do some rough editing, you can select to output "Apple Prores 422(Proxy)(*.mov)"or "Apple Prores (LT)(*.mov)"format to save more space and bandwidth. However, if your Mac version is powerful enough to handle multicam and high-resolution video, even the 4K video and you are going to do many effects editing work with FCP, you'd better choose to output "Apple Prores 422(*.mov)"or "Apple Prores 422(HQ)(*.mov)"for better performance.

How to to encode and compress 4K XAVC S to 1080P Prores for FCP?

Step 1: Import 4K XAVC S videos.

From "File"drop-down option, select "add Video/Audio"to add source 4K XAVC S video files to the program.

Import 4K XAVC S videos.

Step 2: Select output file format.

Click "Format"bar, from its drop-down list, select "Final Cut Pro"> "Apple Prores 422(*.mov)"as your desired output file format.

Choose Apple Prores 422 format

Step 3: Adjust video parameters

Open "Profile Settings" window, you can edit video codec, resolution, bit rate, frame rate, sample rate. channels here. To keep the output video resoltuion as 4K, just set it as 3840*2160; to compress 4K to 1080p, you can change the resolution to 1920*1080.

compress 4k proes to 1080p

Step 4: Convert 4K XAVC S to Apple Prores format.

Go back to the main interface and press the "Convert"icon on the right-bottom to start Sony 4K XAVC S to Final Cut Pro Apple Prores process.

When the conversion is done, you can easily import the converted video to FCP  for furthering professional editing.

Wednesday, May 30, 2018

How to Edit AVCHD Files Effortlessly

AVCHD (Advanced Video Coding High Definition) is a file-based format for the digital recording and playback of high-definition video. Developed jointly by Sony and Panasonic, the format was introduced in 2006 primarily for use in high definition consumer camcorders. And AVCHD files generally use extensions like MTS and M2TS, and can not be accepted by many meida players and devices.

By using AVCHD format, you can burn high definition video to a standard DVD disc. Later you can play that DVD disc in a Blu-ray disc player. Thus you don't have to own a Blu-ray disc burner to enjoy high definition video on Blu-ray disc player. AVCHD video can also be outputted to TV via an HDMI cable or components outputs. It can also be transferred and viewed to computer. Whereas, most people prefer editing the AVCHD before sharing or uploading to the social network. So the best way to get full use of the AVCHD is to convert the file to other format like: MPEG, MP4, MOV, MKV, AVI, etc. After that you are able to play the AVCHD file on iPhone X, iPad, Galaxy S9, Xbox One, and editing in iMovie, Final Cut Pro, Premiere, etc.

The Best AVCHD Video Converter for Windows/Mac

Pavtube Video Converter Ultimate is an application that you can use to encode AVCHD media files to multiple formats, including MPEG-1, MPEG-2, MPEG-4, H.264, H.265, DNxHD, ProRes in MP4, MKV, AVI, WMV, MOV formats. The interface of the program is clean and pretty intuitive. AVCHD files can be imported into the list by using the file browser, by the way the "drag and drop" method is also supported. Batch processing is allowed so that you can add multiple AVCHD files to batch convert AVCHD to any video format you desired with this software. To edit AVCHD effortlessly, you can convert AVCHD to MPEG for Premiere, Sony Vegas editing. If you are Mac users, you also can choose to output "Apple InterMediate Codec(AIC)(*.mov)", "Apple ProRes 422 (*.mov)" for iMovie/FCP postproduction.

Since you can adjust the video bitrate and resolution, you can make the output AVCHD video more compatible with your devices. With the built-in video editor, you can merge multiple AVCHD files into a single one file and you also can trim the AVCHD file to cut off the unwanted part. You also can add external subtitles to the AVCHD file to make the file easier to understand.

Steps to Convert AVCHD to Premiere/Sony Vegas/FCP/iMovie Compatible Video Formats for Further Editing

Step 1: Load protected AVCHD files into the program.

Install and launch AVCHD video converter program on your computer, click "File" > "Add Video/Audio" or "Add from Folder" to load AVCHD files into the program. You also can directly drag and drop the AVCHD files into the software. Batch conversion is supported here.

load avchd

Step 2: Choose output file formats.

Click "Format", from its drop-down option, you can choose MOV, AVI, M4V, MKV, H.264/H.265 MP4, etc. If you want to edit AVCHD with NLE software, you can choose the MPEG-2 preset for NLE software from "Adobe Premiere/Sony Vegas" category.

MPEG format

Choose the "Apple InterMediate Codec(AIC)(*.mov)", "Apple ProRes 422 (*.mov)" for iMovie/FCP postproduction from "iMovie and Final Cut Ex..." and "Final Cut Pro" category respectively on Mac version software.

Option 1.

Option 2.

output for fcp

Click "Settings" on the main interface to open "Profile Settings" window to tweak the output video codec, bit rate, sample rate, resolution, audio codec, bit rate, sample rate and channels to make the output video more fit with your devices or programs.

Check an item to active the "Video Editor" function, then click the pencil like icon on the top tool bar to open the "Video Editor" window, you can trim the AVCHD file length, crop video black bars, add external subtitles to AVCHD files, apply sepcial rendering effect, remove/replace audio in video, etc.

edit avchd

Step 4: Start the conversion process.

After all setting is compelted, press the "Convert" button in the right-bottom and the AVCHD video conversion process will start automatically. When the covnersion stops, please go to the output folder to get the covnerted files.

Wednesday, May 23, 2018

Top 5 Best 4K Camera Phone You Should Know

More and more often you can see 4K technology everywhere. More and more devices, monitor add support of 4K playback, 4K enables people to pursue the extremely audiovisual enjoyment. Nowadays, you can even shot video in 4K resolution with the smart phone in your hand. The following article will give you top 5 best 4K camera phones for you.

1. Sony Xperia XZ Premium

Sony Xperia XZ Premium

In terms of photography, Sony is one of those respected names in the industry. The Sony Xperia XZ Premium has everything you want when paying top dollar for a phone, with its 4K display and slow motion camera two standout party pieces. It will please Sony fans around the world. The camera has an amazing feature that we loved: it is able to record slo-mo video at only 980 frames per second. With this kind of camera, you can even film a nature documentary because it will catch all the details. However, we also need to tell you this up-front: you do need a good light.

2. Huawei P10

Huawei P10

The Huawei P10 comes with one front camera with 8Mp and two back cameras: one with 12MP and another one with 20MP. Just like it already happened with the previous Huawei models, you can use the 20MP one to take black-and-white photos. However, when you use both rear cameras, your photos will have a better clarity. Although the Huawei P10 comes with the feature that allows you to shoot 4K videos, the fact is that it doesn't offer any stabilization when you're recording at this resolution. As if this wasn't enough, if you use Windows, you won't be able to open them by using Windows's 10 Photos app, VLC, and you won't even be able to upload it directly to YouTube. 

3. Samsung Galaxy S9

Samsung Galaxy S9

The Samsung Galaxy S9 is a great phone, but one that hasn't really kicked on from the Galaxy S8, bringing a very similar design and screen to 2017's version. The improved biometrics were sorely needed, and the camera is a leap forward, but the amazing low light capabilities have resulted in sacrifices elsewhere. Samsung Galaxy S9 comes with a front camera with 8Mp and a rear camera with 12Mp. In case you're serious about shooting 4K videos, you need to know that the sound quality is not the best in the market and that you might have a few problems with the hybrid stabilization system. 

4. iPhone X

iphone x

iPhone X comes with a 7Mp camera in the front and 2 back cameras, both with 12Mp. Losing the home button and altering the design was a dangerous move, but one that was sorely needed after years of similarity and the premium design, extra power, all-screen front mix together to create - by far - the best iPhone Apple's ever made. It's impossible to give a perfect score to something that costs this much - but this is the closest to smartphone perfection Apple has ever got. iPhone X allows you to shot 4K videos at 24/30/60 fps steadily. What's bad is that it is the most expensive flagship phone around.

5. MOTO Z2 Play

MOTO Z2 Play

Featuring a 5MP camera on the front and a 12Mp camera on the back, we can say that the photos taken with the MOTO Z2 Play are among average. While the rear camera includes phase detection autofocus, dual-pixel autofocus, laser autofocus, and a dual-tone LED flash, this should imply that low light photos would have an awesome quality. In what concerns video capabilities, the MOTO Z2 Play allows you to shoot using Full-HD or 4K. Although the videos could be a lot better, they are quite ok. Besides, one of the things that you can easily do is to use the Go Live mode and go live directly on YouTube.

Best 4K Camera Assistant

Convert Any Phone Recorded Video to Non-linear Editing Software

Some day, 1080p will be the past, since the 4K will dominate the market. Finally you made the 4K videos, the next thing you want to do is to edit and enhance video and upload it to social network for sharing. Here we strongly recommend you a 4K editing software and covnerter for you which is called Pavtube Video Converter Ultimate (to get Mac version). It allows you to convert 4K video to iMovie, Final Cut Pro, Adobe Premiere optimized presets with the best settings. It also can upscale SD/HD to 4K video, and compress 4K to 1080p if you need.

As we know, when you import 4K video into non-linear editing software and the exported file in 4k resolution will has a large size. You will spend a lot of time to upload the render file to Youtube, Vimeo, Facebook. Don't worry, this software also allows you to customize the video codec, bit rate, frame rate, channels, etc to make the most suitable video for your media player, devices. Know more here(guide).

Pavtube Video Converter Ultimate

Wednesday, May 16, 2018

How to Split Large VOB File into Parts

VOB (Video Object) is the container format in DVD-Video media. VOB can contain digital video, digital audio, subtitles, DVD menus and navigation contents multiplexed together into a stream form. Files in VOB format may be encrypted. Besides that normally VOB files are very large, it brings difficulties to VOB transfer and share. Thus, many guys desire one perfect VOB splitter to split the large file into parts for storage and share. And in post, we will sare the best VOB splitter with you.

vob splitter

What we will share with you is a Pavtube Video Converter Ultimate (to get Mac version), with this software, you can not only split encrypted VOB file, digital file formats with verious different file formats but also commercial Blu-ray/DVD disc. The program offers 3 different way for you to split large video files into small equal parts: by file size, file count or time length to satisfy your different video splitting need.

Besides splitting video, this advanced program also offer other beneficial simple video editing function for you. You can flip or rotate video to get it displayed in the right angel, trim or cut video files to remove unwanted parts or segments, crop video to remove the unwanted black bars or area, add image/video/transparent text watermark to video, apply special rendering effect to video, flip or rotate video angel, remove/replace audio in video or merge separate videos into one file.

Tips: To get smaller VOB video file size, you can convert VOB file to MP4, MOV, and other more compressed video formats. And then lower the video bit rate to get smaller video file size. Welcome to download this software, read this tutorial guide and try it.

Hot Guide: 3 Ways to Compress VOB files on Computer

Step by Step to Split Large VOB Video Into Small Parts by File Size, Count or Time Length?

Step 1: Import large VOB video files.

Launch and start the program on your computer, click "File" > "Add Video/Audio" or "Add from Folder" to import VOB source files to the program. For splitting Blu-ray or DVD disc, insert Blu-ray/DVD into DVD optical drive or external Blu-ray drive, then click "File" > "Loadf from Disc" option.

Import large VOB video files.

Step 2: Define output file format.

From "Format" bar drop-down list, select one of your desired file format to output. If you don't want to loss any file quality, just select to output the same video as original file format by select format from "VOB Format" category. You also can convert VOB to MP4, which is the most popular video format in this world.

Define output file format.

Step 3: Split VOB video into small parts.

By clicking the "Split" button under the file displaying list, checking "Enable" to enable it, and then you can split the file by file count, time length, or file size according to your own needs.

Split VOB video into small parts

Step 3: Trim/Crop/Watermark video.

Select an item on the main interface to active the "Editor" function, then click the Edit icon on the tool bar of main interface to open the Editor Window, you can play and preview the original video and output effects. Also you can flip video, trim, crop, add effect, add watermark, apply special effect, etc.

Trim/Crop/Watermark video.

Step 4: Start VOB video splitting process.

Press the right-bottom "Convert" button to start the large video into small parts or segments splitting process.

When the video splitting is completed, you can find your converted files by clicking "Open output folder" with all splitted small files for convenient sharing, emailing and distributing.

Hot Search: Different Ways to Split AVI File

Friday, May 11, 2018

Edit Bandicam Recorded Files on Mac

For some people who usually record their game videos or other full Desktop screen record, this Bandicam Recording software totally works well.  Bandicam is the most advanced screen recording software on the planet for screen, game and webcam capture. The install space is small but output quality is very sharp. The recorded videos came from Bandicam usually goes to AVI or MP4. There are some occasions that you may want to edit the recorded video on Mac with Final Cut Pro, iMovie or Final Cut Express before sharing with others. However, when you try to import Bandicam recorded file to FCP/iMovie/FCE,you will find the Mac apps return the error said that file or folder is not suitable for import. Why this happened? Let's start with saving Bandicam recorded file as MP4 file.

edit bandicam on mac

As you know, MP4 is most compatible and widely used format in this world. You fail to import MP4 to FCP/iMovie/FCE due to MP4 is just a container and covers different video and audio codec. So it is common that you can not import some Bandicam MP4 to FCP, iMovie and FCE for further editing. To fix the issues, the easy workaround is to convert Bandicam recorded video to a more editing-friendly format. Here is how to do it.

Before that you have to get a third-part assistant, Pavtube iMedia Converter for Mac is highly recommended. This program features high efficiency and seamless conversion. With it, you can easily convert Bandicam recorded file to iMovie, FCP most compstible video formats with just 3 clicks. You also can do batch conversion from AVCHD, MTS, AVI, WMV, VOB, MP4, MOV, etc to native codecs - Apple Intermediate Codec, ProRes, DNxHD and more - ensuring maximum editing quality and efficiency when working with iMovie, Final Cut Pro, Avid Media Composer or Adobe Premiere and more. 

With it, you can effortlessly convert your DVD/Blu-ray files including DVD/Blu-ray discs,  DVD/BD Folder, DVD IFO File, DVD/BD ISO Image File for smoothly importing and editing in various non-linear editing systems (NLE), including After Effects, Adobe Premiere, Final Cut Pro, iMovie, Avid Media Composer, Davinci Resolve and more.

Quick Guide to convert Bandicam recorded file to FCP, iMovie and FCE editable video on Mac

Step 1. Import Bandicam recorded file

Download the video converter for Mac from the below button. After the download is over, run it and click "File" to add source Bandicam recorded file into this tool for FCP, iMovie and FCE.

free try mac buy

On the main interface, there is a preview window provided for you to preview the Bandicam recorded file to ensure the files are what you want to rip. You can also take snapshots of the Bandicam recorded file when previewing them.

imedia converter

Step 2. Select output format

Click "Formats" bar, in the pop-up window, you will find many optimized presets for iMovie, Final Cut Express and Final Cut Pro. Just select the one you need for your editor. By selecting them, you needn't to adjust the video settings like video format, video resolution, frame rate and more by yourself.

imovie format

Tip: You can click the "Settings" button and customize proper video/audio parameters including Video size, bitrate and fame rate and more.

Step 3. Start conversion

Click on the "Convert" button which is red in right bottom screen to start converting Bandicam recorded file to Final Cut Pro, iMovie, Final Cut Express. Just wait for the process to finish. After that, you can get the converted videos and just open the Final Cut Pro/iMovie/Final Cut Express and import the converted videos for editing.

Thursday, May 3, 2018

Top 10 Instagram Hidden Tips and Tricks & Best Instagram Converter

Instagram has become one of the most popular social network, and not just for teens and Millennials. Fpr those who have ever used the platform before, or those who just want tp take their usage to the next level, Instagram has some lesser-known tricks and settings. That's why we set out to find them and list them all in one place.

Top 10 Instagram Hidden Tips and Tricks

1. Download videos and photos in batches

Unlike Facebook, Instagram is trying to protect its users from copyright violations. However, not being able to download the videos and photos you posted to Instagram can be a problem if you lost the original files or if you just want to create a backup of your Instagram posts.

Insta-downloader.net is a website that enables you to download photos and videos from Instagram, while it also provides the option to download all images featured on an Instagram account. You just have to copy the URL of a photo or Instagram profile and click the Download button.

2. Upload photos and videos from your computer

The Instagram app can't be installed on a computer, while the upload feature is not available on Instagram profiles when viewed from a computer-based web browser. As social media managers and professional photographers know working with large amounts of images is much easier from a computer than it is from a Smartphone. In case you would like to post images to Instagram directly from your computer you can use an emulator like BlueStacks that will allow you to connect your Android device with a computer, and post your photos and videos to Instagram directly from a PC.

3. Check out all your liked posts

If you want to be inspired for your brand, a good way is to check the profiles of people who liked your post? You can actually see the 300 recently liked photos which can be useful to see what captures your audience's attention.

  1. Login to your account
  2. If you're on iOS, click the gear icon or the three dots if you are on Android then select Options
  3. Select Posts You've Liked

4. Delete your search history

As you know, Instagram has a search history and displays recent keywords the next time you do a search. If you want to clear out your search history, follow the steps below:

  1. Login to your profile
  2. Tap the gear icon if you are iOS or the three dots if you are on Android then select Options
  3. Scroll to the bottom, then select Clear Search History

5. Share your photos to Pinterest

Pinterest is not yet available from Instagram's sharing options. However, you can still pin it by following the steps below:

Via mobile:

  1. Select the post you'd like to share on Pinterest
  2. Select the three dots in the upper-right part of the post
  3. Select Copy Link
  4. Go to your Pinterest profile
  5. Click the plus sign located at the upper right part of the page
  6. Select Copied link
  7. Pinterest will then open the link that is saved to your clipboard
  8. Choose the image you'd like to Pin

Via desktop:

  1. Go to Instagram.com and select the post you'd like to Pin
  2. Right-click the photo and choose Open Link in New Window
  3. Choose the image you'd like to Pin using the Pinterest browser button

6. Delete comments

Aside from comments left by other users, you can also delete your own comments by following the steps below:

Deleting your own comment:

  1. Tap the bubble icon below the post you commented on
  2. Swipe to the left over the comment you'd like to delete
  3. Select the trashcan icon

Delete comments of other users:

  1. Tap the post containing the comment you like to delete
  2. Swipe to the left of the comment
  3. Tap the trash can icon or continue swiping to the left to delete the comment

7. Comment controls

Instagram now has the capability to filter comments by keyword or disable it entirely for a particular post.

  1. Visit your profile
  2. Select the gear icon and go to Options
  3. Go to Comments
  4. To hide offensive comments, enable Hide Inappropriate Comments
  5. Create your own list of keywords through Manual Filter

How to disable comments:

  1. When posting a photo, go to the part where you add location, caption, and other tags
  2. Select Advanced Settings
  3. Enable Turn Off Commenting

You can enable it back on by tapping the three dots icon above the photo and select Turn On Commenting. You can also disable comments on older posts by following the same steps.

8. Post multiple photos at the same time

Instead of creating a separate post for each new image you share on Instagram, now you can add up to 10 images in a single post and share them on your Instagram account. This recently added option is best used for images that are closely related because featuring images that have nothing in common in a single post can be quite confusing.

The 'Select Multiple' feature enables you to select photos from your Camera Roll and post them to your Instagram account.

9. Adding line breaks to your bio

To make your bio visually appealing, you can add line breaks to your bio. Here's how to do it.

Via mobile:

  1. Write your bio using a text editor and type it as you'd like it to show on your bio, including line breaks
  2. Select all and Copy
  3. Visit your Instagram profile and click Edit Profile
  4. Paste the text into the bio field
  5. Save changes

Via desktop:

  1. Login to Instagram using a web browser
  2. Select Edit Profile
  3. Type your bio and press enter per line to create line breaks
  4. Save changes by clicking Submit

10. Add multiple accounts

If you are planning to have two or more accounts (i.e. one for business and one personal), you can do so by following the steps below.

  1. On your profile, select the gear/three dots icon to go to Options
  2. At the bottom of the screen, click Add Account
  3. Log in your second account
  4. If you want to switch accounts, click the arrow beside your profile name and select your second account

Best Instagram Converter

No matter Instagram, Twitter or FaceBook, they all have limitations on the videos users upload. So you may ask what are the limitations? Or some people have experienced the failure of uploading video. With all this in mind it’s time to get to grips with video in social media thanks to our handy cheat sheet.

Instagram

  • Preferred Format: MP4 (with H.264 Codec & AAC audio, 3,500 kbps video bitrate)
  • Frame Rate: 30fps or below
  • Maximum Dimensions: 1080px Wide
  • Playback Length: Maximum of 60 seconds
  • Filesize Limit: 15mb

Twitter

  • Preferred Format: MP4 (with H.264 Codec & AAC Low Complexity audio)
  • Frame Rate: 40fps or below
  • Maximum Dimensions: 1280px x 1024px (Between 1:3 & 3:1 aspect ratio, with a 1:1 pixel ratio)
  • Playback Length: Maximum of 140 seconds
  • Filesize Limit: 15mb

Facebook

  • Preferred Format: MOV or MP4 (with H.264 Codec & AAC audio)
  • Frame Rate: 30fps or below
  • Maximum Dimensions: 1280px Wide (with a ratio divisible by 16px)
  • Playback Length: Maximum of 45 minutes
  • Filesize Limit: 1.75GB

Althoug these guidelines do seem a little fussy, but they are really useful. When your uploaded content doesn't meet their requirements, they will refuse. So how to settle all the difficulities? A Instagram video converter is necessary. You can get Pavtube Video Converter Ultimate, it helps you convert and trim any video for Instagram, and other social network.  

This video converter can convert MOV, AVI, MKV,M4V, WVM, MPEG-2 ,etc to Instagram compatible H.264 MP4 video. In the conversion process, you can adjust video size from 2160p to 1080p and 720p, video bit rate to 5,500 kbps or 3,500kbps, video frame to 29.96 frames per second or 30fps and adjust audio codec to AAC, audio bitrate to 128kbps to meet all the specs of Instagram.

To meet Instagram video length limitation, you can trim the MP4 video footage or split your MP4 video to several clips to make the video 50MB for Instagram. You also can crop black bar and adjust the aspect ratio to fit in Instagram. Now, click the right version video converter name to download the software on official page then install it on your PC or Mac. Windows version supports windows 10 and Mac version will work stably on macOS High Sierra.

Step-by-Step to Convert Videos to Instagram

Step 1: Load videos you want to upload

You can simply drag and drop all your video files into the software. Batch conversion is supported here.

Load videos you want to upload

Step 2: Choose MP4 Format

Click "Format" button to open drop-down list and there you can choose MP4 format. You can choose MP4 format for Instagram in "Common Video" and "HD Video" categories.

H.264 MP4

Tip 1. Adjust converted MP4 video audio bitrate, codec, size for Instagram

Now, click "Settings" on the main interface to start to adjust video and audio parameters to fit in Instagram according to the below specs.

Video Size: 1080p

Video Bitrate: 3,500 kbps

Video Frame Rate: 29.96 fps

Audio Codec: AAC

Audio Bitrate: 128kbps

You can choose the right settings in this window. When you can't find the settings you want, you can simply tap it in.

adjust video settings

Tip 2. Trim or split MP4 video length for Instagram

Now, click "Edit" to open video editing window. In "Video Editor" there are seven edit tabs: Trim, Crop, Text Watermark, Image/Video Watermark, Effect, Audio Editor and Subtitle.

The "Trim" feature allows users to decide where to start and where to end when converting the selected clip, so that unwanted segments will be cut out after conversion.

To trim a video, please switch to "Trim" tab in "Video Editor" Interface and follow any of the methods below:

1. Drag the control sliders video converter slide 1video converter slide 2to include the segment you want to remain.

2. Click the left square bracket video converter start pointto set start point, and click the right square bracket video converter end pointto set end point when previewing the video

3. Input specific values to "Start" and "End" box.

trim MP4 video

Trim frame by frame: Pavtube Video Converter Ultimate offers "Previous Frame" and "Next Frame" options for users to select frames and trim accurately.

If you want to remove certain frame in your video, you can use Pavtube Media Magician. It is a video editor by frame which can enable you cut off video frame and also trim video length by frame.

Split video to 50MB for Instagram

By clicking the "Split" button video converter split button on file list, or from "Edit" menu, you can launch the "Video Split" window. Checking "Enable" to enable it, and then you can split the file by file count, time length, or file size. We recommend video size to 50MB for Instagram, so here we would split video in 50MB to several clips for Instagram.

split video

With Pavtube Video Converter Ultimate, you also can add subtitle to video, add watermark to video, mute audio, replace audio, etc in "Edit" windows.

Step 3: Start to convert video to Instagram

After all the settings, clicking the Convert button on main interface, you can go to Conversion window to start video to Instagram conversion. When the conversion ends, you can get perfect 1080p video in MP4 format by H.264 codec with 3,500 kbps video bitrate and 29.96 frames per second with AAC audio codec and 128kbps audio bitrate from your MP4 video to Instagram.

Wednesday, April 25, 2018

Compress Video Smaller for Facebook Uploading

Thanks to Facebook social website, we can connect with our friends and the world closely. Over 4 billion video views happen to Facebook everyday. And users would like to tell rich stories with Facebook video, not only in the timeline, but also in business ads, and covers. During Facebook uploading process, you may meet some unknow factors that stop you uploading the videos to this social website. Nowadays, people prefer capturing videos with iPhone, GoPro, DJI drones, Sony/Panasonic/Canon camcoders you need to compress or convert footage to Facebook supported video format before uploading. This article makes it clear on Facebook video uopload specs and how to compress video smaller for Facebook without video quality loss.

Know Facebook Supported File Formats Well

When sharing video on Facebook, you may be recommended to use the MP4 and MOV format, in fact, you also can use the 3g2, 3gp, 3gpp, asf, avi, dat, divx, dv, f4v, flv, m2ts, m4v, mkv, mod, mov, mp4, mpe, mpeg, mpg, mts, nsv, ogm, ogv, qt, tod, ts, vob, wmv which are all supported by Facebbok, except the video format, Facebook limits the video parameters, like the video codec, video frame, video bitrate, audio channels, vudeo size, video length, etc. You must make sure your video is accepted by Facebook.

Video Profile Settings

Codec

The best format to upload to Facebook is H.264 video with AAC audio in MP4 or MOV format. It currently gives you a great bang for your buck in the file size to relative quality ratio, offering the best video compression available, and due to the file size limitations, this format is the optimal choice for Facebook video. And there's no need to change the parameter during Facebook uploading.

Resolution

Use a file with the larger edge of the video constrained to1280px. If your video is less than 1280px in size on the larger edge, try to keep your dimensions to multiples of 16px for best compression.

Frame Rate

Usually videos have the best quality if the frame rate is between 25-30 fps. So you are recommended to keep the frame rate of your video at or below30fps.

Aspect Ratio

The aspect ratio of the video must be within the range of9x16 to 16x9which most videos should have, and the video exceeding the file size or length that the upload page suggests will be rejected.

Bitrate

There is no recommendation for Bitrate as it highly rests upon codec. So you are suggested to optimize video for resolution, aspect ratio and frame rate rather than bitrate.

Audio Profile Settings
Codec MP3 is preferred
Samping Rate Use stereo audio with a sample rate of 44,100hz.
Channels The number of audio channels will be maintained for stereo and mono streams. 5.1-channel audio will be down-mixed to stereo. All other channel configurations are currently unsupported.

Other tips for Facebook video uploading

  1. Keep in mind that the maximum length for a video is 120 minutes and the maximum file size is 4.0 GB.
  2. Check that you're using the latest version of your browser.
  3. Uploading a video works best when you have a strong network connection.

Normally, many people would like to record their life via camcoders, and some recordings in a format that FaceBook doesn't support, or the video in high definition are too long or too large for Facebook and need to trim and compress. You need a video converter or video editor to help you reach that.

For Windows users, Pavtube Video Converter Ultimate is deserved to try. It is a video converter, as its name shown, but also a video editor with some simple and essential video editing functions. With it, you can easily transcode your life recordings, game play recordings to FaceBook playable video and audio format such as MP4, WebM, MOV, etc encoded with compatible video and audio codec. You can trim the recordings length to meet and FaceBook supported video length and size requirement. You also can compress videos by adjusting video resolution, bitrate to reduce the videos size.

To make your videos different, you also can add some subtitle to narrate the videos and add a text/image/video watermark to your videos. Aspect ratio is also supported to change in this video converter. If needed, you even can remove the audio in the video or replace audio from it. Now, download it and try to convert and compress your videos to Facebook supported one.

Quick Guide to Convert and Compress Videos to FaceBook

Step 1: Import video you want to upload to Facebook

Start the FaceBook video converter program on your computer, click "File" > "Load Video/Audio" or "Load from folder" button to import videos into the program. "Drag-and-Drop" and "Batch Conversion" features are also supported. If you loaded multiple clips, you also can merge the video into a single one file.

load video

Step 2: Output FaceBook best uploading format

Click "Format" bar, from its drop-down options, choose FaceBook compatible uploading format from "Common VIdeo" > "H.264 High Profile Video(*.mp4)". You also can choose other FaceBook supported video formats such as HTML5 WebM.

Output facebook best uploading format

Step 3: Compress videos

Click "Settings" to open the "Profile Settings" window, here you can adjust the output video codec, resolution, bit rate, frame rate and audio codec, bit rate, sample rate and channels to let the videos more fit in FaceBook. To compress videos, the most effective way is to reduce the video bitrate. You can change the bitrate value to see the target video size in the below chart.

compress FB videos

Edit videos/recordings Before Export

Trim videos/recordings: In “Video Editor” there are seven edit tabs: Trim, Crop, Text Watermark, Image/Video Watermark, Effect, Audio Editor and Subtitle.  The "Trim" feature allows users to decide where to start and where to end when converting the clips, so that unwanted segments will be cut out after conversion.

Crop videos/recordings: The "Crop" facility enables users to get rid of the black edges and unwanted area of the image.

Keep original videos/recordings aspect ratio and cropped aspect ratio

To keep original aspect ratio, users need make sure the "Display aspect ratio” and the "Size (pix)" in "Settings" option are all set as "Original". If you want to keep the cropped aspect ratio, Pavtube software offers several aspect ratios for you to choose from, including 16:10, 16:9, 5:4, 4:3, 3:2, and 2:1.

crop videos

Add Watermark to Gameplay recordings: You can add text/video/image watermark to selected videos. You can either set parameters or drag the text on preview screen to set its location.

Audio Editor:You can either replace/remove original audio in the videos/recordings, or set audio fade in/out effects.

Subtitle: In this tab, you can add *.srt or *.ass/*.ssa subtitle-files to the videos/recording video as hard subtitles.

edit video for FB

Step 4: Start to Convert and Compress Videos for FaceBook

Clicking the Convert button on main interface, you can go to Conversion window to start to convert videos/recordings to FaceBook. After the conversion, you can click Open output folder to popup output directory with the converted files.

How to Upload video to FaceBook?

1. Choose Add Photo/Video in the Share box at the top of your Home page or Timeline.

2. Click Upload Photos/Video.

3. Select a video file from your computer.

4. Click Post.

video to facebook