Sunday, October 27, 2013

Mac solution: Get Blu-ray movies to Apple TV 3 for wathing

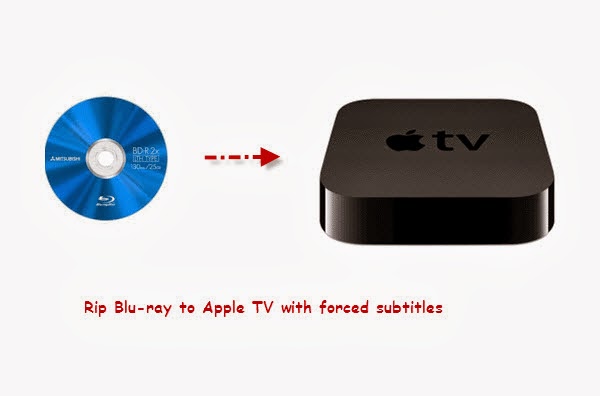
This article shows you the complete guide and easy solution to convert and import Blu-ray movies to Apple TV 3 or future Apple TV 4 on your Mac (including  Mountain Lion 10.8).


Hello. I am in the process of purchasing a Blu Ray drive to use with my desktop Mac and will be purchasing a software program for converting my Blu Rays . I wish to play them on my Apple TV3 and the future AppleTV4. Will these blu rays be stored in the Home Video of ITunes ? Also when do I need to have external hard drive storage for my collections.? I have a 10.8 Mountain Lion 27" IMac. Thanks and looking forward to getting started. 


2013 Halloween is coming and you may have got some horror blu-ray movies like Insidious,The Omen,The Cabin in the Woods,The Evil Dead,Battle Royale,Candyman,Nosferatu,a Symphony of Horror,Psycho, Antichrist, etc. So how to get these blu-ray collection onto Apple TV 3 for watching as the above user asked.

As you know, Blu-ray disc or even the decrypted Blu-ray rips can’t be supported by Apple TV 3. The best solution is to rip and convert Blu-ray to iTunes compatible format then sync to ATV 3 for playback without any limit. Follow the guide below rip Blu-rays to Full HD 1080p MP4 files  for viewing on Apple TV 3 on Mac.

System Requirements for ripping Blu-ray to iTunes and streaming  to Apple TV on Mac

* Mac OS X 10.5/10.6/10.7/10.8
* Compatible Blu-ray Disc Drive
* Pavtube BDMagic for Mac (now is 30% off at Pavtube Halloween promotion)
* 2.4 Ghz Intel Core 2 Duo or faster processor
* At least 2 GB of RAM
* iTunes 10.6 or later
* A video driver that supports HDCP for Windows PC
* A display that supports HDCP with a screen resolution of 1280 x 800 or higher
* Apple TV 3rd generation

Step-by-step guide for ripping Blu-ray movies for Apple TV 3 on Mac

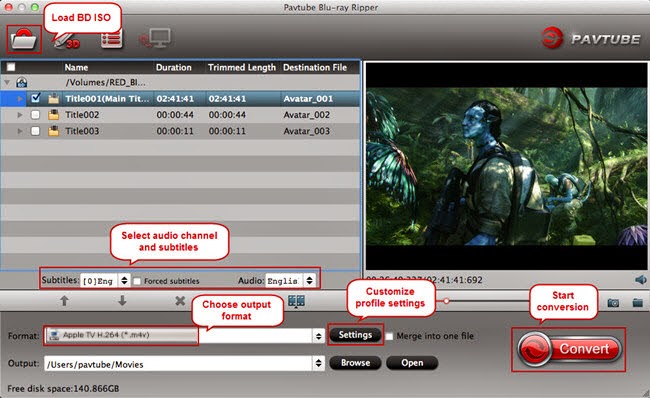
1. Make sure your Blu-ray Disc drive is well connected with computer, and put a source Blu-ray Disc to the BD drive. Mac is lacking of Blu-ray support and you need to add an external BD drive that is compatible with Mac.

2. Have BDMagic installed on your computer. And free download Pavtube Blu-ray Ripper for Mac.


If you are windows users, read my old post how to rip Blu-ray to Apple TV.

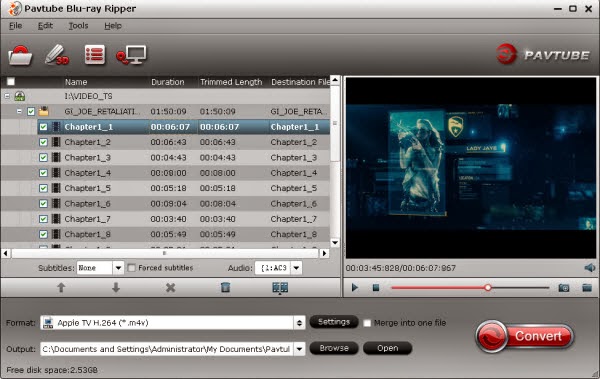
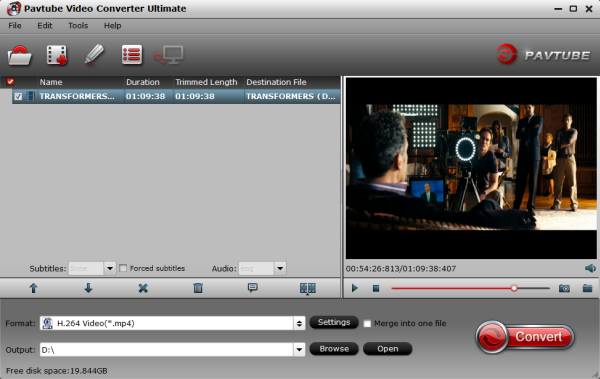
3. Run the 30% off Mac Blu-ray to Apple TV 3 Converter. Press "Load Disc" icon to import Blu-ray movie. The software requires network connection to decrypt Blu-ray so keep your network wired.

4. Select main movie from file list, and set subtitles and audio language for export.

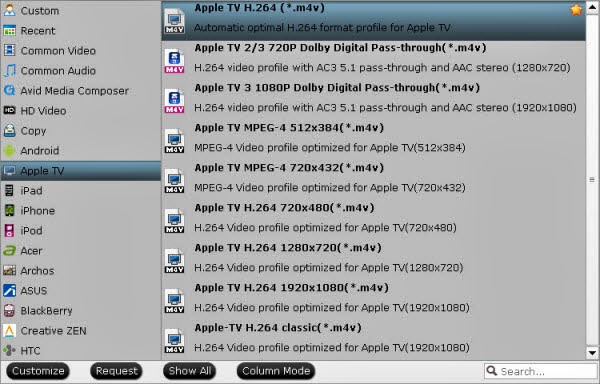
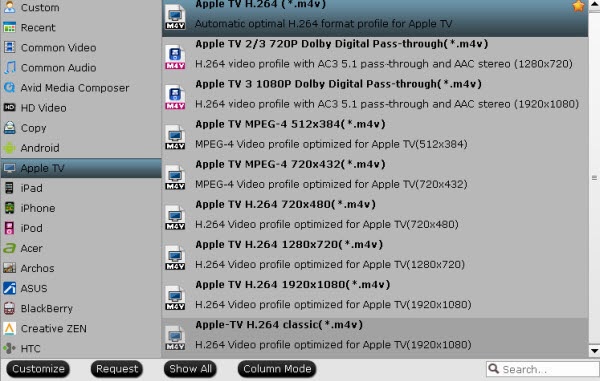
5. Set iTunes/Apple TV 3 compatible format from the drop-down list of "Format". Choose "Apple TV H.264 (*.m4v)" works well in iTunes/Apple TV 3. Both encode Blu-rays to H.264 MP4 with higher bit rate and exports better quality than iTunes movie downloads.


6. Press "Convert" to get Blu-ray Ripper start compressing Blu-ray to Apple TV 3 friendly videos.

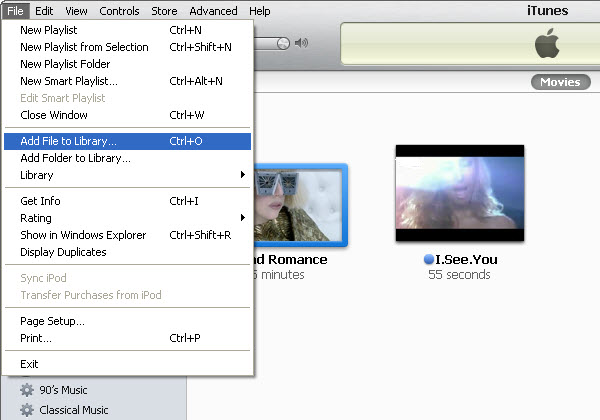
7. When conversion completes, press "Open" to find compressed .m4v movie and add it to iTunes movie store. Open up iTunes and follow "File>> Add file to Library…" to sync ripped Blu-ray movie to iTunes.


Now you can enjoy the Blu-ray movie with iTunes freely and stream the Blu-ray movie to Apple TV 3.

Apple TV 3 Related Articles:

Watch 2014 FIFA World Cup matches on iPad, iPhone, and other portable devices 
How to Watch Instructional DVDs on iPhone/iPad/iPod? 
No 5.1 Audio When Connecting Apple TV to Surround Sound System? Solved! 
Ripping Blu-Ray on iMac and Stream 1080p on Apple TV 3 with Dolby 5.1

Wednesday, October 16, 2013

Rip your Blu-ray collection for Apple TV with forced subtitles

Want to make Blu-ray portable on Apple devices with preserving forced subtitles? This article mainly introduces the way to put Blu-ray on Apple TV with forced subtitles.
We like surfing, email, ebay, remote work, reading, watching movies on our IOS devices iPad2, iPad3, iPad mini, and also on Apple TV. Now I have Blu-Ray which I wanted to view via my AppleTV and store on my media drives. I hope to be able to set Forced subtitles, and write directly out to Apple TV format. Is there any way?

Indeed, you can not play Blu-rays directly on your Apple devices like Apple TV. To make Blu-ray portable with Apple TV, the answer is to rip Blu-ray to Apple TV compatible videos so you can transfer them for smoothly playback.


What's more, some Blu-ray contains the unknown language like Avatar and you cannot understand it without subtitles. So how to keep the subtitles for full Blu-ray enjoyment on Apple TV? In this case, Pavtube BDMagic is the ideal software to you. It will help to rip and convert Blu-ray to Apple TV friendly MP4 format with fast speed and high video quality. Moreover, you can choose the desired subtitle for output and select forced subtitles for some unknown languages. Now let's go to learn how to do it.


How to convert Blu-ray to for Apple TV with forced subtitles?

Get your Blu-ray drive ready and insert Blu-ray you need to the drive. And keep networked when ripping Blu-ray.

Tips: If you are running on Mac, please try BDMagic for Mac.

Step 1. Load Blu-ray to Blu-ray to Apple TV Converter.

Run the best Blu-ray to Apple TV Converter, click "Load file" button to select the inserted Blu-ray and import it for transferring to iTunes. It will take only few seconds to rip Blu-ray. Then the software will recognize the actual main title of Blu-ray and pick it automatically. You do not need to look for the main title manually.

Press the selected main title you can preview the whole Blu-ray movies on the preview window on the right, which works like a media player.


Step 2. Check forced subtitles for output.

Because Blu-ray always contains multiple subtitle and audio tracks, you can go to choose the desired subtitle and audio on the interface for output.

Beside subtitles option, "Forced subtitle" is optional and uncheck by default. Go to check "Forced subtitles" for output. Take note that it will output forced subtitles only if it is checked.

Step 3. Choose Apple TV compatible format.

Choose "Format" dropdown list and go to "Apple TV" options to find "Apple TV H.264 (*.m4v)". This format is best for playing on Apple TV.


Tips: For some advances users, you can go to adjust video and audio parameters like bitrate, resolution, channels, etc. Click "Settings" button you can go to check and change them as you like.

Step 4. Convert Blu-ray to Apple TV.

Before conversion you can go to "Browse" your computer to find the folder for output files. Then click "Convert" button to get Blu-ray to Apple TV conversion started. After a while, you can find the generated file for Apple TV quickly via "Open" button. In this way, you can enjoy your favorite Blu-ray with forced subtitles on your Apple TV wherever you are.

Related articles:


Sunday, October 13, 2013

Top Tivo Converter – Get Tivo Shows off Tivo onto iPhone 5C

In this How-To guide, I will whip up a guide to getting TV shows off TiVo and onto iPhone 5C so that you can freely play your favorite TV shows when travelling. 
The iPhone 5C was one of the hottest stories of the week in tech. Apple's widely-rumoured budget iPhone was revealed once again in an unboxing video, showing the handset in five colours. It has been described as the “budget” model despite a starting price of $A739 and has the same screen size as the current iPhone 5 and is also a great media player which supports a lot of media formats including files with MP4, MOV and M4V as video format and AAC, MP3, Apple Lossless, AIFF, and WAV as audio format.
 

When you have captured TV shows and would like to enjoy them on iPhone 5C, you will find it difficult to put them to iPhone 5C as the Tivo files are saved by digital video recorders with copyright protection. If you also have this problem to figure out how to play Tivo videos on iPhone 5C, this article is right here to help you out. 

At first, you are suggested to transcode Tivo into MP4 format for that it's well accepted by iPhone 5C for steaming directly. To accomplish this, Tivo Video Converter Ultimate is highly recommended for its easy interface, efficient workflow and reliable video quality.

For Mac users, Pavtube Tivo Video Converter for Mac is recommended to you. 
Good News! Pavtube Release a New Site - multipelife.com with Product Migration and Name Change. 
To thanks for your continued support all along our previous site and the new www.multipelife.com, we are holding a 'New Site Special' with fantastic discounts up to 40% off. You can get 20% off BDMagic, 30% off ByteCopy, 40% off DVDAid and 20% off Video Converter Ultimate on Windows/Mac platform:

https://www.facebook.com/pavtubefans/app_209569249055691

Read more: 
http://techmovieshare.blogspot.com/2014/05/pavtube-new-website.html


Now get it installed and let's start to quick convert Tivo to proper video formats on PC with perfect videoaudio sync technology 

Part 1: Transfer TV shows from TiVo to PC

It takes a while depending on length of TV program you are transferring. Make sure your TiVo and computer are in the same home network, and follow this guide to proceed TiVo file transfer: 

1. On your PC, launch TiVo Desktop for PC (click to download), the freeware that transfers shows from your networked TiVo box to your computer. 

2. Click "Pick Recordings to Transfer." A window showing your TiVo box's "Now Playing" or "My Shows" list appears. 

3. Highlight any title in the list to see more information about the show. Check the box next to the title of the show (or shows) you want to transfer. 

4. Click "Start Transfer." Transfer times vary, but may take as long as the show's duration to complete the transfer. 


Part 2: Convert TiVo shows to iPhone 5C friendly MP4 video

After transferring to computer the TV shows are saved as .tivo files. See below how to convert TiVo shows to iPhone 5C playable videos. 

Step 1. Download and install Pavtube Tivo to iPhone 5C Converter to your PC.


Launch it and press "Option" button. Switch to "TiVo" tab in Option window, and enter TiVo Media Access Key. 

Tip: How to find your Media Access Key on TiVo: Go to "TiVo Central" menu >> "Messages and Set Up" "Account and System Information", and your Media Access Key would be there. 


Step 2. Drag and drop TiVo shows to the main interface for converting. 

Step 3. Click "Format" and select an output profile for your iPhone 5C. 

Click the drop-down list on the bottom, select "iPhone" on the left, and then we will find all the presets for different models of iPhone.

To get best video quality on iPhone 5C, you are suggested to choose "iPhone 5S/5C H.264 Full HD 1080P (*.mp4)" or "iPhone 5S/5C H.264 HD 720P(*.mp4)" as the target video format at your needs.


Tips: If you want to convert videos to iPhone 5S/5C with best settings, you need to download profile patch for the software at first. 


Optimize the settings – The default settings may not satisfy you, and you can click the settings button to change the settings by yourself. Keep in mind that the file size and conversion quality is based more on bitrate than resolution (bitrate higher results in big file size, and lower visible quality loss, and vice versa). According to my experience, for watching videos on iPhone 5C, 720p with 1500~3000kbps is just all right. 

Step 4. If you're happy with the output videos, just press the "Convert" button to begin encoding TiVo shows to MP4 for iPhone 5C

Once the encoding task completes, you can transfer the converted videos to your iPhone 5C for viewing on the move when travelling. 

P.S Don't know how to transfer converted video to iPhone 5C? Read this: How to sync converted video to iPhone 5C?

Related Articles: 

Wednesday, October 9, 2013

How to view MKV with DTS audio on iPhone 5C with iTunes

Summary: To get iPhone 5C to play MKV movies with DTS audio, you may have to convert and compress your MKV DTS to MP4 AAC for iTunes and sync with iPhone 5C. This article mainly introduces the way to put MKV with DTS audio on iTunes for transferring to iPhone 5C for viewing.


I have a bunch of mkv film with a DTS soundtrack which I want to play the new iPhone 5C. Hoping to really put this new Retina display to the test, but I find they won't be played. And I'm looking for a good app to convert these .mkv files to iTunes for iPhone 5C syncing. Anyone konws? 

Apple announced the release of two new iPhones: the high-end iPhone 5S and a budget version comes with colorful cases, the iPhone 5C. iPhone 5C carries a 4-inch Retina display and A6 processor as the iPhone 5. It features Retina display and have more powerful chip in graphics processing, this makes watching movies on iPhone 5C a great joy. 

But as above quesions, you will find you can't view MKV with DTS audio on iPhone 5C with iTunes, as the default and downloaded player on the IOS smartphone cannot find a suitable decoder for the DTS audio.

To get MKV DTS files to play on iPhone 5C with iTunes, you may have to convert MKV DTS to something that iPhone 5C or iTunes can recongnize. Here is how.

Free Download and install the App: Pavtube iPhone 5C Video Converter
It's an all-in-one app right for you, the program can help you compress 1080p Blu-ray to iPhone 5C, rip DVD movie to iPhone 5C tablet and convert HD videos to iPhone 5C, including MKV, AVI, MPG, VOB, TiVo, Flash videos and more, everything can be transferred to  iPhone 5C optimized formats at ease. If you are a Mac user, you can use its equivalent Mac version - Mac Video Converter for iPhone 5C to achieve your goal smoothly.

Both the two programs are 20% OFF now at Pavtube Thanksgiving Giveaway!

Simple Guide: Convert/Compress MKV mvoies with DTS sound to iPhone 5C compatible video format with iTunes

Step One. Add videos to iPhone 5C Video Converter.

Click the top left icon to add your source mkv videos, or drag-and-drop them directly.


Step Two. Choose target video format.

Choose the iTunes supported formats in the "Format" dropdown list. You can go to "Common Video" or "HD Video" options to find what you like. I think MP4 format is better for iTunes.

But, here you are recommended to choose "iPhone 5S/5C H.264 Full HD 1080P (*.mp4)" or "iPhone 5S/5C H.264 HD 720P(*.mp4)" as the target video format at your needs.


Tips: If you want to convert videos to iPhone 5S/5C with best settings, you need to download profile patch for the software at first. 

Step Three. Customize video specs. (Optional) 

Click "Settings" to open profiles settings window. Here you are able to customize video size, bitrate, frame rate, sample rate(Hz)…all the specs can be fixed manually. A personal tip: the higher bitrate you choose, the better video quality will be; and you will get videos in larger size. 

Step Four. Start Conversion.

Go ahead and click "Convert" button to get MKV with DTS audio to iTunes conversion started. After a while, you can find the generated file for iTunes quickly via "Open" button. 

Now open your iTunes and then sync the converted mp4 movies to iTunes library for convenient playback on iPhone 5C. In this way, you can enjoy your favorite MKV with DTS audio on your iPhone 5C with iTunes wherever you are.  

P.S Don't know how to transfer converted video to iPhone 5S/5C? Read this: How to sync converted video to iPhone 5S/5C? 

You may be interested in some Money-Saving Tips:

ByteCopy($42) + Video Converter Ultimate($65) = Only $79.9, Save $27.1 
ByteCopy($42) + DVD Creater($35) = Only $44.9, Save $32.1 
ByteCopy($42) + Vidpie($29) = Only $54.9, Save $16.1 
ByteCopy($42) + MXF MultiMixer($45) = Only $69.9, Save $16.1 


……