Thursday, January 29, 2015

How to convert DVD to Nexus 10 for watching DVD movies

Do you want to enjoy DVD movies on Nexus 10? In this article, you'll find how to convert your favorite DVD to Nexus 10 for playback.

DVD is a great way to watch movies on your HDTV at home. If you have a bunch of home videos stored on DVD or some commercial DVD movies, you must want to play it not only on your computer and DVD player, but your own Nexus 10 with a whopping 2560 x 1600 resolution – the same as the 13in MacBook Pro with Retina display.
Nexus 10

Well, if you agree,let's take a look at how to watch DVD films on Nexus 10 tablet. Obviously, DVD discs can’t be played by tablets directly, even if the DVD backup ISO or IFO image files. In fact, as long as you pick up a DVD ripping program, you can easily make it. The most famous is Handbrake. Which is freeware.

But, according to my own experience, this one can’t rip copy-protected DVDs (ie: Disney and other animated discs). Handbrake actually convert MPEG video (including DVD-Video) into an MPEG-4 video file, but only limited to these DVD-like source: VIDEO_TS folder, DVD image or real DVD (CSS will not be supported and must be dealt with externally with third-party software and libraries. So you’ll need to add an intermediate step to get protected DVD movies onto Nexus 10.

If you have kinds of DVD movies for dealing with. I suggest you selecting a professional DVD ripping software. Pavtube DVDAid is highly recommended here. Fast conversion speed, perfect output video quality and optimized Nexus 10 profile is just the reason why it is recommended. (Learm 5 Tips when selecting Reliable DVD Ripper

Now, share my own steps to rip DVD movies to Nexus 10. The mac workflow is here.

Step 1. Install and launch the DVD to Nexus 10 Converter, load movie from DVD disc, DVD folder, or DVD ISO/IFO image.

DVD to Nexus 10 Converter

Step 2. When the DVD disc/folder/ISO is loaded, you can select subtitles and audio track (English, French, German, Spanish…) for each chapter. Expand the DVD folder to check movie chapters.

DVD subtitles

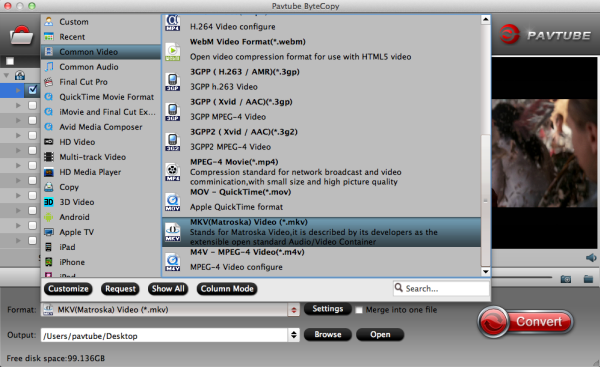
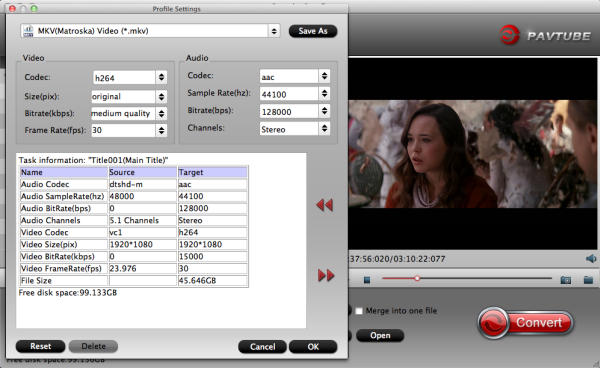
Step 3. Set compatible format for ripping DVD folder/ISO to Google Nexus 10 compatible videos. Click the “Format” bar, and choose “Google Nexus 10 H.264 Video (*.mp4) under “Android” column.

Nexus 10 video format

Step 4. Start converting DVD to Nexus 10 playable videos. Click the “Convert” button at bottom right to get the DVD Ripper works. After conversion you can click the “Open” button to find the converted files.

When DVD movie is converted into H.264 video, you can stream the media file to Google Nexus 10 via USB cable. Hope this guide is really helpful for you to watch DVD movies on Google Nexus 10.

In addition to DVD, you can also enjoy DRM video, Blu-ray and videos on your Nexus 10.

Monday, January 26, 2015

Convert and Import new DVD releases to iTunes for iPad/iPhone/iPod

This article give you the guide on how to convert new DVD releases to iTunes supported video formats for importing to iTunes library and syncing with iPad/iPhone/iPod.

Are you a DVD movie fan? Do you plan to buy some DVD discs like the new released The Judge, The Book of Life, Before I Go to Sleep, My Old Lady, Fury, etc? Ever thought of importing these new DVD releases to your iTunes library for syncing to iPad/iPhone/iPod and watching them anytime anywhere even on your way home after a-whole-day work for relaxation? This article will give you some tips for adding DVD movies to iTunes for iPad/iPhone/iPod playback.
Convert and Import new DVD releases to iTunes

As you know, iTunes could only recognize video files in MP4, MOV, M4V, which means you can't play DVD on iTunes directly. That is to say, no matter you just want to watch DVD movies on your iTunes or wanna sync to your iDevices, you need firstly to convert DVD to iTunes supported format.


To complete the ripping, an easy-to-use DVD to iTunes Ripper is necessary. If you start with the application like DVD Decrypter, things might become even more complicated. It is a free program that allows you to get iTunes compatible MP4 video files from DVD movies, but it will require quite a bit of time and computer knowledge to do this and it only can convert non-commercial DVDs (unprotected DVD).

Well, don't despair, here Pavtube DVDAid is an ideal app for you to remove the strict DVD protection and rip any DVD movies to iTunes (iTunes 11/12 included) video very quickly while retaining great video quality for iPad, iPhone and iPod syncing. Besides, it also can help you to convert DVD to almost any other common video format such as VOB, FLV, WMV or backup DVD keeping the whole movie structure as you need. Mac users can turn to DVDAid for Mac. Now just download it and follow the tutorial below.

Convert DVD movie for importing to iTunes library with high video quality

Step 1. Load DVD movies

Place the disc from the DVD-ROM. Launch the DVD to iTunes Converter; click disc button to import DVD movies into the program. Loaded DVD movies can be previewed in the right preview window.

DVD to iTunes Converter

Freely select the subtitles for you DVD movies from the "Subtitles" option for watching DVD movies with preferred subtitles.

Step 2. Decide on output format

Click the drop down box of "Format", through which it is possible to select iTunes highly compatible format like H.264 HD Video(*.mp4), MPEG-4 HD Video(*.mp4) from "HD Video" profile list.

iTunes highly compatible format

If you want to add the DVD movie to iTunes for play on iPhone, iPad, iPod, etc., you can also directly select iPhone, iPad or iPod as the output format to get videos with optimized settings for your iDevices. Also, ripping DVD to Roku 3 and Big Screen TV is so easy.

Tip: If you need, you can also click "Settings" to modify parameters of your output profile to meet your professional needs: bit rate, frame rate, aspect ratio, etc.

iTunes video settings

Step 3: Edit DVD movies (Optional)

You can even use its provided Edit feature to edit your output video by cropping, adding watermarks, trimming and inserting subtitles so on.

Step 4. Start ripping DVD to iTunes

The final step is to tap the Convert button and commence converting DVD movies to iTunes video files.

Step 4. Add DVD movies to iTunes

After the conversion, click on "Open" button to access to the videos you ripped. Open your iTunes and import the DVD to its Movies library by clicking File -> Add File to Library.

After that, you can transfer and watch DVD on iTunes or your iPad, iPhone and iPod freely andsmoothly at full quality anytime anywhere. In addition to new DVD released discs, DVD video_ts folder can be ripped to adding to your iTunes library.

Thursday, January 22, 2015

Rip and stream Disney Blu-ray to WD TV Live Media Player for playback

In order to play Disney Blu-ray movies via WD TV Live media player, you need to rip Blu-ray to WD TV supported video formats. Here is the detailed solution.

WD TV Live is a gorgeous HD media player, and also lets you stream all your personal and Internet media files to your HDTV so that you can enjoy your digital content on the big screen of your HDTV. Want to watch some Disney Blu-ray movies on your HDTV via WD TV Live (Plus, Hub) but only to find that your Blu-ray movies or Blu-ray folders are not directly supported?

Watch Disney Blu-ray movies on WD TV

Don't worry! In this article, you’re going to learn how to convert Disney Blu-ray movie to WD TV Live supported video formats like .MP4, .MKV or .AVI, etc. for watching with ease.


First of all, download and install Pavtube ByteCopy.

By searching widely, and I found many guys recommend Pavtube Blu-ray ripping software-ByteCopy, it will bring the best audio/video for watching on WD TV Live. Read the review and here is the mac version.

It can help rip Blu-ray movies (including protected Disney Blu-ray movies) to WD TV Live supported MP4, AVI, MOV, MKV, etc. so that you can play your Blu-ray movies on HDTV via WD TV Live without any limitations! What’s more, this program comes with a built-in video editor that allows you to edit your Blu-ray movies by trimming, cropping, adjusting video effects, etc. Now download this tool and follow the instructions to convert Disney Blu-ray movies to videos for WD TV Live.

Convert and Stream Disney Blu-ray for playing on WD TV Live Media Player

Step 1. Load Disney Blu-ray files.

Insert your Blu-ray disc to the drive, then launch the Blu-ray to WDTV ripping software and click the “Load Disc” button to have the Disney Blu-ray content imported. You can also add BDMV folder,  Blu-ray ISO files are the source files for converting.

Blu-ray to WDTV ripping software

Note: Check the “Merge into one file” on the main interface; you will get multiple selected titles into one output file. It merges not only the chapter in to a title and file but also merges the titles in to one file.

Step 2. Choose MP4 format.

In the dropdown list of “Format”, there are a mass of video format. You can choose “HD Video -> H.264 HD Video (*.mp4)” directly or choose the desired portable devices which is the best streaming format via WD TV Live Media Player. Also you can rip Blu-ray to play on Smart TV. Just choose according to your own needs.

streaming format via WD TV Live Media Player

Tip:

1. If you want to get output blu-ray video keeping multiple audio tracks, multiple subtitles and with with lossless quality, you can choose “Multi-track Video” > “Lossless/encoded Multi-track MKV(*mkv)” format.

2. You are also allowed to change the video and audio parameters like codec, bitrate, channels, frame rate, etc. You can adjust it according to your demand or keep it default for output.

HD MP4 video settings

Step 3. Convert Disney Blu-ray to MP4.

Click the “Convert” button to start converting Disney Blu-ray to MP4 format. With the technology of CUDA acceleration it will provide you fast conversion speed. Once completed, go to “Open” the generated MP4 files.

Now you can connect to an HDTV using an HDMI cable and access the Internet with either a direct connection to a router or by joining a home network like DLNA, just get your Disney Blu-ray playback on your WD TV Live Media Player with ease.

Read More:

Monday, January 19, 2015

How to stream DVD movies from PC to play on Roku 3

Will Roku play DVD movies? Yes. This article is a tutorail on how to stream DVD movies from PC to play on Roku 3.

We may feel great satisfied if we have Roku box. Use Roku to stream Netflix, Hulu, and video content from dozens of other providers to television. But it happens that we may have an Roku and want to play DVD movies on Roku player. Is it possibile? If yes, how?

stream DVD movies from PC to play on Roku 3
Keep in mind that the Roku only supports H.264 MPEG-4 certain common video formats. So if we want to enable Roku 3 to play DVD files, all we need to do is to convert DVD to Roku 3 supported video formats with a professional DVD to Roku 3 Converter.

Here Pavtube DVDAid is the recommended DVD to Roku converter for you. (Read reviews) With this program, you can rip DVDs and lossless re-encode DVDs to MKV, MP4 format for Roku 3 playback. Of course, this DVD ripper can help you convert commercial DVD movies to AVI, WMV, FLV, MOV, etc as well. What's more, it can also enable you to rip DVD for directly playback on Android, iOS, Windows based devices. If you are using Mac, you can also use DVDAid for Mac. Free download the right version and follow the guide below.

How to Rip DVD movies to Roku 3 for Playing

Step 1: Load DVD movies

Install and launch DVD to Roku 3 Converter, click the "Load DVD" button on the menu bar to load your DVD files. By importing DVD files, you can select DVD subtitle, audio and angle, preview DVD videos, snap screenshots, etc.

DVD to Roku 3 Converter

Step 2: Select an output format

To convert DVD to MP4, MKV for Roku 3, just click on the dropdown menu of "Format", and then choose MKV, H.264 MP4 from Common Video profile list. You can also store your DVD onto NAS server for playback later.

Roku 3 video format

Tip: If you like, you can click "Settings" to change the video encoder, resolution, frame rate, etc. as you wish. Keep in mind the file size and video quality is based more on bitrate than resolution which means bitrate higher results in big file size, and lower visible quality loss, and vice versa.

Roku 3 video settings

Step 3. Rip DVD movies to Roku 3

Click the convert button under the preview window, and the DVD ripper will start the conversion from DVD movies to MKV/MP4 for Roku 3.

After the conversion, you can hit "Open" to quick locate the converted video; now you can transfer the converted video to a USB file or SD card and attach it to Roku 3 box and you will have no trouble to watch your favorite DVD movies on big-screen TV through Roku set-top box.

What's more, take it easy to stream Blu-ray, MKV and iTunes video to Roku 3 for playback.

Read More:

Thursday, January 15, 2015

Really Simple Way to Copy Blu-ray on Yosemite for Playback and Storage

Get a pretty simple way to backup/copy Blu-ray on Yosemite for Playback and Storage with the best Blu-ray Ripper for Yosemite from this tutorial.

Apple has announced its new OS X 10.10 – Yosemite on October 16, 2014, which has a new interface combining freshness with familiarity and delivers newer user experience than the previous versions. In the meantime, making Blu-ray backup on Yosemite also arouses attention.
Copy Blu-ray on Yosemite

To copy Blu-ray on Yosemite for playback or storage, finding a Blu-ray ripper for Yosemite is the key. Here Pavtube ByteCopy for Mac is exactly the tool compatible to work with the latest Mac OS X like Yosemite as it continuously updates to support the latest operating systems, which will let you not only backup Blu-ray with original video/audio quality in a few minutes, but also rip any Blu-ray to MP4, MKV, MOV, Prores, FLV, MPEG, M4V, AVI, etc. (Read the review)

It is capable of copying latest or hottest copy-protected Blu-rays like The Amazing Spider-Man 2, Captain America: The Winter Soldier, Disney Frozen, etc on Yosemite by removing Blu-ray Copy Protection and moreover has the ability to pull individual chapters. I stongly recommond it due to its reasonable price as well as easy-to-use interface. I dislike Handbrake, but with this powerful Yosemite Blu-ray Ripper from Pavtube, I have ripped many discs successfully to various formats on my new system after testing.

Simple Tutorial to Teach You How to Use Blu-ray ripper software for Yosemite 

Step 1. Load Blu-ray to the software

Insert the Blu-ray disc to Blu-ray drive as the source file. Launch the top Blu-ray Ripper for Mac  Yosemite; click the disc button to load the entire Blu-ray disc for ripping.(For windows users, here is the workflow)

Blu-ray Ripper for Mac  Yosemite

Tip:

1. If you have backed up the entire Blu-ray disc on hard drive with BDMV file structure, you can also load the BDMV folder for conversion on Yosemite .

2. The Blu-ray movie has more than one audio tracks and subtitles. You can choose your preferred one from the "Subtitles", "Audio" options retained in the output video.

Step 2. Choose output format

Click the Format bar and follow Common Video; MP4, MOV, AVI, MPEG, M4V... are all the popular output formats for you. This Mac Blu-ray Riper also has 150+ presets for almost all popular multimedia devices. Or choose Prores 422 codec for editing in FCP. You are allowed to choose one device as the output format as well.


Step 3. Adjust video and audio settings (Optional)

This Mac Yosemite Blu-ray Converter allows users to adjust video and audio parameters to customize the output file quality. Click "Settings" button and then you can adjust video resolution, frame rate, bit rate, audio channel, etc.


Besides, you can also click “Edit” to active the built-in video editor, and you are allowed to cut off unwanted video scene from source Blu-ray to get individual chapters.

Step 4. Start ripping Blu-ray on Mac OS X Yosemite

Click "Convert" button to start converting Blu-ray movie on Mac OS X 10.10 Yosemite. After conversion click "Open" to find converted movie, and then you can play the output video on Mavericks or sync to USB Flash Drive, iPad, iPhone, Apple TV 3, upload to YouTube, Vimeo freely.

Read More:

Monday, January 12, 2015

Copy Disney DVD to HD MP4 for Galaxy Tab 4 with ease

This article aims to show you the easiest solution to rip Disney DVD to HD MP4 for Galaxy Tab 4, so that you can watch your favorite DVDs on Galaxy Tab 4 freely on the go.

Here is my situation:

I have about 20 DVD movies in hand like Downton Abbey Season 1 West Wing Season 1, We were Soldiers and mostly are Disney DVD(frozen, Little Mermaid, Mary Poppins). Now I want to make the utmost of my Samsung Galaxy Tab 4 for watching these Disney DVDs with a 4 year old child when spending a week in a car. But the ripping process stopped half way through or the sound didn't match the action so I had to find something new. Any tool I can choose to use for ripping or converting my Disney DVDs? Or any easy solution?
Copy Disney DVD to HD MP4 for Galaxy Tab 4

After searching for reviews on Best Disney DVD ripper/converter and reading about different rippers on the drive from Orlando to Houston, I find Pavtube DVDAid which was listed as #1. I love the product so much. It made my Christmas travel bearable!!!!!!! (Here is the review)

Just through a few clicks, it can smoothly rip Disney DVD movies (including DVD ISO files) to Galaxy Tab 4 friendly video format with high image quality. Another feature of this program is worth mentioning. As we know, newly published Disney DVDs are always encrypted with DVD copy protection, making many common DVD rippers fail when ripping these protected DVDs. But for this top DVD converter for Galaxy Tab 4, ripping such new released DVDs is just a piece of cake, letting you rip all Disney DVDs to Galaxy Tab 4 without any obstacles.

How to Rip Disney DVD to HD MP4 for Galaxy Tab 4 playback with Ease

You can always download the trial version and try it out. And install it to your computer. Are you a mac user? Don't worry, get the mac version: Pavtube DVDAid for Mac.

Plus your wanted Disney DVD Disc into your computer's drive. Then start this ripper program up and press the "Load Disc" button to let this program load the DVD file from the drive-ROM. Once this program has completed the importing, all DVD titles will appear in the main workspace of this program. Isn't that handy?

DVD to Galaxy Tab 4 Ripper

On top of that, you can also edit your DVD video whenever you like! There'll be no limitation of downloading subtitles and add to your videos before converting. What are you waiting for?

Select the suitable Video format by clicking the "Format" pull-down menu. This DVD to Galaxy Tab 4 Ripper presets a set of video format for the popular portable device. Here you can select "Samsung Galaxy Tab 3 Video(*.mp4)" from the " Samsung" option for playing on Galaxy Tab 4. Also you can convert DVD to Galaxy TabPro 10.1.

Galaxy Tab 4 video format

Your best video settings for the Galaxy Tab 4 can be retrieved by clicking on the Settings button. For example, you can set video size to 1920*1080 and get 1080p video playback on Galaxy Tab 4.

Galaxy Tab 4 video settings

The last step is to click "Convert" button to start the video conversion.

This Galaxy Tab 4 DVD Ripper will convert the Disney DVD video files to HD MP4 with top quality and speed, AMD APP and NVIDIA CUDA acceleration technology is supported by this program, it can save much time for you.

If you do not remember the location of generated files, click "Open Folder" button to find it quickly. Now Galaxy Tab 4 acts like an external hard drive. You just need to connect your tablet to your PC with a USB cable, then transfer the converted videos from computer to your Galaxy Tab 4 directly.

Now your plight can be easily solved by a professional DVD converter for Galaxy Tab 4, just enjoy a jewel of family hour with kids for travel by car to the full with the Disney DVD.  Blu-rayTivoMVI can be also be prepared fo your family tip on Galaxy Tab 4. 

Friday, January 9, 2015

Download Amazon movies to watch on Surface tablets

To get your downloaded Amazon WMV videos freely playback on Surface tablets, the best way is to remove DRM and record them before transferring.

“The day before yesterday I bought an Amazon Video, but when I put the Amazon Video to my Surface tablet, I find it is not possible to play Amazon video, the video files can’t be played. What can I do? please help me!”

Download Amazon movies to watch on Surface tablets

Many Windows device users talk about how to stream Amazon instant videos to their Surface devices. In fact, whatever app they use for Surface, Amazon Instant video files can't be played well by Surface tablets since Amazon Instant video just like iTunes, Digital Copy contents, is protected by DRM.


So, if you want to play Amazon Video on Surface tablets you must remove protection and convert Amazon Video to the other format that Surface can support friendly, say H.264 .mp4 video. To get the work done, the key point is to select a useful DRM video converter.

Here Pavtube ChewTune is highly recommended to help you convert protected Amazon WMV to DRM-free MP4 for playing on all Surface tablets, like Surface RT, Surface Pro, Surface Pro 2, Surface Pro 3, Surface Pro 4, etc. With it, you can effortlessly make your Amazon WMV videos playable on Surface in just a few mouse clicks in Windows 8.1/8/XP/7/Vista. It has comprehensive features that can meet all your needs. (Here is a review) Use it you just need to follow the simple guide below.

Adding your Amazon WMV movie purchase to Surface tablets

Part 1. How to download Amazon Instant video to Windows/Mac computer:

All of the videos you buy from Amazon Instant Video are stored in Your Video Library. To download a video from Your Video Library on Amazon.com:

  • Visit Your Video Library.
  • Sign into your account if prompted.
  • Click the video you want to watch.
  • Choose Download to see a list of download locations and available copies of the video.
  • If you select Download for offline viewing, choose a download location from the pull-down menu and click Download Now.

Part 2. Get the Amazon WMV videos converted into H.264 MP4 for Surface tablets

Step 1. Download Pavtube ChewTune as the Best DRM removal software.

There would be a command window pop up during the installation to install specific soundcard drive for DRM Removal, pls do not shut down it and let it running until the installation completed.

install specific audio driver

Step 2. Add video and choose target format.

Drag and drop your videos to it directly, or you can click icon to import them as below.

Amazon video to Surface Converter

Let's click the drop-down-list besides "Format" and choose "Windows >Microsoft Surface Windows RT/Pro H.264 Video (*.mp4)" for playing on Surface tablets.

Surface supported format

Step 3. Customize target video specs. (Optional)

Click "Settings" to enter Profile Settings window, you can find settings for video size, codec, bitrate and frame rate. Change them according to your own needs.

Step 4. Start conversion.

Now click the big red icon to start converting DRM protected Amazon WMV videos to Surface tablets in batch; this converter will activate your media player automatically and start to play this video (let's keep it running). The player windows cannot be removed or closed.

In the meanwhile, it will start to record this video in MP4 real-time. The conversion time is equal to the video length itself; you can do other tasks during the converting the process.

After the conversion, click "Open output folder" to quick locate the converted video for transferring to Surface tablets for movie playback. You can also add your DRM protected files to watch on your Android devices.


Monday, January 5, 2015

Getting iTunes to play on Windows Media Player nicely

If you want to put iTunes files to Windows Media Player for playback, Pavtube iTunes to WMP converter is the best choice for you.

In some forums, questions like "Will songs or movies downloaded off iTunes work with Windows Media Player?", "How can I get a TV show/movie from iTunes onto my Windows Media Player. Does iTunes movie work with them?", etc. are often heard. To make it clear, first, you should know that iTunes movies are often locked with Apple DRM protection. The Windows Media Player doesn't recognize this file format yet. (Learn tips for letting iTunes & Windows Media Player live happily together here)

Getting iTunes to play on Windows Media Player nicely

To enjoy iTunes music, movies and TV shows in M4A/M4P/M4B/M4V on Windows Media Player, you need to remove DRM protection and convert the video files to WMP supported video format WMA, MP3 WMV, AVI at first.

Pavtube ChewTune (For Windows & For Mac), which acts as a practical iTunes movies to Windows Media Player converter, shows its speciality in removing DRM protection. With the advanced built-in DRM remove technology, it is able to convert protected M4V video files to conventional and unprotected videos and allows you play the covnerted video files on Windows Media Player. (Read Top 10 Best DRM Removal Review)

How to remove iTunes DRM and convert iTunes video to Windows Media Player

Step 1. Load M4V files to the DRM Removal Tool.

Get this DRM Removal Tool installed, drag and drop your iTunes M4V files to it directly.

iTunes to Windows Media Player Converter

Step 2. Choose output file format for editing or playing.

Windows Media Player supports MP4, MP3 file formats, Just click the drop-down list besides “Format” and choose “Common Video -> H.264 Video(*.mp4)”; You can also key in mp4 in the search box to quick locate this profile.

Windows Media Player compatible video format

And “Settings” button provides you more customize options like video size, bitrate, frame rate, sample rate(Hz) etc. for output files.

Step 3. Strat removing DRM protection from iTunes contents.

Now you can click “Convert” button to start removing DRM protection. Wait for moments, then click “Open” to locate the converted DRM-free video. And now you can now are able to add and import iTunes contents to Windows Media Player effectively for freely playback.

Here are several tips during the conversion:


a). Please don't use iTunes during converting, or an error may occur.
b). It's highly recommended to use iTunes V10.5.0 or higher.
c). This product cannot convert unplayable iTunes files (damaged, unauthorized, etc).
d). The DRM removing process may mislead your anti-virus software to falsely report virus/worm. Please ignore the report to keep on ripping.

Hints: This DRM Converter can also convert iTunes protected video and music to play via Plex, Roku 3 or edit in Windows Movie Maker.