Monday, December 29, 2014

Rip Blu-ray ISO image file to HEVC/H.265 MP4 on PC

This guide shows how to convert Blu-ray ISO to HEVC/H.265 MP4 on PC for playing with an easy-to-use yet powerful ISO to H.265 converter.

The ISO is an exact digital replica of the Blu-ray disc which is an ideal way of backing up personal BD collection. Although it is convenient for backing up and archiving, it doesn’t lend itself all that much to portability. Plus, you will be worry free about their large size possessing large storage space.


Now it's an opportunity to cut back the video file size with identical quality- convert Blu-ray ISO to HEVC/H.265 MP4 on PC since H.265/High Efficiency Video Coding (HEVC) is said to double the data compression ratio compared to H.264/MPEG-4 AVC at the same level of video quality.

To transfer Blu-ray ISO file to HEVC/H.265 MP4 for playing smoothly, the latest upgraded Pavtube BDMagic/ByteCopy/Video Covnerter Ultimate is highly recommended to you to rip your favorite Blu-ray ISO movies to HEVC/H.265 MP4 mp4 with best quality and fast speed. What’s more, this professional Ripper not only can support Blu-ray disc, Blu-ray folders, but also can deal with DVD ISO IFO files, DVDs and DVD folders. Below is a tutorial for you to rip Blu-ray ISO file to HEVC/H.265 MP4 on PC.

How to Convert Blu-ray ISO to HEVC/H.265 MP4 on PC


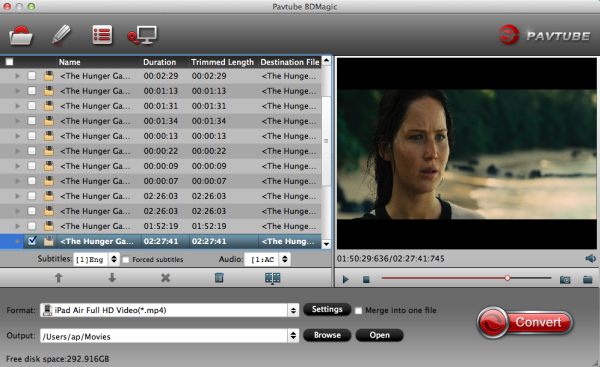
Step 1. Load source Blu-ray ISO file on your PC

Launch this Blu-ray to H.265 Ripper and click “File-Load IFO/ISO” button to import Blu-ray ISO file into the program. DVD/BD discs and folders are also supported.


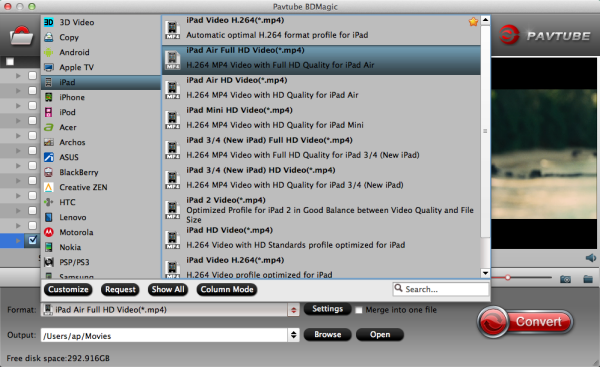
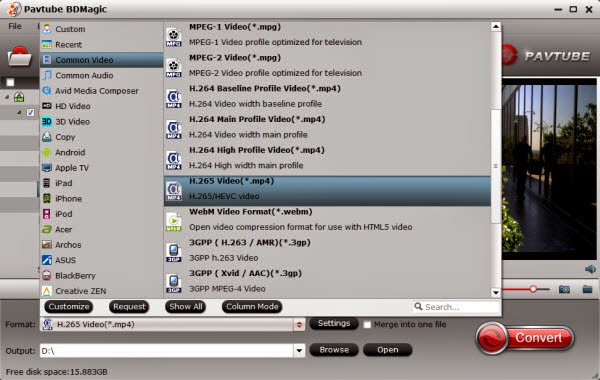
Step 2. Choose output profile

Click on the dropdown menu of “Format” and then move your pointer to “Common Video”, under the sublist, “H.265 Video(*.mp4)” as the output format. What's more, you can rip your Blu-ray ISO to H.264 MKV and AVI, MKV, MPG, WMV for playback.


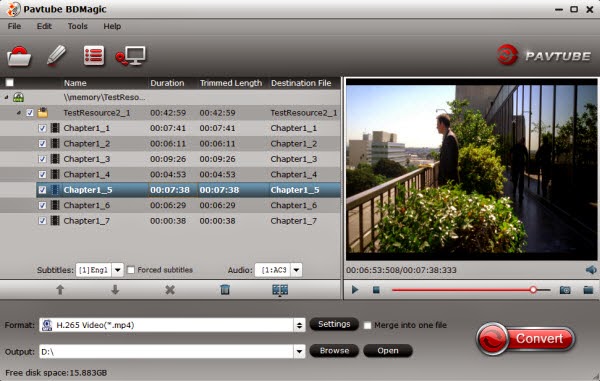
Step 3. Start Blu-ray ISO to HEVC/H.265 MP4 conversion

Tap “Convert” button on the main interface to start transcoding Blu-ray ISO movies to HEVC/H.265 MP4.

After the conversion, click “Open” to locate the result videos and then you can play the Blu-ray ISO files on your PC with digital players like Divx Player and VLC Player smoothly or preview directly in upgraded Pavtube Video Converter Ultimate.

Additional Tip:

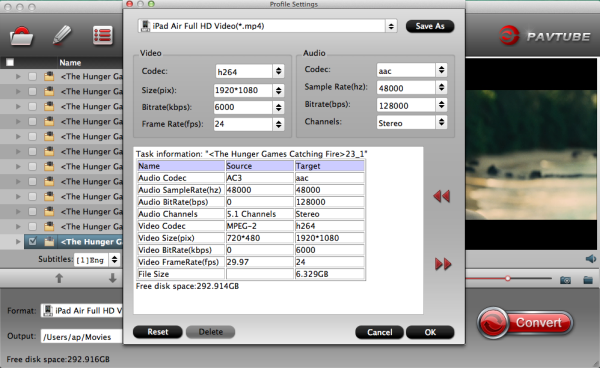
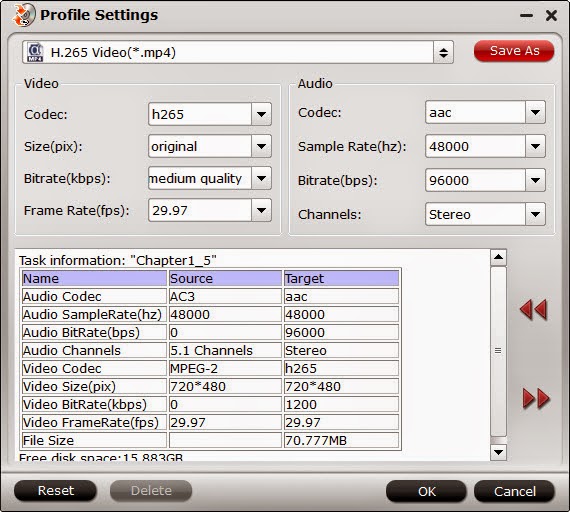
Before ripping, you can click the “Settings” button on the main interface to adjust the profile parameters such as video size, video&audio bitrate, frame rate, etc to meet your own demands.

NEWS!!! Recently, Pavtube Studio has upgraded its top-ranked Pavtube BDMagic/ByteCopy/Ultimate to version 4.9.0.0 with supporting the most advanced hardware acceleration NVIDIA CUDA & AMD APP by H.264/H.265 codec, which can give users 30x video transcoding speed than before.

Friday, December 26, 2014

Upgrade! Pavtube Supports H.265/HEVC, XAVC and Latest Blu-ray!


Pavtube has released the latest products of Windows Platforms, Support H.265/HEVC Encode & Decode, XAVC codec! Detailed information is in this article.

Marry Christmas 2014! On December 25, Pavtube Studio has announced this new update version. All Win versions have been updated to 4.8.2, which add XAVC, H.265/HEVC decode and encode, latest Blu-ray discs ripping features and work more powerful. What new features have they got?
  1. Support MXF in XAVC video codec
  2. Add H.264 baseline/main/high output profiles
  3. Support H.265/HEVC decode
  4. Support H.265/HEVC encode
  5. Support latest Blu-ray movies, like The Expendables 3, Le Chef, Sin City A Dame to Kill For, Sands of Iwo Jima, When The Game Stands Tall, Love in Venice, Mystery Road, Pink Floyd Endless rive,etc. are all supported.
Pavtube Upgrade 

Updated software


XAVC support: 


For the first outstanding feature, many powerful camcorders can shoot under this XAVC mode, like Sony, Panasonic, JVC and Canon all have many series HD Camcorder which can such job. Most XAVC codec will shot in MXF format, this may be good for importing quality ,but may be a big problem for their users. Although Sony has offered their XAVC plug-in to help customer to solve this problem, but many users still replay that they can’t do anything about their videos. How to tackle that? New Pavtube relevant Video converter software can handle this highest level video standard. XAVC can support 4K (4.96×2160 and 3840×2160), which just cater the trend of 4K.

Add H.265/HEVC Decode and Encode:


All Pavtube Video Converter Ultimate products have added the H.265/HEVC decode/encode. You may very family about H.264/MPEG-4, but may not know about this H.265/HEVC. Actually, those two codec are said to double the date compression at the same level of video quality. This H.265 can be said as the Intro Time of 4K Generation. This H.265/HEVC is considered not only play a remarkable role on improving the image quality but also can support 4K resolution to UHDTV, the highest level can up to 8192×4320 (8k). Like the hottest Samsung NX1 has already explore this brand new market. The 205-point phase-detection AF, 4K film resolution, H.265 compression coding, 15fps high-speed continuous shooting, etc., Samsung NX1 seems has already won the game. But with this fast update of the H.265 camera, the related peripheral support software seems not get enjoy strength. Many media player and NELs still stick on the H.264, so how to get your H.265/HEVC video into compatible while quality maintained? The brand new Pavtube relevant Video software will be the best solution to deal with the H.265/HEVC. No quality drop, fast conversion, smooth playback, all you need is in this new Pavtube. The Mac version is in full update, do please look forward to those brand new Pavtube relevant iMedia Converter for Mac!

Merry Christmas^^

About Pavtube Studio


Founded in 2007, Pavtube creates expert multimedia software applications that help consumers access, transfer and share their digital content across different devices that range from PC, Mac, NLE softwares, tablets, smartphones, to HD media players, game consoles, and home theatre systems. On the basis of computer OS, Pavtube products are divided into two categories – Windows solutions and Mac solutions, spanning across BD/DVD saving, video transcoding, camera/camcorder footage, and DVR recordings (e.g. TiVo) conversion. With creativity, expert knowledge as well as cutting-edge technology, Pavtube helps consumers throughout the world enjoy more in a digitally connected audio-visual world. See http://www.multipelife.com and http://www.pavtube.com for more information. More info can be found here.

Thursday, December 25, 2014

How to Rip Pixar Blu-ray/DVD collection to Watch on an iPad Air 2

Have a big Pixar Blu-ray/DVD collection and want to play on iPad Air 2? Here you will find the easiest way to convert and rip Pixar movie to iPad Air 2 supported video formats. 

Do you have the Blu-rays and DVDs of famous or classic animated films produced by Pixar like Finding Nemo, The Incredibles, Cars, Up, Cars 2, etc? What if enjoy the Pixar Blu-ray, DVD movies with your iPad Air 2 on the move?
Rip Pixar Blu-ray/DVD collection to iPad Air 2

However, you may be disappointed that you could not just watch Pixar Blu-ray/DVD movies on iPad Air 2 directly without conversion since Pixar movie is protected with copy protection which may make your Blu-ray and DVD backup software get stuck during ripping or copying.

In such cases, you can give Pavtube BDMagic for Mac a try which can make a perfect Pixar Blu-ray/DVD to iPad Air 2 conversion process. Well, after multiple tastings, I found this Blu-ray/DVD to iPad Air 2 Ripper is the ideal tool to help you out. 

It features great ability to handle the latest Blu-ray, DVD releases including movies from Pixar without neither crashing issues nor importing errors and offers optimized format for the iPad Air to generate best videos suitable for viewing on iPad Air 2. If you are not satisfied with the quality, you could even tweak the video, audio settings. If you are a Windows user, you can use Pavtube BDMagic. Just download it and follow the guide below to convert and copy Pixar Blu-ray/DVD movies to iPad Air 2 for smooth playback. 

Also learn how to backup Disney Christmas DVD or convert Warner Brothers Blu-ray movie.

Step 1: Load Pixar Blu-ray, DVD movies 

Insert your disc into your BD/DVD drive; run the Mac Blu-ray Ripper for iPad Air 2 and click “BD/DVD disc” icon to load movies. 


Step 2: Choose output format Click on the pull down menu of Format and choose iPad > iPad Air Full HD Video(*.mp4) as the target format. It ensures the best video quality on iPad Air 2. Of course, "iPad Air HD Video(*.mp4)" is also the proper choice for you to copy Pixar Blu-ray/DVD to iPad Air 2/iPad Air.


Note: You can customize the settings including video size, video bitrate, frame rate, audio sample rate, audio, etc for the output.


Step 3: Start Pixar Blu-ray, DVD to iPad Air 2 ripping 


Click the "Convert" button under the preview window, and the Blu-ray/DVD to iPad Air 2 Converter will start the BD/DVD conversion from Pixar to MP4 for iPad Air 2. 

After conversion, you can easily transfer Pixar Blu-ray and movies to iPad Air via iTunes. Enjoy.

Monday, December 22, 2014

Play 2014 Christmas Blu-ray movie on Computer, 3D TV or Portable Devices

This article will guide you how to copy 2014 Christmas Blu-ray movies (A Christmas Story, Bad Santa, Jingle All The Way, etc.) on Computer, 3D TV or Portable Devices in a hassle-free way.

Christmas could be a movie feast for movie fans. There’re many Christmas Blu-ray movies to watch on Christmas holiday, like A Christmas Story, Bad Santa, Jingle All The Way, etc.

2014 Christmas Blu-ray

A Christmas Story

Ralphie has to convince his parents, his teacher, and Santa that a Red Ryder B.B. gun really is the perfect gift for the 1940s.

Bad Santa

A miserable conman and his partner pose as Santa and his Little Helper to rob department stores on Christmas Eve. But they run into problems when the conman befriends a troubled kid, and the security boss discovers the plot.

Jingle All The Way

A father decides to dream the impossible; to get a Turbo Man action figure for his son just before Christmas.

With the approaching of 2014 Christmas, many movie fans need to know how to play and watch Christmas Blu-ray movies on Computer, 3D TV or Portable Devices currently have no direct support of Blu-ray disc. Surely, it’s not necessary to purposely buy aBlu-ray Player just for watching Blu-rays; as long as you have an external Blu-ray drive, we can make all this happen.

Pavtube BDMagic is such a magic tool to help you roll off your Blu-ray protection and rip Blu-ray to best MP4 for playback on Computer or Portable Devices with perfect aspect ratio. Also you can also convert your 2D/3D Blu-ray to 3D SBS MP4/MKV videos so as to play on 3D TV.

Mac version is available here; well support Mac Mavericks and Yosemite.

Now you can download the software and take a try. This guide offers you a Blu-ray Ripper app that helps you easily and free playback 2014 Christmas Blu-ray discs on your PC or Mac. 

How to watch 2014 Christmas Blu-ray on Computer, 3D TV or Portable Devices ?

Step 1. Run Best 2014 Christmas Blu-ray Converter and import disc.

Click this icon to load Blu-ray disc from bd drive, or Blu-ray folder, ISO images files. DVD sare also supported.

 2014 Christmas Blu-ray Converter

Step 2. Choose format.

Click “Format” drop-down list and choose “HD Video > H.264 HD Video(*.mp4)”; it’sthe most widely used format which will be supported by your Computer or Portable Devices.

format supported by your Computer or Portable Devices


Or choose "3D video>MP4 side by side 3D video" as 3D TV best format. MKV is also the 3D television compatible format.

Step 3. Adjust video specs or change aspect ratio (Optional)

If you are not satisfied with default specs, then click “Settings” to enter Profiles Settings windows; here you can customize video frame rate, bitrate,size and other settings freely.

If you want to trim, crop, editaudio/subtitles or adjust aspect ratio, click the pencil-like icon and switchto “Crop” tab. Choose Advanced mode, lock the “Keep Ratio” and you can free change aspect ratio.Usually it will be set to “Original”; it would be ok to playback on TV, or you can change it to 16:9.

Step 4. Start conversion.

Click the big red “Convert” to start converting your 2014 Christmas Blu-rays to H.264 MP4. Afterthe conversion, click “Open output folder” to quick locate converted files; now transfer the converted Blu-ray in MP4 to your 3D TV or Portable Devices or directly play on Computer.

Enjoy 2014 Christmas Blu-ray movie with family!

More related: 

Friday, December 19, 2014

How to Get all DVDs into Synology NAS drive for Streaming

If you some DVD discs, do you want to put them into Synology NAS for sharing on media streamers, just read on this article to get solution to stream DVD to NAS.

NAS is just a big file storage really and you may find that just copying the DVD files to Synology NAS directly is a pain to try and play with a media streamer(PS3, WD TV, etc). Then which is the best way to take the DVDs and put the DVD movies on NAS drive for playing on most media streamers…
stream DVD to NAS

First, a quick note: we know that there is still a lot of legal ambiguity around ripping content that you have legally purchased. At Audioholics, we believe that you should be able to watch purchased media on your system regardless of whether it's coming from a standalone DVD player or a media center frontend. Actually, it's not as difficult as you imagine. To get DVDs on Synology NAS, you'll need a third-party DVD ripping software.

Most of you are likely familiar with the excellent Handbrake for ripping standard Def DVDs, but it still cannot yet protected DVD discs. The way it can with regular DVDs, so you'll need to add an intermediate step. Pavtube DVDAid is the bee's knees, which can help you fast rip DVD discs to a format playble by NAS while keeping the original quality. (Best DVD Ripping for Windows/Mac)

With it, ripping DVD for Synology NAS is simple as ABC. After downloding, follow the wizard to install and run the program. The mac version is DVDAid for Mac. Then follow the steps below to convert DVD to Synology NAS comaptible formats in a few clicks!
How to rip and stream DVD movies via Synology NAS

Step 1: Insert your DVD disc into DVD ROM, Launch the program and click the "Disc" button to import the DVD movies. DVD folder and ISO/IFO files are also supported. You can select subtitles as you want.

DVD to NAS Ripper

Step 2: Click Format and choose MP4 video from Common Video, which can be recognized by Synology NAS well. MKV is also a good choice; as a container format it takes whatever you give it. And then click the Browse button to specify an output folder to save the converted files.
NAS video format

Tip:
With the right settings you can retain the quality of the original DVD while also saving space. This is particularly helpful when streaming over your network, depending on your network quality. Simply click Settings bar and you can tweak the settings to your satisfaction and even save it as preset.

NAS video settings

Step 3: Finally, hit the "Convert" button at the bottom of the main interface to start the conversion. It will automatically convert DVD to Synology NAS compatible video files.

Once the conversion is finished, click "Open" to quickly find the converted movies. Then, Synology NAS will recognize, catalog, play and stream these DVD rips at ease.

Related links

Tuesday, December 16, 2014

Get DRMed iTunes/Digital Copy Movies and Google Nexus 7 To Play Nicely

You will learn how to strip DRM protection and convert iTunes/Digital Copy movies to Nexus 7 supported MP4 format for playback. The easy-to-use tool you need is DRM video to Nexus 7 Converter.

Google Nexus 7 Tablet comes with a stunning 7.0-inch, 1280×800 pixels display which supports videos up to 1080p. With over one million pixels in hand, the Android 4.1 (Jelly Bean) Tablet really rocks for watching movies. If you have some purchased m4v videos or Digital Copy movies in iTunes library, you may want to get them ported over to Nexus 7 for enjoying on the go.

Get DRMed iTunes/Digital Copy Movies to Nexus 7

However, things turn to be different when you trying to sync and play iTunes/Digital Copy movies on Goolge Nexus 7, you're only told that the Android-based Tablet cannot play them due to DRM copyright protection.

To achieve your goal smoothly, you may have to strip DRM from iTunes/Digital Copy first and then convert them to a friendly format by the Google Nexus 7. Below is a simple tutorial for you, guaranteed to get the DRM protected (iTunes and Digital Copy) videos and Google Nexus 7 to play nicely. (Learn how to use New Nexus 7/10 to View Videos Stored in Wi-Drive)

Requirements

Before anything else, you have to download an app that you are going to use later. You are required to download and install:

ChewTune (available for Windows or for Mac users). Get the Windows version here, and the Mac version here.

Instructions

ChewTune is an easy-to-use yet top-ranking DRM removal software for Android/Windows dvices. It supports protected movies, TV shows from iTunes, and Blu-ray/DVD digital copy videos that have been transferred to iTunes. And the output quality is as decent as possible as original. (Read reviews) Follow the DRM removal process realize the way about viewing DRMed iTunes and Digital Copy movies on Nexus 7.

Removing DRM from iTunes/Digital Copies for playback with Gogole Nexus 7

1. Run ChewTune, drag and drop digital copy or iTunes movies to the software.

DRM video to Nexus 7 Converter

2. Choose Output format for Google Nexus 7. You're suggested to select "Google Nexus 7 H.264 Video(*.mp4)" from "Android" category.

Nexus 7 video format

Tip: You can adjust the output parameters of the video by click "Settings" button. For watching videos on the Android-based Tablet, 720p with 1500~2000kbps is just all right. I find that bitrate higher results in big file size, and lower visible quality loss.

Nexus 7 video settings

3. Click the big Convert button to transfer iTunes/Digital Copy to Google Nexus 7.

Once the process completes, you can transfer the result videos to Nexus 7. In this way, you can start viewing DRM protected iTunes/Digital Copy movies on Google Nexus 7 as you want. You can also convert DVD ISO/IFO, MKV and MPG video to play on Nexus 7.

All these goals are be achieved by the bundle: Video Converter Ultimate + ChewTune.

Thursday, December 11, 2014

iTunes to Plex - Watch iTunes Movie on Plex Media Server Freely

Plex Media Server can not play iTunes contents. This article will guide you how to work around to get Plex playing purchased and rented iTunes movies TV shows. 

To have all these movies backed up and saved to watch anytime you want without having to pull out the disc? Plex Media Server is the solution. It allows you to store all your movies on a central server and watch them on your TV, iPad, computer or phones both home and away.

Watch iTunes Movie on Plex Media Server

However, there are people who have Plex Media Server and iTunes Movies and TV Shows. Is there any method to play iTunes movies and TV shows on Plex? The following tutorial will give you answer!
Because of DRM protection, movies and TV shows that you purchased and rented from iTunes Store are limited to play in Appple ecosystem. This kind of videos have DRM protections that prevents you from copying and transferring to other devices or programs for playing. Besides, Plex Media Server allows to stream and play nearly all kinds of local media files including MP4, MOV, AVI, MPEG video files, MP3, WMA audio files, and etc, but M4V files is not supported.

The best way to successfully import iTunes DRM videos to Plex Media Server for streaming and playing is to remove DRM from iTunes videos and convert iTunes DRM M4V to common videos like MP4, MOV, AVI, and etc. What you need is a powerful DRM removing tool and iTunes M4V Video Converter- like Pavtube ChewTune. (Read Top 10 Best DRM Removal Review)

Money-saving Tips:
If you are a Mac user, please turn to ChewTune for Mac. Free download the right version and enjoy your iTunes M4V movies on Plex Media Server without any hassle!

Tips and preparations:

1. Make sure that your computer is authorized by source iTunes videos, that is to say you can play the source iTunes movies in iTunes without trouble.

2. Allow the audio driver installed during the Pavtube ChewTune installation.

install specific audio driver

3. Close iTunes before running the Pavtube DRM Removal Converter when converting iTunes M4V movies.

How to Convert iTunes movies to Plex Media Server

Step 1: Download a trial version of Pavtube DRM Removal Tool, and install it.

Step 2: Start the iTunes to Plex Converter, hit the "Add video" or "Add from folder" button and browser the source iTunes videos location for loading.

iTunes to Plex Converter

Step 3. From the "Format" drop-down list, choose suitable profile for Plex Media Server. Here I suggest you choose "Common Video > H.264 Video(*.mp4)" as output format.

Plex Media Server compatible video format

Optional – If you like, you could adjust profile settings including video codec, bitrate, frame rate, etc to get better video and audio quality for watching iTunes movies on Plex Media Server.

Step 4. Hit the "Convert" button to start recording iTunes movies. After it finishes, click the "Open" icon to locate the recorded iTunes movie, and you are ready to transfer and stream these MP4 videos to Plex Media Server, it's very easy.

Pavtube ChewTune is developed as the top DRM Removal tool and Recorder to help users legally strip off DRM protection from iTunes M4V movies, Amazon Instant Videos and Digital Copy so that you are able to watch almost all DRM movies on multiple smartphones and tablets anywhere you like. Have a try!

Hot Topics:


Tuesday, December 9, 2014

Effective Way to Watch Frozen iTunes Movie via Roku 3

Why can't I play iTunes movies on TV via Roku 3? In this guide, I will show the easy way to remove DRM and convert Frozen iTunes M4V to Roku 3 with the top DRM Removal. 

The Roku 3 currently offers access to over 750 different entertainment channels including popular apps such as Netflix, Amazon Instant Video, Hulu Plus, Vudu and HBO GO. And we also use Apple TV to access iTunes movies, YouTube video and etc on TV.
But can we install iTunes on RoKu 3 for playing iTunes movies and music? How can I play iTunes contents on RoKu 3 through USB? You come to the right place! In this article, you will learn how to convert the hot Disney movie Frozen from iTunes to mp4 for playing on your Roku 3 player.
Watch iTunes Movies via Roku 3

Af first, you should know Videos/Movies purchased or rented from iTunes are in M4V format with DRM protection. That means users could just play the iTunes M4V TV episodes, movies, and music videos in portable Apple devices like iPad, iPhone, iPod, Apple TV. Naturally, iTunes movie can’t be directly played on Roku 3. So, to play Frozen iTunes movie with Roku 3, the DRM needs to be removed and the movies in M4V format should be converted to common MP4 videos that Roku 3 supports.

What format can play on RoKu 3?

A USB port enables local media playback (supported formats include: MP4 (H.264) & MKV (H.264) video / AAC & MP3 audio / JPG & PNG image).

To accomplish this goal, my girlfriend recommended me an amazing DRM Converter and Removal- ChewTune for its easy-to-use interface, straight workflow and reliable video quality. It can easily get rid of Apple's DRM protection from those iTunes downloaded m4v video, and transfer it to various video formats including MP4 profiles for Roku 3. (Here is the review)

More Money-saving Trip:
Now just download this software and follow the tips below to make your Frozen iTunes movie playable on Roku 3.

A command window will pop up during the installation to install specific audio driver, do not shut down and let it running until the installation completed.

install specific audio driver

How to convert Frozen iTunes DRM video to MP4 for Roku 3?

Step 1. Add video to this iTunes to Roku 3 Converter(Mac version is here). Drag and drop your videos to it directly, or you can click "Add" icon to import them as below.

iTunes to Roku 3 Converter

Step 2. Let's click the drop-down-list besides "Format" and move to "Common Video" column and choose "H.264 Video(*.mp4)" as output format for your Roku 3.
Roku 3 compatible video format

Step 3. You can click "Settings" to enter Profile Settings window and customize target video spec, you can find settings for video size, codec, bitrate and frame rate.

Step 4. Now click the big red icon to start converting Frozen iTunes M4V video to Roku 3 in batch; this converter will activate your media player automatically and start to play this video. The player windows cannot be removed or closed.

In the meanwhile, it will start to record this video in MP4 real-time. The conversion time is equal to the video length itself; you can do other tasks during the converting the process.

Note: The system volume could turn off temporally during this period; no worries, do not touch it to get perfect DRM removed video.

After the conversion, click "Open output folder" to quick locate the converted video.

Tips:

1. The DRM removing process may mislead your anti-virus software to falsely report virus/worm. Please ignore the report to keep on ripping.

2. This product cannot convert unplayable video (damaged, unauthorized, etc).

After that, you can directly play the movie on your PC or transfer the converted video to a USB file or SD card and attach it to Roku box. Now the Roku set-top box will have no trouble to play your Frozen iTunes movie file.

If you are disc lovers, learn how to copy Blu-ray to NAS for HD 4K TV, rip Blu-ray to external hard drive for Roku 3 and convert TS Folder and VOB files to PS3.

Wednesday, December 3, 2014

Copy 2016 hot Blu-rays to NAS for HD 4K TV or Normal def TV streaming

This article shows you with an easy workaround for copying 2016 hot Blu-ray releases to NAS so that you can stream to HD 4K TV or Normal def TV for watching.

NAS, with Network Attached Storage in full, is the extender for home sharing. If you have tons of 2016 hot Blu-ray releases like Guardians of the Galaxy, Harry Potter and the Deathly Hallows, How to Train Your Dragon 2, Planes: Fire & Rescue, X-Men: Days of Future Past, etc. and want to copy them to NAS for streaming with your HD 4K TV or Normal def TV for watching on big sceen in your living room, find the all-in-one solution from the following paragraphs.
Copy 2014 hot Blu-ray releases to NAS

To preserve your 2014 hot movie Blu-ray collection on NAS or playback on TV for sharing with your families and friends with ease, you need to convert Blu-ray to NAS compatible format first.

To realize it, a Blu-ray ripping program- like Pavtube BDMagic is highly recommended which can rip and convert Blu-ray/DVD to NAS supported MP4, MKV video effortlessly within a few clicks, so that you can sync and play your DVD, BD files on HD 4K TV or Normal def TV without any limitations. If you are a Mac user, please turn to BDMagic for Mac. Just download it and follow the steps below to learn how to do it.

Put 2016 hot Blu-ray releases onto NAS for playback on HD 4K TV or Normal def TV

Step 1: Run the best Blu-ray to NAS Converter and click disc icon to load your Blu-ray movie files. It programs also enables you to convert Blu-ray, DVD ISO files to NAS drive.

Blu-ray to NAS Converter

Step 2: Choose your desired output format for NAS, like MKV, MP4 and more. Here just set H.264 HD MP4 for example.


Tip: By clicking the "Settings" button, you can modify the video/audio parameters like 1920*1080 (Full HD 1080P video resolution), which can help you get the ripped Blu-ray movies with high quality

Step 3: Hit the Convert button to start converting Blu-ray movies to NAS video.

After a short conversion, click the Open button you will get the ripped Blu-ray files. Make sure the wireless network connection is accessible among the NAS and HD 4K TV or Normal def TV streaming.

Then just enjoy the high quality 2016 hot Blu-ray movies with your families and friends at ease. In addition, you can Get all Blu-rays into NAS and Get all DVD into  NAS for watching.

Related links