Monday, April 25, 2016

Play MKV movies on JRiver Media Center 21/20

Summary: How to transfer MKV files into River Media Center 21/20? Just follow the below step-by-step tutorial to learn to convert MKV videos into JRiver Media Center 21/20 for further playing and streaming.


To transfer MKV files into River Media Center 21/20, we should figure out which video formats are supported by JRiver Media Center. According to JRiver's spec, we can clearly find that JRiver Media Center 21/20 supports a wide range of video formats including AVI, MPEG, WMV, DIVX, VOB, MOV, RV, SWF, TiVo, FLV, etc though, MKV is not included in this list. In other words, if we stick to playing MKV video files via JRiver Media Center21/20, you'd better convert MKV to one above preferable video format initially.

To accomplish the MKV files into River Media Center 21/20, a decent tool is required and here Pavtube Video Converter Ultimate  is highly recommended for you! With the Pavtube Video Converter Ultimate, you can effortlessly convert MKV to JRiver's preferable video formats with fast speed and excellent output quality. Besides, you're also allowed to convert MKV to many other popular video formats including MP4, WMV, MOV, AVI, FLV, etc for fitting seamlessly other multi-media devices like iPhone6/6S/SE, Apple TV, Xbox, FCP, Premiere Pro, QNAP NAS, etc. If you are a Mac user, you can also turn to the Mac version. A simple guide:

Free download and install

          
Other Download:
- Pavtube old official address: http://www.pavtube.cn/blu-ray-video-converter-ultimate/
- Cnet Download: http://download.cnet.com/Pavtube-Video-Converter-Ultimate/3000-2194_4-75938564.html

Professional yet Friendly Functional Video Toolbox -- Pavtube Video Converter Ultimate

1. Freely select subtitle and audio tracks

Choose the desired language and subtitles from original MKV files and source video to display on your media devices. Or attach SRT/ASS/SSA subtitles for source video.

2. Customize video and audio parameters

Optionally set video display ratio, bitrate, frame rate and other settings to obtain the best video and audio playback on your mobile devices.

3. Edit video and create personal movie

Customize output files with provided practical video editing features, including: trim video length, crop video size, split large video into segments, add watermarks, adjust video effect.

How to Convert MKV for playing via JRiver Media Center

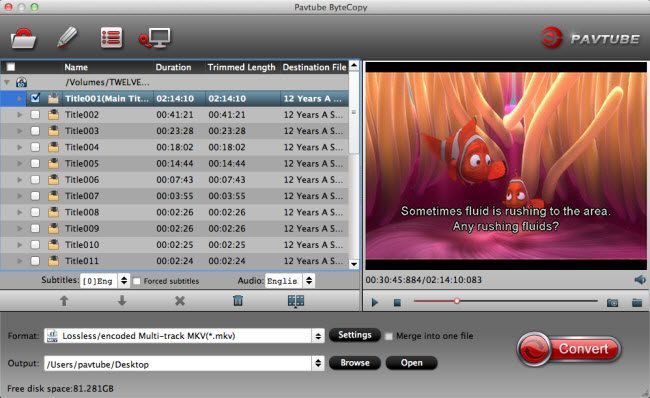
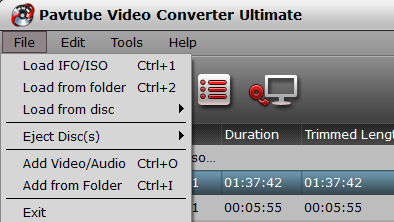
Step 1. Load Blu-ray/DVD disc.

Run the program on your computer, import your MKV files by clicking "File" and "Load from disc". 


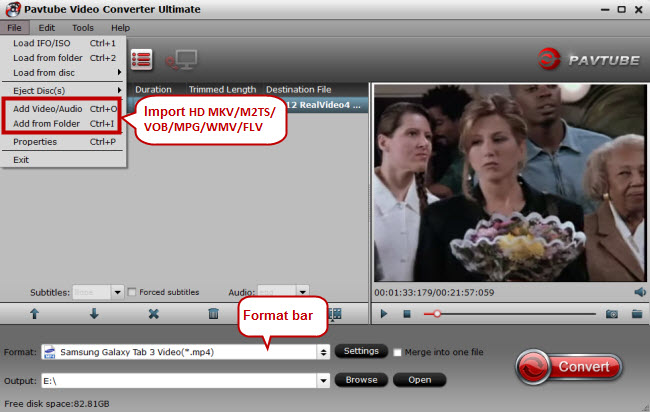
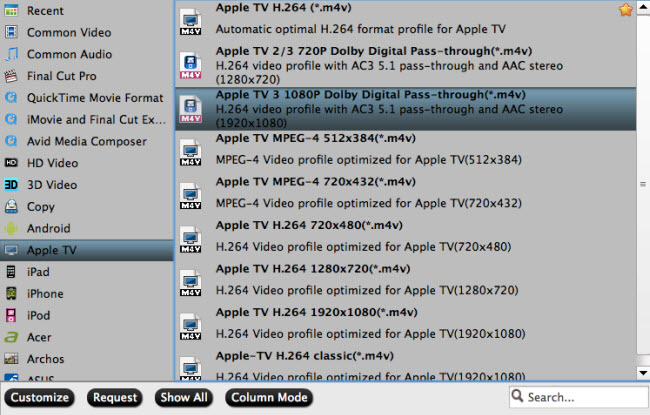
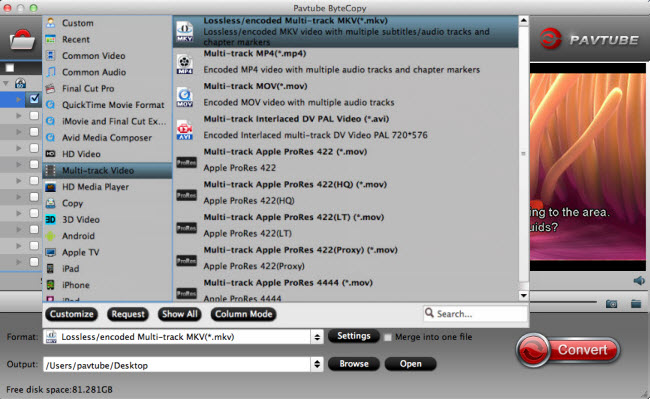
Step 2. Choose lossless MP4 as target format

Click the format bar to follow "Multi-track Video" and "Lossless/encoded Multi-track MP4 (*.mp4)" because it will contain subtitle languages, audio tracks and chapter markers in the output video. If you want yourMKV files to be played on other devices, choose the suitable format for them.


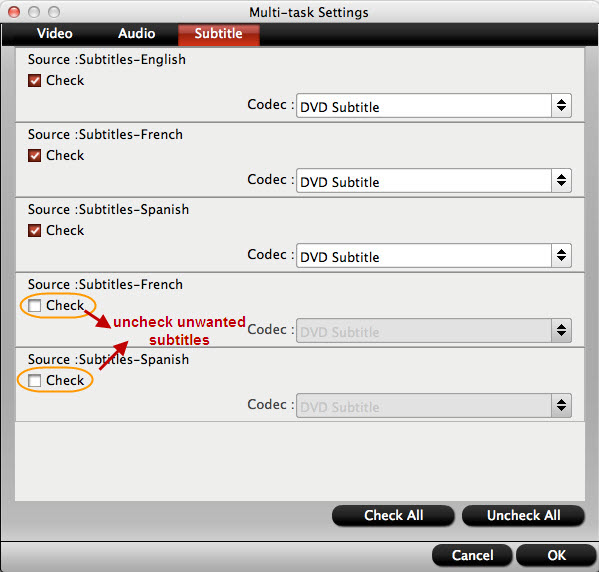
Step 3: Adjust multi-task settings.

Click "Settings" on the main interface to open "Multi-task Settings" window, all audio and subtitle tracks from the source files are checked and to be saved in the output MP4 container by default, if there are some audio tracks or subtitle streams you don't like, uncheck and remove them under the "Audio" and "Subtitle" tab.


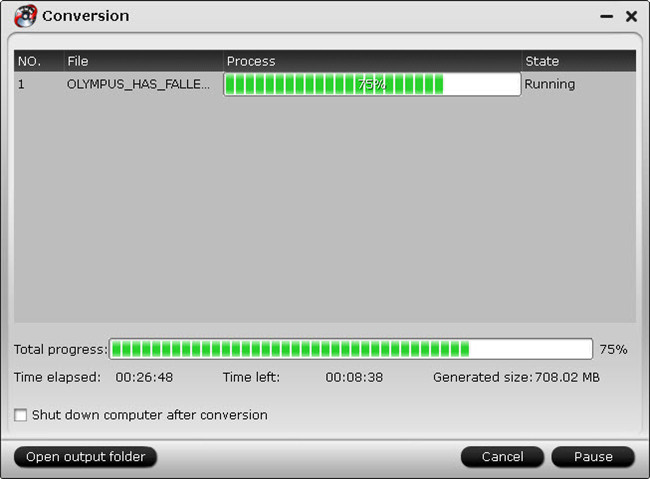
Step 4: Converter to Lossless Multi-track MP4 for JRiver Media Center 21/20.

After finishing all the settings, go back to the main interface, press the right-bottom "Convert" button to start MKV to lossless MP4 for JRiver Media Center 21/20 conversion process.

When the conversion is completed, click "Open output folder", a window will pop out with all your converted files. You can transfer them your an external hard drive and add them to JRiver Media Center 21/20 for playback.

Related articles

Thursday, April 21, 2016

Top 5 Free Format Factory Alternatives for Mac (El Capitan included)

Summary: The top 5 Free Format Factory Alternatives for Mac (El Capitan included)  on the market.


In enjoy fantastic movie in you Smartphone, if you want to share this movies with you best friend , then you need a powerful converter to convert the video to playing in a big screen, maybe is on Samrt TV, also could be on PC. then you should consider to the video format is to play any other device supported. You don’t worry this troubles, just a powerful of video format conversion device to solution the problem ,that video player not support the video playing on other device.

A powerful converter, maybe you could be imagine the Format Factory. But now on the market have many Format Factory Alternatives for Mac. Those video converter both media file convertor that supports the conversion of all popular videos, pictures and audio files to a number of other formats, and can repair damaged video and audio files. Format Factory also supports the file formats used on iPhone, iPod Touch and iPad devices. Next we will intruduce the top 5 Free Format Factory Alternatives for Mac (El Capitan included).

Part 1. Pavtube iMedia Converter Mac

Pavtube iMedia Converter for Mac is more than just a converter. It comprises a video converter, blu-ray ripper and dvd ripper to process videos. This feature-rick Mac video converter toolbox can not only copy and standard video with original structure, and convert all video collection to virtually any video and audio format for iPhone, iPad, Apple TV, Android, Windows Phones, PSP, PS3, and other devices. This total Video converter can also transcode between virtually all video and audio formats and add practical video editing functions to export media files playable on Ios, Android, Windows, game consoles, etc.


Part 2. Wondershare Video Converter Pro for Mac

Wondershare Video Converter Ultimate provides quickest universal solution for 4K video entertainment - With one click, download a video ultra-fast. And take advantage of the universal media player, built-in video edit, and much more. Powered by the exclusive and industry-leading APEXTRANS technology, You'll be amazed when you see it in action. 59 formats supported and counting.


Part 3. Leawo HD Video Converter on Mac

Leawo HD Video Converter is a widely used royalty-free video converter for multi-platforms available to convert 4K video to MP4, MKV and iPhone, Apple TV, Android with nearly any formats. It’s allows users to add presets for converting videos to specified formats or devices, but the process is a little difficult for beginners without a guide. Leawo HD Video Converter offers adjustable video/audio parameters (bitrate, framerate, codec and channel) to let users to customize video to get a perfect result as possible. New formats are constantly added.


Part 4. Aimersoft Video Converter for Mac

This video converter is loaded with dozens of features offering hassle free HD video conversion solutions in Mac. It can convert HDTV/HD-camcorders videos, Blu-ray videos, MKV, HDTV, 4K UHD videos, MPEG-TS, BDAV, MOV, OGM, WMV, FLV, TS, MPEG, standard AVI and QT videos. This is 83 times faster HD, handy and versatile video converter for MAC that also comes with numerous device presets for iPad Pro, iPhone 6S/6 (Plus), mini 4, Apple TV (4), Air 2, iTunes, Samsung Galaxy , Android, Chromecast, Surface Pro 3, WP8, Amazon Kindle Fire, PSP, Xbox, etc.


Part 5. Xilisoft Video Converter Ultimate 7 for Mac

Xilisoft Video Converter Ultimate is one of the easiest to use video converter for conversion of 4k videos. It is a professional video converter for all Mac users which has an amazing and wide collection of features. It’s can download a free trial to determine whether it is worth your money and requirements, and covert 4k videos to 1080p or 720p HD or even SD video format. Other than being user friendly, it provides a very fast conversion speed with high output quality. Like any other video editor, it also allows you to trim, crop and watermark the video files.


Top 5 Free Format Factory Alternatives for Mac 

Type
Pavtube iMedia Converter on Mac Wondershare Video Converter Pro for Mac Leawo HD Video Converter on Mac Aimersoft Video Converter for Mac Xilisoft Video Converter Ultimate 7 for Mac
Support windows

Video trim
Remove audio
Converter speed
Editing Video
Easy to Use
Output M3U8
×
×
×
×
Adjust brightness
Add srt.ssa.ass Subtitle
Text Watermarking
Support H.265 video formats
×
Reset Audio Channel/codec

Related articles

Monday, April 18, 2016

Top 3 4K Video Converter for Mac EI Capitan

Summary: Three excellent 4K Video Converter that will work on the Mac EI Capitan. You can choose from the best 4K video converter software for Mac to convert ultra high definition 4K videos.


Along with the a huge leap to a higher-than-1080p resolution, the popularization of 4K generate, users can now enjoy videos and movies with staggering vivid details through the newest system of Apple, Mac OS X 10.11 El Capitan is already generating a lot of interest. 

On many similar occasions, you need a 4K video converter for Mac EI Capitan. The idea of a 4K video converter is to take your high quality 4K files and convert them into a supported format of your choice, ready for editing in older versions of software or into software that has not yet been updated for 4K supported. But there will meet some new issues such as "can't convert 4 K video on Mac El Capitan" 

In this way, You need a top-rated Mac EI Capitan Video Converter with those features, easiness, speed, video quality and price all considered,

Next we will introduce Top three 4K Video Converter for Mac EI Capitan and giving its pros and cons, so you can trackle all your video files on Mac OS X El Capitan with end result you definitely satisfy.

The 4K Video Converters for Mac EI Capitan No 1 - HandBrake


A free Mac 4K video converter that is quick in converting and comes with a bit rate calculator that will alter video quality in order to adjust the video size to your desire. It is 4Kvideo converter that has many options which will enable you to convert numerous files of various sizes without any compromise in quality. You can convert only MP4 and MKV formats on Mac El Capitan, and transcodes videos to be played on devices such as iPhone, iPod and iPad. 

Handbrake is a rather disappointing video converting software when it comes to use on Mac El Capitan for video converting.

Pros:

It allows users to convert numerous files of various sizes.
It converts files without any compromise in quality.

Cons:

Unfortunately, this video converter doesn't support as many different formats as the previous one.

The 4K Video Converters for Mac EI Capitan No 2 - Free Video Converter for Mac


Free Video Converter for Mac is very similar to the previously described Mac EI Capitan Video Converter Pro. It enables various video conversion modes, allowing you to convert many different video formats on Mac El Capital so you can view them on your Apple iPhone, iPod, or iPad, as well as some Android devices. 

The only negative side is the decreased quality of converted file, which due to conversion loses its crisp quality, as well as its slow converting speed. However, it is nevertheless worth a try thanks to its advanced technical abilities. This video converter comes free of charge.

Pros:

It supports various video conversion modes.
Many different video formats are supported.

Cons:

Conversion speed is slow.
Quality of converted file will be decreased.

The 4K Video Converters for Mac EI Capitan No 3 - Pavtube iMedia Converter for Mac

With the excellent 4K video converters, you can effortlessly transcode 4K videos to most latest devices, iPhone 6S/SE, iPad Pro, iPad Air 2, Mini 4, Android, Samsung Galaxy S7/Edge and more with fast speed and no quality compromising.Using its built-in video editor, we can freely crop, trim, deinterlace, add subtitles, set special effects to our original 4K source video and we can customize the video output resolution, bit rate, frame rate and encoder of your choice. 

Free download and install

          
Other Download:
- Pavtube old official address: http://www.pavtube.cn/imedia-converter-mac/
- Cnet Download: http://download.cnet.com/Pavtube-iMedia-Converter/3000-2194_4-76177788.html

So now that we know that it is very essential in today's digital era to have the convenience of easily converting 4K videos to another on Mac Mac EI Capitan. 

Pros:

1. Convert 4K Videos to 1080p/720p HD/SD Variety of Format

So first and foremost, the primary feature of this program is that it converts videos. However, the magic lies in the way it does that. With 4K Video Converter for Mac, you can convert 4K videos into almost any format you can think of such as WMV, MP4, MOV, MKV, AVI and much more in SD/HD. You can convert any other formats of SD/HD videos as well.

2. Convert 4K Videos to Fully Compatible with Various Editing Software

This top-ranked Video Converter for Mac supports convert 4K videos to various professinal encoders - Apple Intermediate Codec, ProRes and DNxHD, DVCPRO, HDV, MPEG-2 - ensuring maximum editing quality and efficiency when working with iMovie, Final Cut Pro, Avid Media Composer, Adobe Premiere and more.

3. Ease to Use

EaseFab Video Converter for Mac allows various kinds of users to use the program easily. No special skills are required. Whether you are a beginner or an experienced user, you will find it easy enough.
4. 6X faster conversion speed and high output quality

Being tested with more than 10,000 video files, EaseFab Video Converter for Mac is assured the fastest video converting tool on Mac EI Capitan. It offers you an extraordinary 6X faster conversion experience with zero quality loss while converting 4K videos to H.264 encoded videos like MOV, M4V, M2TS, MTS, and many more. You can amazingly convert a 2 hour HD movie in 5 minutes with this software in hand.

5. Edit and Retouch Videos Instantly

The Mac 4K video Converter comes with a built-in video editor, you can personalize and retouch your videos in clicks. All the smart video editing features lets you get a video with all the factors you prefer. You can trim, crop, add watermarks and more with your 4K videos.

6. Customizable settings for video output

Options such as resolution, frame rate and bit rate can all be selected before you start the conversion process.

7. Easily to convert 4K videos for sharing on Vimeo, YouTube etc. 

With the smart 4K video converter for Mac, you can effortlessly convert your 4K videos to online video sites supported formats: YouTube, Vimeo, Facebook, FLV, SWF, F4V, WebM.

Pavtube iMedia Converter for Mac provides excellent customer support service, including lifetime free upgrade of product and technical support. 

Cons:

Need to pay a fee, but after the trial you will believe it is worth to pay for.
More question  read solution here

Convert 4K video with easy steps 

Step 1. Load video with the iMedia converter program.

Launch the program, click "File" > "Add Video/Audio" to import video the program.


Step 2: Choose 4K file format.

From "Format" drop-down options, scroll down to "HD video" main category, since HD video  has the same format standards as its previous model 4K video, therefore, you can choose to output “HD video” 1080P " as the best playable format on Mac EI Capitan


Step 3: Start conversion process.

Go back to the main interface, hit right-bottom "Convert" button to start 4K video conversion process.

When the conversion is completed, you will be able to add converted videos Media player. Also users can contact the support staff via email for help and suggestion.

Related articles

Sunday, April 10, 2016

Backup and Put Blu-rays to Synology DS416slim NAS on Mac

Summary: An easier way to backup and convert Blu-rays to Synology DS416slim NAS , so that you can preserve them on Synology NAS or playback on HD media player/home theatre for sharing with your families and friends with ease.


The extender for home sharing Network-attached storage - Synology DS416slim NAS. If you have tons of movies on Blu-rays and want to watching them to Synology NAS for DLNA streaming with your Apple TV 3, Samsung TV, PS4, WD TV etc, so you need to backup Blu-rays to Synology NAS compatible MP4 or MKV format first. 

Hot searches Get all DVDs into Synology NAS / Backup Blu-ray to Synology for DS Video  / Backup Blu-ray to Synology DS215j / Difference between Synology NAS and QNAP NAS

With the supported network protocols established between Synology NAS and Blu-rays Player or HD TV, etc. With a professional Blu-rays tool to backup Blu-rays to Synology NAS compatible MP4 or MKV format, then you can enjoy high quality movies in high definition without physical Blu-rays discs.

To backup Blu-rays movies for Synology NAS, there has two professional Blu-rays tool highly recommended. The program is capable of backup Blu-ray to MP4, AVI, MKV for Synology NAS streaming without no quality loss. And it's easy to use and very stable. Best of all, it allows you to copy your Blu-rays to Synology NAS with original structure or main movie only. 

The first method - MakeMKV

MakeMKV is your one-click solution to convert video that you own into free and patents-unencumbered format that can be played everywhere. MakeMKV is a format converter, otherwise called "transcoder". It converts the video clips from proprietary disc into a set of MKV files, preserving most information but not changing it in any way. 


MakeMKV Supported Windows, Mac, Linux OS, It can convert blu-rays to only MKV output.  To reads Blu-ray disc, preserves all video and audio tracks, including HD audio, with fast conversion - converts as fast as your drive can read data. The software no additional is required for conversion or decryption.

MakeMKV is a program that is very complex inside, but has very simple interface. Converting a video disc is a simple 3-step process.

Step 1. Open a disc

On a first screen program will show all available optical drives. At that point you can open the Blu-rays disc or file on Synology NAS. 


Step 2. Select content

Once the video source is opened you will see its contents as a tree structure. Normally, disc contains titles (individual clips such as main movie and bonus features). You can select which titles you want to save and what tracks to keep in each title (use right mouse button to ease selection of multiple items). 


For each item you can see detailed information such as item type, size, length, codec, language and so on. After you've selected what content you want to save, just press the "Make MKV" button.

Step 2. Wait for conversion

The conversion screen will display progress. The time to convert the disc is determined by a single factor - how fast is your drive capable to read. A typical time to backup blu-rays disc is about 15 minutes.


Conclusions from the edit the only disadvantage with this sofeware is that only supported MKV the only one formats.

The first method - Pavtube ByteCopy for Mac

The Pavtube ByteCopy Supported Mac OS X 10.11 El Capitan, Mac OS X 10.10 Yosemite, 10.9 Mavericks, 10.8 Mountain Lion, 10.7 Lion, 10.6 Snow Leopard, 10.5 Leopard OS, Supported output formats likes H.265, M3U8, MP4, MOV , M4V, AVI, WMV, MPG, MKV, etc. With it can backup, copy and convert blu-rays files to Synology DS416slim NAS on Mac easier, aslo support the encode H.265/HEVC codec from blu-rays disc. The best blu-rays to multi-track MKV, MP4, MOV, etc. Solution ways, in the convert process also can add SRT, ASS, SSA subtitles to blu-rays movie.

Step 1: Load Blu-ray movies

Install and launch Blu-rays to Pavtube ByteCopy for Mac Converter, and then click the disc icon to import your source Blu-rays movies to this program. Set your wanted subtitles and audio track from the drop-down box of "Subtitles" and "Audio" tab.


Step 2: Select an output format

To convert Blu-ray to MP4 or MKV for Synology NAS storing and streaming, just click on the dropdown menu of "Format", and then choose MKV, H.264 MP4 from HD Video profile list. If you want to keep 1080p resolution as source movie, you can choose HD Video > H.264 HD Video(*.mp4) or HD Video(*.mkv) as output format.


Tip: If you like, you can click "Settings" to change the video encoder, resolution, frame rate, etc. as you wish. Keep in mind the file size and video quality is based more on bitrate than resolution which means bitrate higher results in big file size, and lower visible quality loss, and vice versa.

Step 3. Backup blu-rays movies to NAS

Click the convert button under the preview window, and the Pavtube ByteCopy will start backup the conversion from Blu-ray movies to MKV/MP4 for Synology NAS or media player.


Conclusions from the edit that after the conversion, you can hit "Open" to quick locate the converted video; now you can stream converted Blu-ray files through Synology NAS to HDTV, Android tablet, DLNA device or other HD media player for wide sharing.

Related links

Thursday, April 7, 2016

Settings for playing Blu-ray to Galaxy S7/S7 Edge on MAC

Samsung Galaxy S7/S7 Edge is the new entry in Samsung Android-based Galaxy smart phone line. It has a fantastic enhanced multimedia viewing experience. If you collected Blu-ray Discs at home, you may wanna enjoy free and smooth Blu-ray playback on Galaxy S7/S7 Edge. Unfortunately, there’s no BD drive to allow you insert Blu-ray discs for playback directly on Galaxy S7/S7 Edge. Wanna play Blu-ray on Galaxy S7/S7 Edge, protect your Blu-ray disc, save space as well as maintaining the original quality, you should  turn to a powerful Blu-ray to Samsung Galaxy S7/S7 Edge ripper to rip the Blu-ray on PC or Mac to GalaxyS7/S7 Edge accepted video format listed below.
  • Video format: MP4, M4V, 3GP, 3G2, WMV, ASF, AVI, FLV, MKV, WEBM 
  • Video resolution: UHD 4K (3840 x 2160) @30fps 
  • Audio format: MP3, M4A, 3GA, AAC, OGG, OGA, WAV, WMA, AMR, AWB, FLAC, MID, MIDI, XMF, MXMF, IMY, RTTTL, RTX, OTA
Hot Search:  HD movies on Galaxy S7  |   ISO/IFO to Galaxy S7   | Galaxy S7 movie | 

Read more: 

With very easy-to-use interface, Pavtube Video Converter Ultimate  is the best Blu-ray ripper recommended to you. You can import both rented or purchased Blu-ray discs, Blu-ray folder or Blu-ray ISO image files to this converter without quality loss, and transcode Blu-ray movie to best compatible video formats for playback on your Samsung Galaxy S7/S7 Edge. Apart from Galaxy S7/S7 Edge, the application also facilitates you to convert any video files to transfer and play on Galaxy S6, Galaxy Tab S, Galaxy Note 4, etc. What’s more, this video converter support converting blu-ray to 3D movies  to play on your Samsung S7/S7 Edge with Samsung Gear VR.

How to rip Blu-ray to Samsung Galaxy S7/S7 Edge?

Install and launch pavtube Video Converter ultimate on your PC, follow the detail tutorial to successfully get Blu-ray movies to play on Samsung Galaxy S7/S7 Edge.

Step 1. Add Blu-ray files to the program.

Launch the program, Insert your Blu-ray disc into your Blu-ray Rom, click the "File>Load from disc" icon to upload Blu-ray movies from your local computer to Samsung Galaxy  S7/S7 Edge Blu-ray Ripper. You can add multiple files and convert them in batch since batch conversion is supported.


Step 2. Define output file format.

Tap on the "Format>Samsung", choose specify Samsung Galaxy series video format as the output video format for Samsung Galaxy S7/S7 Edge. You can also select "HD Video> H.264 HD Video(*.mp4)" as output file format. As you see, you can also convert Blu-ray to MP4, MOV to AVI, WMV to MOV, and almost all other popular video formats.

Tip: When Blu-ray movie is imported, you can select one wanted audio track and subtitles for output.


Step 3. Adjust output file parameter

If you have special needs, open "Profile Settings" window, here you can change video file size by output file resolution or bit rate with small values.

Step 4. Start Blu-ray to Samsung Galaxy S7/S7 Edge conversion

Click the "Start conversion" button to start Blu-ray to Samsung Galaxy S7/S7 Edge video conversion process. you can click "Open" button to get the converted videos from the folder you set before. 

Now you can connect your Galaxy S7/S7 Edge to computer, transfer the converted Blu-ray movies to Galaxy S7/S7 Edge for playing.

Related Article:

Related articles


Tuesday, April 5, 2016

Can Vizio Smart TV play MKV movies from USB?

Summary: The best MKV to Vizio Smart TV converter, which will help you to convert MKV files to Vizio Smart TV supported video format, and then play converted videos on Vizio TV via USB.


“I have a Vizio Smart TV in my office. On the side of it is a USB port. I am using an USB drive, created a 'movies' folder and loaded an MKV movie in that folder. When I connect the USB drive to the tv, it shows a "Picture" folder. When I click OK, it then opens a "system" folder and my "movies" folder. When I select the "movies" folder and press OK, nothing happens. Up at the top right, it says “Empty Folder”. Does my tv not read even simple MKV file format?”

Can playing MKV movies on Vizio Smart TV via USB?

many video formats are not supported by Vizio Smart TV, such as MKV, WMV, M4V, AVI, MOV, FLV, MPG, MTS, etc. These files with an unhelpful audio codec error message displaying right on your screen. in this case, if you want to watching movies in these unsupported video formats, you will meet with video playback issue, which just like the problem showed above.

An MKV is just a container format, holding video, audio, image or subtitle files in it. The video and audio files in different MKV files can be encoded with different codecs. In such a case, you’d better to transfer them to a fully compatible format to USB drive support formats and then play on Vizio Smart TV directly.

How to playing MKV movies on Vizio Smart TV via USB?

If an MKV file with DTS audio can't be rendered on Vizio Smart TV. A professional MKV to Vizio Smart TV converter lets you convert any MKV files to best fit the Vizio Smart TV.Pavtube Video Converter Ultimate With it, you don't need to know what is the audio codec in the MKV format that'll be best for your Vizio Smart TV. You just need to choose the among the optimized presets for Vizio Smart TV and this program will do the rest to conveter the formats be supported for you. A while later, the video conversion will be finished and you'll be able to watch the some media content on Vizio Smart TV without having to compromise on the quality.

With the Pavtube Video Converter Ultimate, not just think that the USB port no longer in many Smart TVs was more of a thought for pictures or just providing 5V power to a device. Because they do support multiple formats play, and also to support more formats to requires more processing power, and not to pay for different codecs.
Here in order to help you to play MKV mo on Vizio Smart TV from USB smoothly.


Other Download:
- Pavtube old official address: http://www.pavtube.cn/blu-ray-video-converter-ultimate/
- Cnet Download: http://download.cnet.com/Pavtube-Video-Converter-Ultimate/3000-2194_4-75938564.html

The best tool playing MKV movies on Vizio Smart TV via USB?

Share Pavtube Video Converter Ultimate use steps. The best MKV to Vizio Smart TV converter with you, which will help you to convert MKV files to Vizio Smart TV supported video format, and then you can play converted videos on Vizio TV via USB.

Steps 1. Import MKV videos to Pavtube Video Converter Ultimate

This program offers you two doable ways to upload your MKV files. You can either click the button to browse your hard disk or local directories and load the target files or simply drag your local MKV videos onto the interface. The uploaded files will be shown as thumbnails.


Steps 2. Select the Vizio Smart TV support formats as the streaming device

Click format bar and select the output format you need. With this program you can convert videos to MP4, MOV, MKV, AVI, etc. to play videos on Vizio Smart TV with supported video format from USB drive, we recommend you to choose MP4 format, because it is the best format for Vizio Smart TV and other playable devices.


Steps 3. Start the conversion process

If you need to adjust the output parameters before convert movies to Vizio TV, you can click the settings button and adjust the resolution, bitrate, frame rate, etc. Then click convert button to start the conversion process.


When the video conversion process is finished, you can copy converted videos to USB flash drive, and then you can watch videos and movies on Vizio Smart TV with best format, there is no problems anymore.

Additional tips -- How to Upgrade the Firmware on Vizio Smart TV

Prepare the USB Flash Drive

1.Insert the flash drive into an available USB port on the computer. Wait for Windows to recognize and configure the flash drive. If an AutoPlay window appears, close it.

2.Click the Windows "Start" button and select "Computer." After Windows Explorer opens, right-click the drive letter assigned by Windows to the USB flash drive and click "Format" from the context menu.

3.Click the "File System" drop-down menu and select "FAT32."

4.Choose "Quick Format" and click "Start." Wait for Windows to reformat the flash drive with the FAT32 file system. Close the Format window after Windows confirms that the USB flash drive was formatted successfully.

Downloading and Installing the Update

1.Open your Web browser and navigate to the Vizio website (see Resources.) Click the "Support" link and select "Downloads."

2.Enter the model number of your Vizio TV into the Search By Model Number field and click the arrow icon. Alternatively, click the "Select Your Product" drop-down list and scroll down to the model number of your Vizio TV. The downloads page for your TV will appear on the screen.

3.Click the "Firmware" or "Download Firmware" link on the download page for the TV. Select the drive letter for the USB drive and click "Save" to download the firmware .IMG file and save it to the USB flash drive connected to your computer.

4.Right-click the Windows "Start" button and select "Open Windows Explorer." Double-click drive letter for the USB flash drive to display the downloaded .IMG filename.

5.Select the filename, then press the "F2" key. Rename the file to "fwsu.img" and press "Enter." Close Windows Explorer and disconnect the USB flash drive from the computer.

6.Power off your Vizio TV and unplug the AC power cord on the rear of the unit. Insert the USB flash drive into the USB slot on the rear or side of the TV. Plug the AC power cord back in and use the remote control to power on the TV. After you turn on the TV, a red or blue bar will appear at the bottom of the screen. This indicates that the TV is updating the firmware using the file on the USB flash drive. Wait until the light illuminating the Vizio logo on the front of the TV turns off and only the Power LED remains lit.

7.Unplug the AC power cord again from the back of the TV and disconnect the USB flash drive from the TV. Plug the AC power cord back in and turn on the TV.

8.Press the "Info" button on the remote control to view the new firmware version for the TV. Set up the TV and scan channels just as you did when you first purchased the TV.

Related posts