Friday, February 23, 2018

Backup Blu-ray Movies with Chapter Markers Preserved

As a standard feature in Blu-ray disc, chapter markers can let viewers and listeners quickly skip through sections of a program using the Previous and Next buttons on their playback app or device to quickly jump to these points in the movie. The chapter markers can be recognized during playback by various portable devices, media players and also most standard DVD and Blu-ray players.

For people who plan to backup movies to protect it from being damaged or for convenient playback on different devices without flipping through the whole Blu-ray disc collection, you may wish to preserve your chapter markers when you perform the Blu-ray disc ripping or copying process. The good news is that here comes Pavtube ByteCopy, which can assist you to rip Blu-ray movies with chapter markers well preserved in the following 2 two ways:
- 1:1 full disc copy of Blu-ray disc with original file structure including chapter markers, audio tracks and subtitle streams and also special features/bonus contents/extras well preserved.
- Make a lossless multi-track MKV copy from Blu-ray with all your desired audio streams, subtitle tracks and chapter markers well preserved.

Related article: Extract SRT Subtitles from Blu-ray | Encode Blu-ray to H265 with GPU Acceleration | Digitize Blu-ray/DVD on Mac

Pavtube ByteCopy can powerfully bypass all Blu-ray copy protection and region code, in addition, it also keeps constant update with perfect support for the new MKB63/MKB62 used on many recently released Blu-ray disc. Apart from chapter markers, you can also get best sound quality when ripping Blu-ray with 7.1 surround sound when using above 2 methods to copy or backup Blu-ray movies.

For your great convenience, Pavtube ByteCopy is available on both Windows and Mac platform. For Mac users, you can switch to download Pavtube ByteCopy for Mac to perform Blu-ray chapter marker ripping process on macOS High Sierra, macOS Sierra, Mac OS X El Capitan, Mac OS X Yosemite and Mac OS X Yosemite.

Step by Step to Backup Blu-ray Movies with Chapter Markers Well Preserved

Step 1: Load Blu-ray disc.

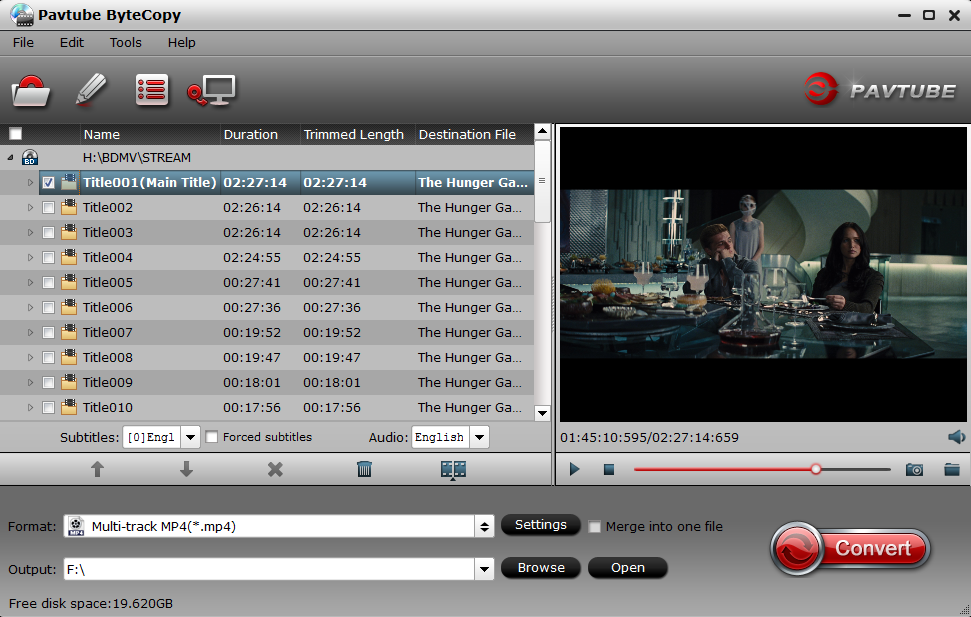
Insert the Blu-ray disc into your computer's Blu-ray drive. If your computer doesn't ship with a drive, you will need to purchase an external USB Blu-ray drive to read the data on Blu-ray disc. Then press "File" > "Load from disc" option on the main interface, alternatively, you can also import Blu-ray folder or Blu-ray ISO files with the program.

Load Blu-ray disc

Step 2: Rip Blu-ray with chapter markers.

Full disc copy of Blu-ray with chapter markers

On the top tool bar of the main interface, use the  option to make an entire disc copy of original Blu-ray structure with chapter markers well preserved.

Lossless MKV copy of Blu-ray with chapter markers

From "Format" bar drop-down list, select "Lossless/encoded multi-track MKV(*.mkv)" under "Multi-track Video" category to backup Blu-ray with your chapter markers and your wanted subtitle languages and audio tracks.

Lossless MKV copy of Blu-ray with chapter markers

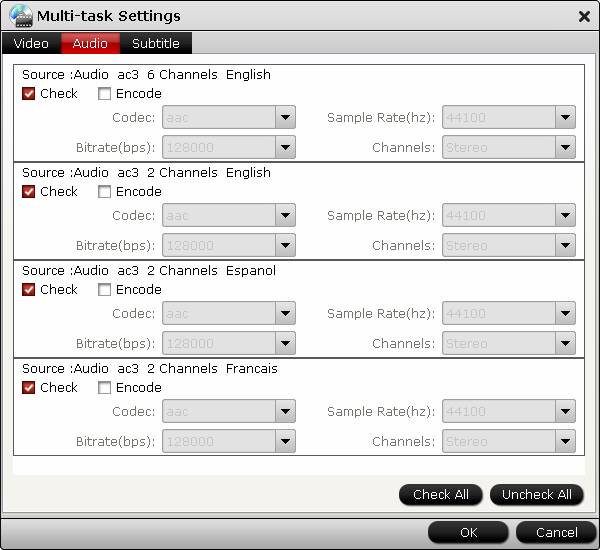
Step 3: Adjust multi-task settings.

When you output the lossless/encoded multi-track MKV format, all the subtitle languages and audio tracks in original source file will be preserved. If there are some subtitle languages or audio tracks you don't like, you can click Settings button and go to Multi-task Settings window to uncheck and remove them under Audio tab and Subtitle tab.

Adjust multi-task settings

Step 4: Start Blu-ray chapter marker ripping process.

Click the button "Convert" on bottom right to start entire Blu-ray disc copy or Blu-ray to lossless MKV conversion with chapter markers. After conversion, just press "Open Output Folder" to find generated videos. You can set auto shut down by checking the box of "Shut down computer after conversion".

Friday, February 16, 2018

Merge 4K Video into One File

Now, more and more devices can record video in 4K resolution. It's likely that you have shot some 4K video in cameras or mobile devices and you may want to merge separate 4K video into one contiguous clip into one file for making a complete film or uploading and sharing on popular video sharing sites. When you are searching on the Internet, you may find that there are many programs on the market can assist to combine 4K video into one file. Have no idea which one to choose, the following article will show you the important standards to pick the 4K video merger.

Important standards to pick the best 4K Video Merger

- Full support for all 4K video wrapped with different container file formats and compression codec.
- Batch conversion mode to load multiple 4K video into the application at one time
- Merge various separate 4K video clips into one file
- Fast merge 4K H.264/H.265 video into one file
- Merge 4K video into various different file formats or with no quality loss
- Available to work on both Windows and Mac platform and has perfect compatibility with the new Windows and Mac OS.

Review of best 4K Video Joiner/Combiner

Based on above listed standards, we have picked the best 4K Video Merge software - Pavtube Video Converter Ultimate to you. The program has full importing support for all 4K file formats such as 4K AVI/WMV/MP4/MOV/MKV/TS/XAVC/XAVC S/MXF and compression codec such as H.264, H.265, Prores, etc.

The batch conversion mode allows you to load multiple 4K video with different container file formats and compression codec into the application for conversion at one time to save your precious time.

Different from some free video merge software such as Windows Movie Maker which only allows you to merge contiguous clips into one, this program lets you to arrange all the 4K video in the right order and then merge all the separate 4K video clips into one file simply by checking "Merge into one file" option on the main interface of the application.

For those people who wish to merge 4K video into H.264 or H.265 format, you can get up to 6x H.264 codec encoding speed as long as you run your computer on Graphic cards that supports Nvidia CUDA or AMD App technology or up to 30x H.265 codec encoding speed as long as you run your computer on Maxwell (GM206) or Pascal based Graphic cards that supports NVENC technology.

The program offers various output format options, so that you can join 4K video while export to any of your desired 4K/HD/2K/HD digital file formats as you like. If you don't want to suffer any quality loss, you can also choose to direct produce the same file format as original file format while keep other profile parameters unchanged.

For your great convenience, the program is available to download and install on both Windows and Mac platform (get Mac version). In addition, it also has perfect compatibility with the new Windows 10 and macOS High Sierra.

Get Pavtube Video Converter Ultimate with 20% off discount, coupon codec: 45K2D47GJH

Step by Step to Merge/Join/Combine 4K Video into One File

Step 1: Import 4K Footages.

Launch and start the 4K Video Merge program on your computer, click "File" > "Add Video/Audio" or "Add from Folder" to import source files to the program. Click the "Move up" or "Move down" arrow under the video file displaying window to adjust your source video file order according to your own needs. You also can directly drag and drop your multiple 4K clips into the Video Joiner.

For Mac users, please use the equivalent Pavtube iMedia Converter for Mac which can make you join 4K footages to a single one file on macOS High Sierra, macOS Sierra, El Capitan, Yosemite, Mavericks, etc.

Load 4K video into the application

Step 2: Choose output file format.

From the "Format" bar, select your desired output file format from "Format" drop-down options. Here, you can choose to produce one of the two popular 4K file formats such as "H.264 High Profile Video(*.mp4)" or "H.265 Video(*.mp4)" under "Common Video" main category.

Output 4K H.264 MP4 video

Output 4K H.264 MP4 video

Output 4K H.265 MP4 video

Output 4K H.265 MP4 video

Tips: Enable GPU Encode Acceleration.

Click "Tools" > "Options", in the opened "Options" window, click "Acceleration" menu, then check "Enable GPU Encode Acceleration" otpion so that the program will accelerate converion speed when encoding 4K video to H.265/H.264 codec.

Enable GPU Encode Acceleration

Step 3: Merge several videos into one.

On the main interface, check  option to combine all your separate video clips into one single file.

Step 4: Start separate 4K video clips joining process.

Press the right-bottom "Convert" button, a window will pop out with the conversion progress.

When the conversion is completed, you can find your converted files by clicking "Open output folder" with all merged 4K files into one for further usage.

Thursday, February 8, 2018

Solve MakeMKV No Disc Issue

The "No Disc" issue of MakeMKV to Rip Blu-ray/DVD

"I've ripped over 40 blu-rays and DVD's so far, however I have stumbled upon a few of them giving a "No disc" error. I have searched and found that it could be an issue with the drive, but some of the movies have been just out of the foil and the drive still rips other Blu-rays without issues. The issue is only regarding the blu-ray discs. Specs below:
OS: Win10 Build 14393
BD-ROM: USB3.0 Slim drive ECD008-SAU3
Movies affected: Expendables, Martian, Bourne series + some other movies.
MakeMKV version: 1.10.2 Beta

Not sure if the pc specs are necessary but the rig is with a 5960x cpu and 32g of memory. I don't have any other BD-ROM's, but I've thought of getting another "real brand" one to verify with. Just not entirely sure why it wouldn't read some specific discs? Could it be the encryption? Neither MakeMKV or the OS sees this."

Why no disc when using MakeMKV to rip Blu-ray/DVD disc?

"No disk" means MakeMKV asked the operating system about the status of the drive, and the OS said "No disk". While encryption issues give different errors - either that the access key used to read the disk was not acceptable (Key exchange failure), or debug errors because unexpected results were returned. Since MakeMKV relies upon the operating system telling it there is a disk in the drive, and allowing it access to it. If the operating system says "no disk", it will block MakeMKV's access to the drive.

Solution to fix MakeMKV no disc issues

Apparently that the Blu-ray drive that you are using is suffering incompatibilities with your OS, it would be much ideal for you to buy the latest BD drive which will let formerly unmountable BD disks now mounted rapidly and rip without problem.

Best MakeMKV alternative to fix the no disc issue

Some users reflects that they downloaded Pavtube Ripper application and the disk mounted immediately since Pavtube Blu-ray Ripper software doesn't depend on the system to mount the Blu-ray/DVD disc. It can automatically detect the Blu-ray/DVD disc inserted on your DVD/BD drive, and then scan the disc and select the main Blu-ray/DVD title for you.

If you are looking for a combo function of Blu-ray/DVD Ripper as best MakeMKV alternative, we highly recommend Pavtube ByteCopy (get Mac version) to you. This cross-platform application has perfect compatibility with the new Windows 10/8.1/8/7 and also macOS High Sierra, macOS Sierra, Mac OS X El Capitan, Mac OS X Yosemite and Mac OS X Mavericks, etc. It features built-in powerful disc decrypter to assist you to automatically bypass all Blu-ray/DVD copy protection in the background. In addition, it also keeps constant update with perfect ability to bypass the new encryption used on many recently released Blu-ray/DVD disc.

Unlike MakeMKV that only allows you to produce a lossless MKV file from Blu-ray/DVD disc, this powerful application also assists you to make a 1:1 full disc copy of Blu-ray/DVD with original file structure, fast main Blu-ray/DVD copy without unwanted comments, ads or trailers. You can also choose to rip Blu-ray/DVD to any of your desired digital file formats or hot devices and applications preset profile formats.

Apart from the core Blu-ray/DVD disc ripping function, the program also offers advanced profile parameters settings functions to allow you to flexibly adjust output video codec, bit rate, frame rate, resolution, audio codec, bit rate, sample rate, channels, etc. The versatile video editing function can facilitate to trim/crop/watermark/apply effect/add watermark to video. The beneficial subtitle function such as selecting desired internal subtitles, enabling forced subtitles  or adding external subtitles to Blu-ray/DVD, etc also assists you to better understand Blu-ray/DVD movies after the ripping process.

How to Fix MakeMKV No Disc Issue with Best MakeMKV Alternative?

Step 1: Load Blu-ray/DVD disc with the program.

Insert DVD into your computer's optical DVD drive, for loading Blu-ray disc, you will need an external Blu-ray drive. The run the program on the computer, click "File" > "Load from disc" to load Blu-ray or DVD disc into the program. When both Blu-ray or DVD disc exists, the program will load DVD disc first.

Load Blu-ray/DVD disc into the application

Step 2: Copy/Rip Blu-ray/DVD disc in different ways.

Full disc copy

Make a full disc copy by hitting the entire disc copy icon on the top tool bar of the main interface.

Main movie copy

From "Format" bar, select "Copy" > "Direct Copy" to copy the main movie of the Blu-ray/DVD disc.

Main movie copy

Lossless Multi-track MKV copy

To preserve all your wanted audio tracks and subtitles streams in the source movie, you can use the program to rip Blu-ray/DVD to " Lossless/encoded multi-track MKV(*.mkv)" under "Multi-track Video" category.

Lossless Multi-track MKV copy

Output digital file formats or device preset profile formats

From "Format" bar drop-down list, select one of your desired file formats or device preset profile formats according to your own needs.

Output Blu-ray/DVD to popular digital file formats

Step 3: Start final conversion process.

After finishing all the settings, go back to the main interface, press the right-bottom "Convert" button to start to copy or rip protected Blu-ray/DVD movies to any of your desired file formats.

When the conversion is completed, click "Open output folder", a window will pop out with all your converted files. Then feel free to copy your favorite Blu-ray/DVD to external hard drive, play with VLC on computer, transfer to portable devices or stream Blu-ray/DVD movies to TV via home media server or from USB drive.

Friday, February 2, 2018

Upload DVD to OneDrive

As a file-hosting services that operated by Microsoft, the OneDrive offers 5 GB of storage space for users to store files as well as other personal data in the cloud. The stored files can be synced to a PC, accessed from a web browser or a mobile devices as well as shared publicly or with specific people. For DVD disc collectors who wish to free their favorite movies and TV shows from the shiny silver prisons so that can conveniently view them use phone, tablet, computer, etc. It would be a good option for you to rip and backup DVD movies to OneDrive.

Rip DVD for OneDrive accessing

If your DVD movies are home-made ones without copy protection, just download the free and open-source video transcoder Handbrake to copy and rip the DVD disc to OneDrive supported MP4, MOV or M4V file formats.

Tips: Handbrake only supports to output H.264/H.265/MPEG-4/MPEG-2 encoded video with MP4 container file format.

If the DVD movies that you own is stored purchased ones, then you will need a commercial ripper like Pavtube ByteCopy to bypass the DVD CSS or other built-in protections such as Region code, RCE, key2Audio, UOP, CSS, Macrovision, FluxDVD, Protect, ARccOS, AACS, BD+, ROM Mark, BD-Live, etc and then rip and backup the non-protected DVD to OneDrive supported file formats listed above.

Related article: Upload DVD to Google Drive | Blu-ray to Google Drive | iTunes to Google Drive

Apart from DVD disc, the application also has full importing support for Video_TS folder, IFO/ISO image file, Blu-ray disc, BDMV folder, ISO image file. Considering the limited free cloud storage of onedrive, the app enables you to reduce output video file size by lowering video file resoltuion, bit rate, frame rate. You can also use the built-in trimming function to cut off unwanted parts from the beginning or end or split a large video into small by file size, count or length.

For Mac users, you can go to download the Mac version - Pavtube ByteCopy for Mac to perform the conversion on macOS High Sierra, macOS Sierra, Mac OS X El Capitan, Mac OS X Yosemite and Mac OS X Mavericks, etc.

How to Rip DVD Movies for OneDrive Uploading and Sharing?

Step 1: Load DVD files to the program.

Launch the program on your computer, click the "Load files" button to import DVD disc from the optical DVD drive to the program. You can load DVD Folder by clicking "File" > "Load from folder" or load DVD IFO/ISO image by clicking "File" > "Load IFO/ISO".

Load DVD disc

Step 2: Pick output file format.

From the "Format" bar drop-down list, select Microsoft OneDrive imported file from "HD Video" > "H.264 HD Video (*.mp4)" as the output video format.

Output OneDrive supported file formats

Step 3: Reduce output file size.

Lower output video file resolution, bit rate, frame rate

Click "Settings" on the main interface to open "Profile Settings" window, here, you can flexibly change output file resolution, bit rate, frame rate to small values. Make sure to keep a good balance between file size and quality.

Trim/Split video

In the video editor window, choose the "Trim" tab and this tab is selected by default when the editing window appears. You can use the trim function to cut off unwanted parts from start and end. You can either drag pointers on the process bar or set exact time point in Start and End boxes to set.

Trim video length

Split video file size

Click the split button on the file list to launch the Video Split window. Ticking "Enable" option, you can split the file by file count, time length, or file size.

Split video file size

Step 4: Start the conversion process.

In the right-bottom of the main interface, hit right-bottom "Convert" button to convert DVD to Microsoft OneDrive compatible mp4 format.

When the conversion is completed, you can upload files to OneDrive by the 3 ways offered in this article: Getting started OneDrive tutorial.