Showing posts with label Backup. Show all posts

Tuesday, December 8, 2015

How do I rip large collection of Blu-ray/DVD onto NAS Server

Now I have a large stack of DVD’s and Blu-ray movies. I would like to store the discs in a disc binder and copy the movies to my NAS for streaming. Then I can easily get these disc playable on my Samsung Galaxy Note 5,HP Windows 8 Laptop and Samsung TV. Besides, I want to keep the multi-tracks of the movies, then I can enjoy it with any language by switching to the desired one. How to get it done? 

To freely stream the Blu-ray/DVD movies from NAS server for watching without time limitantion with multiple languages on portable devices, you'd better backup them to NAS compatible format with multi-track format. Since Blu-ray/DVD movies often carried with more copyright protection including region code, AACS, BD+, etc, in that case, ripping Blu-ray to MP4 container format with multiple audio tracks and subtitles included is a wonderful idea for you.

To achieve this goal, Pavtube ByteCopy is perfect for you. Ease of use and Very Intuitive UI and a large variety of encoding options. It can not only backup Blu-ray/DVD to mp4 format in multi-track, but also convert BD/DVD to any video format you like. For Mac users, you can turn to (Pavtube ByteCopy for Mac on Mac OS X El Capitan.

Read more:

MakeMKV vs ByteCopy vs DVDfab
User-friendly Blu-ray Ripper: ByteCopy vs DVDfab, Which one is best?

Free Download and trail: 


Other Download:

- Pavtube old official address: http://www.pavtube.cn/bytecopy/
- Cnet Download: http://download.cnet.com/Pavtube-ByteCopy/3000-7970_4-76158512.html

Good News! To thanks for your continuous support, Pavtube Official Website and Pavtube Facebook are now holding the biggest sale for this Thanksgiving Day, Black Friday Holiday Cyber Monday Crazy Promotion with fantastic 50% off discounts and giveaway. Pay less to get powerful Blu-ray/DVD/Video Converter to build your own home media center on your becoming Christmas!

Now let me show you how to backup Blu-ray/DVD to Multi-track MP4 format for NAS server in 3 steps.

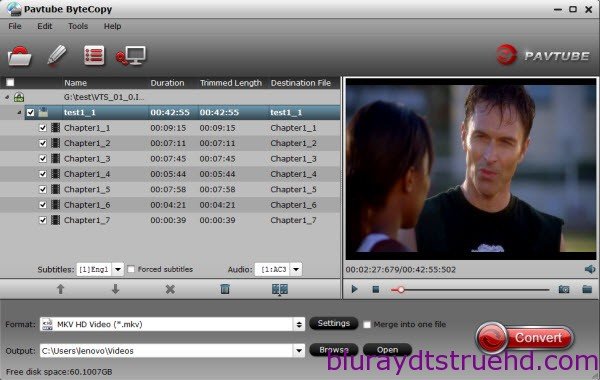
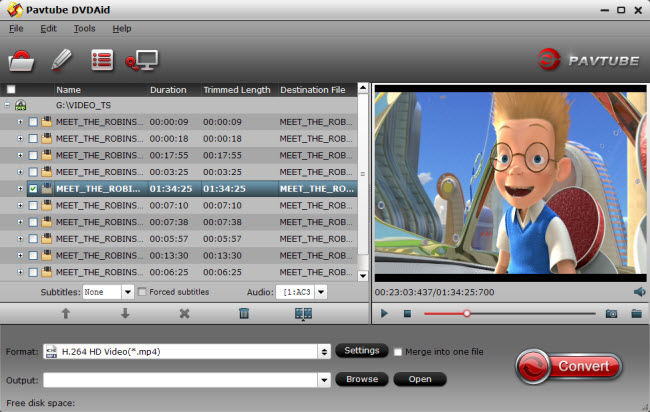
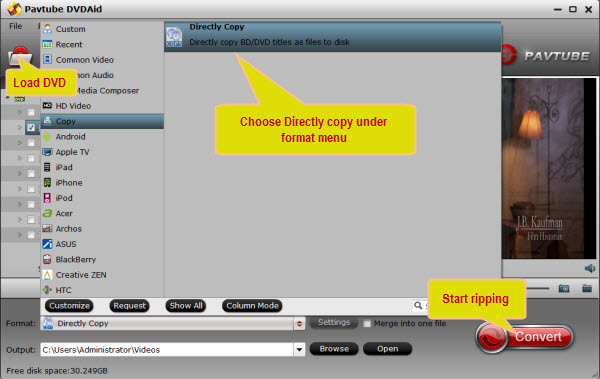
1. Import Blu-ray/DVD to Pavtube ByteCopy.

Click "Load file" icon on the top left to load the Blu-ray/DVD disc. Pavtube programs support batch conversion and you can merge into one file for output. If you have large collections of BD/DVD, it will be your first choice.


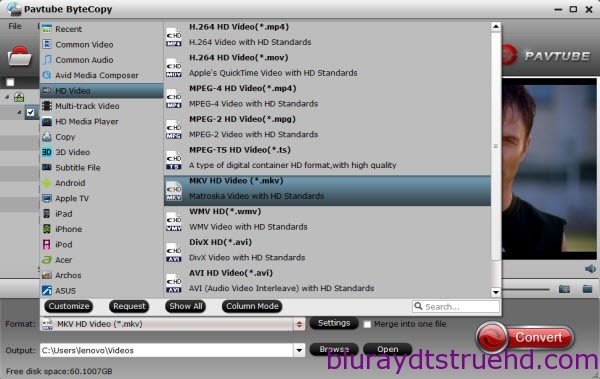
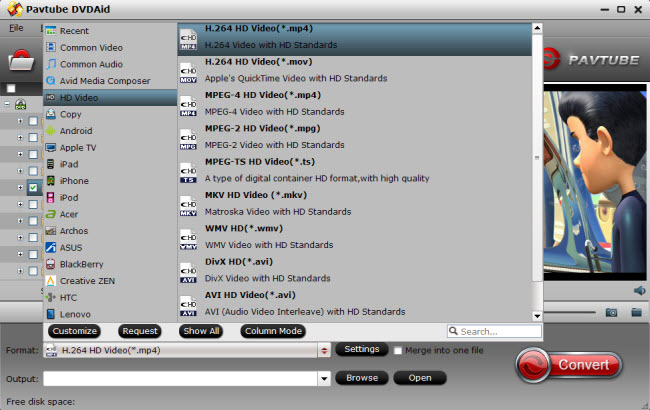
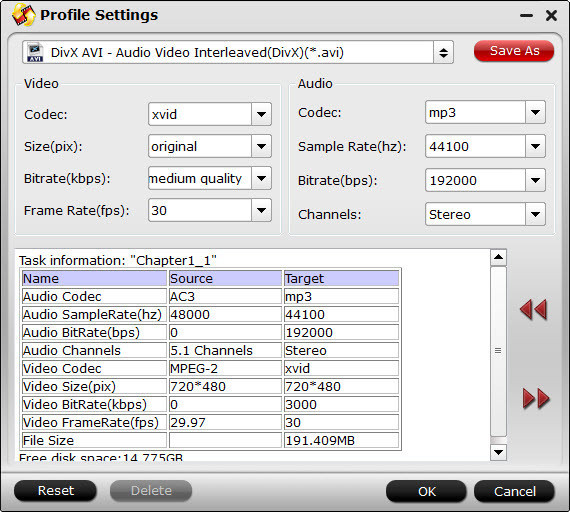
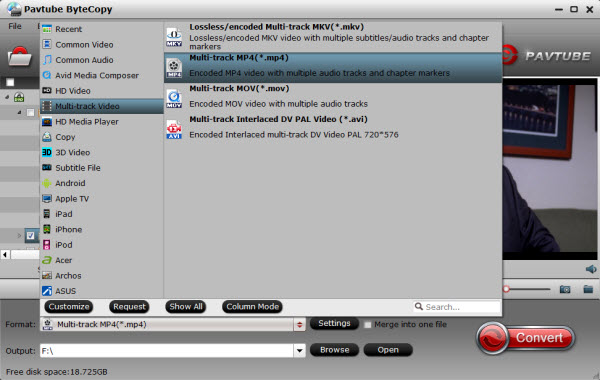
2. Choose Multi-track mp4 format for NAS server with multiple audio tracks.

If you want to watch your Blu-ray/DVD movies with multi-tracks, click the "Format" bar and choose the "Multi-track MP4(*.mp4)" format under "Multi-track Video" option which is designed for keeping multiple audio tracks.


Tips:

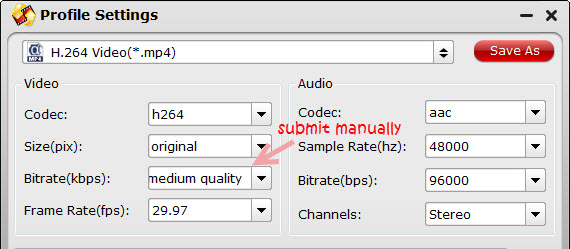
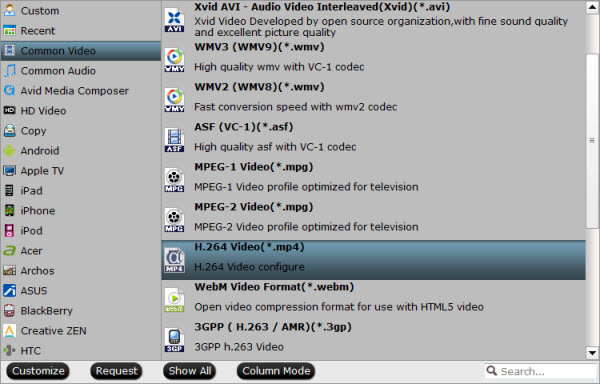
a. If you want to convert Blu-ray/DVD to other video formats or portable devices, just choose the video format you need or select portable devices in the dropdown list.

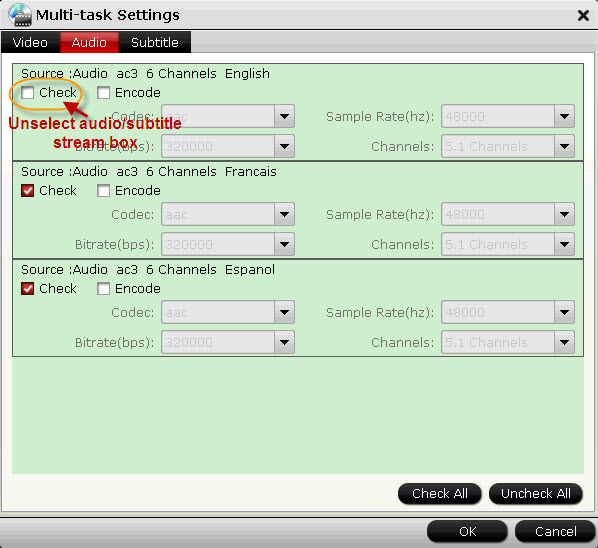
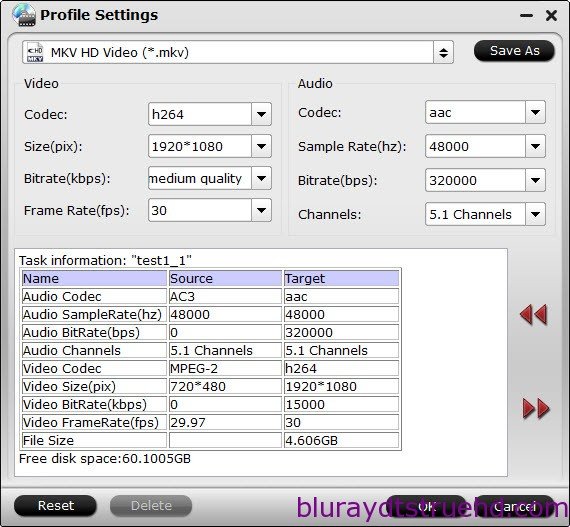
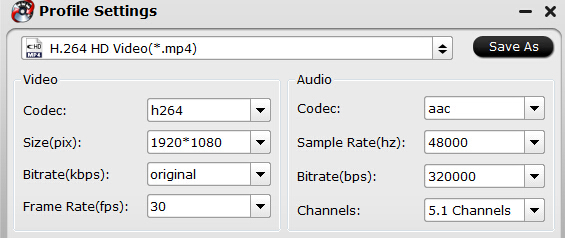
b. Click on "Settings", you can extract more than one audio track from source Blu-ray/DVD movies in saved MP4 files. And you are allowed to remove unwanted audio track by unchecking the “Check” box in front of each audio source.

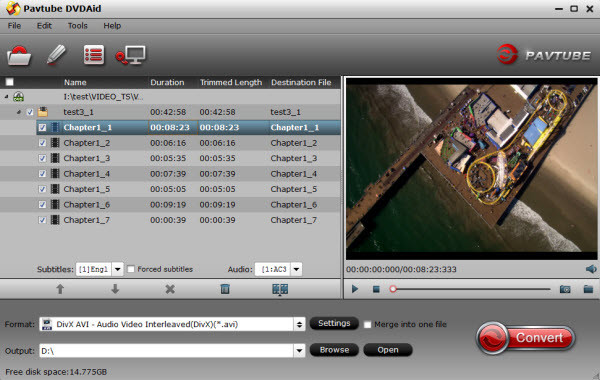
3. Start conversion.

Click big "Convert" button to start conversion. It won't take much time for conversion and then you will get mp4 video once completed. Hit "Open" button you will go to location of generated files.

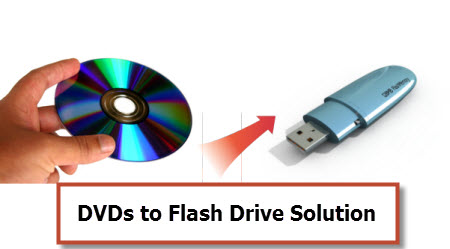
Now transfer the converted files to NAS device, and go to fully enjoy your favorite Blu-ray/DVD with with multiple language and share with other friends.

More features in ByteCopy:

* Full Disc Copy can 1:1 backup the whole Blu-ray/DVD disc with original structure including chapter markers.

* Directly Copy will backup 100% intact Blu-ray main movie with all the multiple tracks excluding menu.

* Contain all the features of Blu-ray Ripper: rip and convert latest Blu-ray/DVD to various video formats for playback or editing, edit the video before conversion including trim, crop, effect, etc, add *sst and *ass subtitle into video part and so on.

Money Saving Software Bundles are coming and it will provide big special sale on much software bundled like:

ByteCopy($42) + ChewTune($29) = Only $54.9, Save $16.1
Video Converter Ultimate($65) + ChewTune($29) = Only $74.9, Save $19.1
BDMagic($49) + ChewTune($29) = Only $49.9, Save $28.1
DVDAid($35) + ChewTune($29) = Only $49.9, Save $14.1

If you have many other videos to deal with, it is the right place for you.

Further reading:


  • How to Play ISO image files in Windows Media Center
  • WTV to PS4 Tips - Enjoy WTV files on PS4 with Suitable Formats
  • View Blu-ray Movies on XBMC player via network
  • Play Blu-ray on Mac via iTune, play on TV via Apple TV 3
  • Lossless Backup Blu-ray to Multi-track MP4/MOV for streaming to Mac
  • Thursday, December 3, 2015

    Rip Christmas Blu-ray to Multi-track MP4 for Playing on your Tablets

    Summary: This guide provides a simple way to convert Blu-ray movies on Apple/Android/Windows tablets in multi-track MP4 format so you can switch to the desired language during playback.

    To take the cinema with you as you travel, you can consider to rip your large Blu-ray collection for watching on your portable tablets. Then it will be possible to end up bored or if you are travelling most of the time. With all your Blu-ray videos on your mobile device, you will be entertained for many hours.

    In addition, you may find most Blu-rays include multiple audio and subtitle tracks so that people from different countries who speaking different languages can enjoy same movies in their native languages, so is it possible to freely swithing language while playing them in your Apple/Android/Windows tablets?

    To accomplish this goal, you need a powerful Blu-ray Ripper to assist with the process of ripping Blu-ray Disc to MP4 file with multiple audio and subtitle streams and you can easily switch audio and subtitle tracks with freely chapter switching.

    Pavtube ByteCopy, is such a tool for you. It is a new released BD/DVD backup and ripping program, supports to preserve multiple audio and subtitle streams and leave out unwanted ones, retain chapter information, allow editing videos, etc. Here is the reivew

    Note: For Mac users, you can turn to Pavtube ByteCopy for Mac to Rip Blu-ray to Multi-track MP4 on Mac OS X El Capitan.  

    Here we present you a brief instruction about keeping multiple audio and subtitle streams when converting Blu-ray Disc to MP4 for enjoying on all your portable tablets.

    Free Download and trail: 


    Other Download:

    - Pavtube old official address: http://www.pavtube.cn/bytecopy/
    - Cnet Download: http://download.cnet.com/Pavtube-ByteCopy/3000-7970_4-76158512.html

    Good News! To thanks for your continuous support, Pavtube Official Website and Pavtube Facebook are now holding the biggest sale for this Thanksgiving Day, Black Friday Holiday Cyber Monday Crazy Promotion with fantastic 50% off discounts and giveaway. Pay less to get powerful Blu-ray/DVD/Video Converter to build your own home media center on your becoming Christmas!

    Step 1. Load source Blu-ray Disc

    After successful installation of ByteCopy, launch it, click “Add Disc” icon to add source Blu-ray Disc from disc driver. Or load from BD folder or ISO/IFO file.


    Step 2. Choose output format.

    Click the Format button, and you would see lots of profiles listed. To keep multiple audio and subtitle tracks from Blu-ray Disc, you are recommended to choose “Multi-track Video” > “Multi-track MP4 (*.mp4)" for output.


    Ps: If you want to lossless backup Blu-ray/DVD to MKV with multiple audio tracks and subtitles preserved for freely swithing language while watching movies, choose "Lossless/encoded Multi-track MKV (*.mkv)

    Tip: If you want to remove unwanted audio or subtitle stream from original Blu-ray for output, just unselect the box in front of it.


    Step 3. Convert Blu-ray Disc with multiple audio and subtitle steams.

    Click the Convert button to start converting Blu-ray to MP4 with original subtitles, audios and chapters you choose. Find generated mp4 files by clicking “Open” icon and you can transfer and play Blu-ray Disc with multiple audio and subtitle streams on your Apple/Android/Windows tablets. And you can choose your desired audio stream.

    Related Guide:

  • Convert DVD movies to MOV with multiple audio & subtitle tracks
  • Getting Blu-Ray into Apple TV 3 with 5.1 audio on Mac
  • Best Way to Play Blu-ray via AC Ryan Media Player
  • Chromecast MKV- Solve MKV files won't transcode to Chromecast issue
  • View Blu-ray Movies on XBMC player via network
  • Thursday, November 12, 2015

    Copy DVD Movies to Synology DS216se For Watching on TV/PS4/iPad

    This article mainly shows you a quick way to rip and backup DVD to Synology DS216se for storage or streaming from Windows 10 or Mac OS X El Capitan with ease.

    Tips for Backup Movies: Store 300+ DVDs on Synology | iTunes Videos to NAS | DVD to 25 terabyte Drobo DAS | Blu-ray on RAID 1 network drive | 

    Just like DiskStation DS216play and DS416, the Synology's DS216se is another great option for storing your stuff from anywhere and helps you consolidate your photos, videos, and other documents. If you have a crap load of DVDs in your movie collection, you may want to rip your collection onto this Network Sever so that you can view your DVD movies via Synology DS216se from any Smart TV in the house or you can stream the videos for the Kids on holiday.

    If you have no idea about this, you've come to the right place. This article will teach you how to rip and backup DVD collection to Synology DS216se for convenient sharing and playback.
      
    To reach the goal, you can use Pavtube ByteCopy to help you. It is one of the dynamic Blu-ray/DVD ripping tool that can help you rip DVD collection to Synology DS216se compatible MP4, AVI, MKV, etc. video files with high output video quality and fast ripping speed. Besides, the program is also an excellent DVD backing up tool that can make 1:1 copy of your source DVD with original structure including extras and menus. It also enables you to copy DVD movies into lossless mkv format with chapter markers, all subtitle/audio tracks preserved. 

    What's more, this app is regarded as a great BD/DVD ripping program to help users to convert DVD collections for various multimedia devices including but not limited to iPad Air Plus, iPad Mini 4, iPhone 6S, iPhone 6S Plus, Samsung Galaxy Tab 2S, Galaxy S7, Kindle Fire HDX and so forth. If you are a Mac user, Mac verson is here. And you can get the lowest price at our Facebook.

    Free download and install:


    Other Download:

    - Pavtube old official address: http://www.pavtube.cn/bytecopy/
    - Cnet Download: http://download.cnet.com/Pavtube-ByteCopy/3000-7970_4-76158512.html

    How to rip DVDs to Synology DS216se for enrich your digital life?

    Step 1: Add DVD movies

    Insert your DVD disc into your DVD driver and run the best DVD to Synology DS216se Converter and click “BD/DVD disc” icon to load movie from DVD source. Set your wanted subtitles and audio track from the drop-down box of “Subtitles” and “Audio” tab.


    Step 2: Choose right output format

    Click the “Format” option, and choose HD Video > MKV HD Video (*.mkv) as output format. If you want to keeping orginal multiple audio tracks, subtitles and chapter markers from DVD, “Multi-track Video > Lossless/encoded Multi-track MKV (*.mkv)” is recommended for you.


    Tip: If you want to store more DVD movies on Synology DS216se, you can adjust video bitrate to reduce the video size. Just click“Settings” to change the video parameters and you can preview the output video size at the below chart. Keep in mind the file size and video quality is based more on bitrate than resolution which means bitrate higher results in big file size, and lower visible quality loss, and vice versa.

    Learn also: Store Purchased Movies to Seagate Wireless Plus


    Step 3: Start ripping DVD to Synology DS216se

    Click the big red“Convert” button under the preview window, and the DVD to Synology DS216se Ripper will start the conversion from DVD movies to MKV. 

    When you put ripped DVD to DS216se, you can watch these DVD movies on many devices via Synology, like Apple TV, PS4, LG HD TViPad

    Note: If you don’t know how to set up the connection between your Synology NAS and your DLNA/UPnP-compliant DMAs, here is a detailed guide. And if your DLNA/UPnP-enabled device is an Apple TV, here is a more simple tutorial on setting up Synology NAS with Apple TV.  

    Related Articles:

    Tuesday, November 10, 2015

    Backup DVDs to Amazon Fire TV 2 from RN104 NAS

    Q: “ I would like to copy my 300 or so DVDs to my RN104 then be able to watch them on my Amazon Fire TV, both are connected via 100Mbps Ethernet. I have a 104" screen and a Hi-Fi based 5 channel surround system so sound and video quality is most important, I am not fussed about file size as I have loads of storage on the RN104. I'm using a Cambridge Audio 551R as a pre-amplifier which can decode every current surround format so I'd like to keep the highest quality soundtrack available on the DVD, whether that be Dolby Digital or preferably DTS if it's there. I have been test MakeMKV and Handbreak but faild. Many thanks in advance for anyone out there who can help!” -see more 2016 Best 3 DVD Ripping Software

    Though playing DVDs on New Amazon Fire TV 2 from RN104 is still out of the question because of Amazon Fire TV 2 is lack of the DVD drive. As we know, Amazon Fire TV 2 usually supports video formats including H.263, H.264, MPEG4-SP, etc. And RN104 support MP4 files too. 

    Hot Search: DVD to H.264 MP4 | DVD to MKV | DVD to QuickTime | DVD to PS4 | DVD to DROBO 5N

    You may opt for some free DVD rippers like HandBrake to rip DVD to Amazon Fire TV 2 compatible formats. But such kind of DVD rippers isn't suit for copy protected DVD movies, like Frozen, Guardians of the Galaxy, Transformers 4. In order to fast copy DVDs to RN104 then stream to Amazon Fire TV 2, we need to rip DVD to new Amazon Fire TV compatible video formats Pavtube DVDAid, one top-quality DVD ripper, which can easily and quickly rip DVD to the new Amazon Fire TV supported H.264 MP4, so that you can connect Amazon Fire TV 2 from RN104 with your TVs including Smart TV, HD TV, 3D TV, 4K TV, and more. 

    After downloading and installing, you can rip and stream DVD to Amazon Fire TV 2 in several simple steps. (For Mac users, Pavtube DVDAid for Mac is the way to go. (Mac OS X El Capitan include).  

    Free download and install:
              

    Other Download:
    - Pavtube old official address: http://www.pavtube.cn/dvd_ripper/
    - Cnet Download: http://download.cnet.com/Pavtube-DVDAid/3000-7970_4-76158510.html
              
    Step 1. Run DVD to Fire TV 2 Ripper; load DVD.

    This converter both support DVD folder, DVD ISO/IFO files, your ISO image file would be recognized automatically so there’s no need to run virtual drive to mount it any more.


    Step 2. Choose output format for Fire TV 2

    To put Blu-rays on your RN104 NAS. As RN104 NAS is powerful enough to almost all kinds of formats, you can choose the format according to your own needs. 

    • Fire TV 2 Supported Video/Audio: H.263/H.264/MPEG4-SP/VC1 & AAC/AC-3/E-AC-3/HE-A/PCM/MP3. 
    • And read Plex Supported Video and Audio Format here.


    Tip: From the specification of Amazon Fire TV 2, the video in H.264/AVC codec can be up to 1080p and 30 fps. So you can hit on “Settings” to open settings window where you can adjust the video size to 1080p and frame rate to 30 fps. Since AC3 is not sure playable or not, you can choose AAC and 5.1 channel for audio. If 5.1 sound is not supported, it will be limited to stereo audio.  


    Step 3: Start to rip DVD to Amazon Fire TV 2

    After all settings, just press “Convert” icon below the preview window. Once the process ends, you can locate the generated file in output folder. Now,  put the ripped DVD to RN104 and install a Plex on it. Then install a Plex on Amazon Fire TV 2, too. Try again to play DVD videos on Amazon Fire TV via Plex through RN104 NAS. 

    If it doesn’t work, maybe you should try other option that is to get a player that supports more formats. Dune, WDTV Live and PCH are popular choices (there are others). Many can access your media directly using SMB/CIFS and NFS - so there is no need for plex or ReadyDLNA at all. 

    Read More:

    Tuesday, June 30, 2015

    DVD to DivX - Convert DVD to AVI, DVD to DivX Guide

    I have a Network attached storage device (Buffalo) that has DLNA protocol awareness to make it a media server playable on a PS3 and Xbox One. Some movies may be queued up on an iPad for over night stays. I need a Divx converter which can convoluted with all the add in codecs it requires just to make a back up of an old school DVD. Aside from have a movie server in the house, the primary reason I wanted the software is to be able to watch movies we already own for the kids in the back of our Land Rover. So I mainly plan on converting to AVI, Any suggestions?  

    I used Google to search on best "DVD Ripper" reviews and then I went through a bunch of sites to see the recommendations with pro's and con's. I choosed Pavtube which called DVDAid. I Love it! It is easy to use as most reviewers have stated. 
      
    Tips for about DVD Movie tips: DVD on iPhone 6 Plus | DVD Audio to Lossless FLAC | DVD to Windows Media Center |

    Scratching your head and wanna find a way to rip DVD to AVI either for backup or convenient playback/share? Here is a good option: get a professional DVD ripper and convert DVD to AVI with ease. After the conversion, you can surely play your movies on computer, HDTV, portable devices; share them on YouTube and more to have fun. 

    You might ask what kind of DVD tool could be a professional one. Here Pavtube DVDAid is recommended. It has an intuitive interface and enables you to convert DVD to DivX AVI as well as MP4, MKV, FLV, MOV, MPEG, WMV, etc. with selected subtitles and audio tracks. For Mac users, Pavtube DVDAid for Mac will do a great job for you. Download the right version and have a look at how it works. 

    Backup DVD to DivX AVI for playable on Any devices

    Step 1. Insert the DVD disc into your DVD-ROM and then load the WBO television series DVD movies to the program by clicking the disc icon. A DVD usually contains several subtitles and audio tracks. Just click to select the subtitles and audio soundtracks you need. 


    Step 2. Next, click the Format bar. You can then choose AVI from the drop-down list as the output file format. Here, you can choose "DivX AVI - Audio Video Interleaved(DivX)(*.avi)" from the "Common Video" list. 


    Tip: You can then personalize the output video by setting the video/audio parameters like resolution, frame rate, audio quality, bit rate, etc. 


    Step 3. When you're sure everything is OK, click the Convert button of the best DVD to DivX AVI Converter. It will begin ripping DVD to DivX AVI keeping subtitles immediately. Wait for the conversion to be done and click Open to get the converted AVI videos. 

    Now you can watch these wonderful DVD Movies cozily on a cruise holiday. Hopefully this page can help you rip DVD to AVI successfully. 


    Read More:

    Wednesday, April 15, 2015

    Copy DVDs to Flash Drive for transferring

    The information in this article will help you get the top DVD Ripper for Flash Drive by copying DVD to flash drive easily in less than ten minutes. 

    Hot Search: YouTube Videos to TVHD video to Apple TVTivo to AndroidQuickTime to WMP


    Why Need to Rip DVD to Flash Drive? 

    USB flash drives have become an easier way to store and transfer data than burning CDs and DVDs. USB flash drives are nearly infinitely re-writable, whereas most DVDs can only be written to a few times. The flash drives are also easier to carry around, without worry of scratching. In order to transfer the contents of the DVD to flash drive, you can simply copy and paste between the two. 
       
    If you want to rip DVDs to flash drive, you need a program that is able to convert and then compress the videos to a format that is computer-friendly. Here Pavtube DVDAid is right for you. Such programs enable you to rip the disk to a variety of popular video formats, including MPEG, WMV and AVI. After you rip the DVD, use Windows Explorer to transfer the file to a flash drive. The format used for copying files to a flash drive will depend largely on the storage capacity of the drive. It is capable of converting DVD to digital copy with various playable video formats, and moreover, it also can support to backup DVD without any quality loss. Now let's learn how to do it. Review.

    The app is also available for Mac OS – Get Pavtube DVDAid for Mac if you work with OS X 0.5/10.6/10.7/10.8/10.9/10.10.

    Part I: How to rip DVD to USB Flash Drive for various purposes

    Step 1. Launch the highly recommended DVD Ripper. Insert your DVD movie to DVD-ROM, and click "Load Disc" button on Pavtube DVDAid interface to load DVD disc; it also support importing DVD ISO/IFO and DVD folder.


    Step 2. Select the main title and set subtitles/audio language you'd like to preserve.

    Step 3. Click "Format", you can find many video formats in the dropdown list, you can choose the one you need like "H.264 Video(*.mp4)" or "DivX AVI - Audio Video Interleaved(DivX)(*.avi)" or "WMV3 (WMV9)(*.wmv)" from "Common Video" option.


    Tips: If you are not satisfied with the default video/audio specs, click "Settings" to adjust video seize(pixel), frame rate, bitrate (the higher bitrate, the larger file size and better video quality), or audio settings.


    Step 4. Start Conversion.

    Click the big "Convert" to start converting DVD to Flash Drive as AVI, MP4, FLV, WMV, MOV, etc. After conversion, you can click "Open" to find the converted files.

    Now you can successfully rip and backup Copy Protected DVD to Flash Drive Up to the format you wish.

    This DVD Converter can convert your DVD to all formats to Flash Drive, here is more method to backup your DVD movies:

    1. You can hit the Copy the entire disc icon on Pavtube DVDAid main interface and start DVD backing up process. 

    2. If you'd like to copy only movie content and leave out the extras and commentary, the Directly Copy is exactly what you need, which copies intact .VOB main movie from original DVD disc without extras.

    Part II: Transfer ripped DVD to Flash Drive

    Insert the flash drive into one of your computer’s USB ports.

    For Windows: Open the ripped movie and choose "Save as" and then set the USB drive as location and click "Save".

    For Mac users: Simply drag the movie onto the USB drive's icon on Mac desktop.

    Now, you can play DVD via Flash Drive on Computer/Smart TV etc. Hope this article will be useful. 

    See Also:

    Thursday, March 26, 2015

    Put DVD on Western Digital My Cloud for Sharing

    An easy workaround for copying DVD to Western Digital My Cloud for streaming by ripping DVD to Western Digital My Cloud friendly video format. 
     
    WD My Cloud is a fast, easy-to-use NAS server for your home that includes an excellent personal cloud function. It has a USB 3.0 port for storage extension or backing up data. When you have collected lots of DVD movies, are you planning to backup these DVDs to  
    a video file while keeping its audio and video effect unchanged? This disambiguation article will give you the effective way to put and rip DVD movies onto your WD My Cloud for sharing and streaming with ease. 

    Although WD My Cloud can support a wide range of format like MP4, MOV, AV, due to the reason of lacking DVD drive, WD My Cloud can not meet the demands of put DVD discs online. To achieve this goal, an easy-to-use DVD Converter is the key. Pavtube DVDAid is such a wise choice for you to solve the problem. Read the Top DVD Ripper review for WD My Cloud. 

    You can rip and convert DVD to WD My Cloud with super fast conversion speed and excellent image and sound quality. It is capable of ripping DVD to MP4, AVI, MKV for NAS streaming with no quality loss; you can easily backup your DVD disk with whole content copy or backup main movie only. If you are running on Mac OS X, turn to Pavtube DVDAid for Mac. If you haven’t got the software, download it now and let’s start the conversion. 


    Free Download this Top DVD Ripper for WD My Cloud: 


    Step 1:  Launch the DVD ripping program for WD My Cloud. Then click "Load DVD" to import the DVD files you want to convert. To select the subtitles you like, simply click Subtitle and select the one you prefer.


    Tip 1: Before start converting DVD movies, you can backup your DVD contend first with its full disc copy or directly copy features. 


    Step 2: As My Cloud is powerful enough to almost all kinds of formats, you can choose the format according to your own needs like MP4, MOV, AVI, MKV, etc.  


    Tip 2:  You can click settings button to customize the output parameters, such as resolution, bitrate, etc, you can also skip this step. 

    Step 3: After all settings, click convert button to rip/convert DVD to optimized format for WD My Cloud. Once you've liberated your DVD movie library, you'll make it available for viewing anytime, anywhere just with the help of your WD My Cloud. 

    After all, you can enjoy your DVD movies from WD My Cloud on your Samsung smart TV, iPad Air 2, iPhone 6/6 Plus etc and any portable devices as you want.  

    Read More: