Tuesday, December 9, 2014

Effective Way to Watch Frozen iTunes Movie via Roku 3

Why can't I play iTunes movies on TV via Roku 3? In this guide, I will show the easy way to remove DRM and convert Frozen iTunes M4V to Roku 3 with the top DRM Removal. 

The Roku 3 currently offers access to over 750 different entertainment channels including popular apps such as Netflix, Amazon Instant Video, Hulu Plus, Vudu and HBO GO. And we also use Apple TV to access iTunes movies, YouTube video and etc on TV.
But can we install iTunes on RoKu 3 for playing iTunes movies and music? How can I play iTunes contents on RoKu 3 through USB? You come to the right place! In this article, you will learn how to convert the hot Disney movie Frozen from iTunes to mp4 for playing on your Roku 3 player.
Watch iTunes Movies via Roku 3

Af first, you should know Videos/Movies purchased or rented from iTunes are in M4V format with DRM protection. That means users could just play the iTunes M4V TV episodes, movies, and music videos in portable Apple devices like iPad, iPhone, iPod, Apple TV. Naturally, iTunes movie can’t be directly played on Roku 3. So, to play Frozen iTunes movie with Roku 3, the DRM needs to be removed and the movies in M4V format should be converted to common MP4 videos that Roku 3 supports.

What format can play on RoKu 3?

A USB port enables local media playback (supported formats include: MP4 (H.264) & MKV (H.264) video / AAC & MP3 audio / JPG & PNG image).

To accomplish this goal, my girlfriend recommended me an amazing DRM Converter and Removal- ChewTune for its easy-to-use interface, straight workflow and reliable video quality. It can easily get rid of Apple's DRM protection from those iTunes downloaded m4v video, and transfer it to various video formats including MP4 profiles for Roku 3. (Here is the review)

More Money-saving Trip:
Now just download this software and follow the tips below to make your Frozen iTunes movie playable on Roku 3.

A command window will pop up during the installation to install specific audio driver, do not shut down and let it running until the installation completed.

install specific audio driver

How to convert Frozen iTunes DRM video to MP4 for Roku 3?

Step 1. Add video to this iTunes to Roku 3 Converter(Mac version is here). Drag and drop your videos to it directly, or you can click "Add" icon to import them as below.

iTunes to Roku 3 Converter

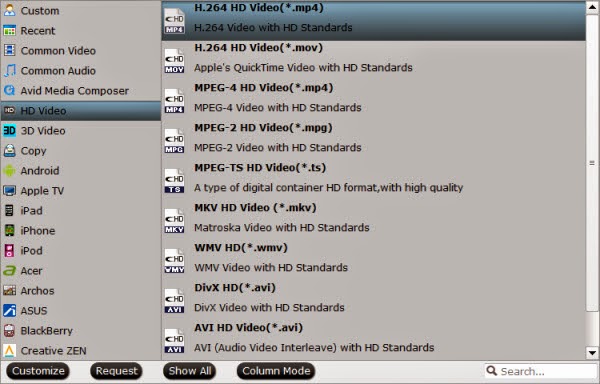
Step 2. Let's click the drop-down-list besides "Format" and move to "Common Video" column and choose "H.264 Video(*.mp4)" as output format for your Roku 3.
Roku 3 compatible video format

Step 3. You can click "Settings" to enter Profile Settings window and customize target video spec, you can find settings for video size, codec, bitrate and frame rate.

Step 4. Now click the big red icon to start converting Frozen iTunes M4V video to Roku 3 in batch; this converter will activate your media player automatically and start to play this video. The player windows cannot be removed or closed.

In the meanwhile, it will start to record this video in MP4 real-time. The conversion time is equal to the video length itself; you can do other tasks during the converting the process.

Note: The system volume could turn off temporally during this period; no worries, do not touch it to get perfect DRM removed video.

After the conversion, click "Open output folder" to quick locate the converted video.

Tips:

1. The DRM removing process may mislead your anti-virus software to falsely report virus/worm. Please ignore the report to keep on ripping.

2. This product cannot convert unplayable video (damaged, unauthorized, etc).

After that, you can directly play the movie on your PC or transfer the converted video to a USB file or SD card and attach it to Roku box. Now the Roku set-top box will have no trouble to play your Frozen iTunes movie file.

If you are disc lovers, learn how to copy Blu-ray to NAS for HD 4K TV, rip Blu-ray to external hard drive for Roku 3 and convert TS Folder and VOB files to PS3.

Wednesday, December 3, 2014

Copy 2016 hot Blu-rays to NAS for HD 4K TV or Normal def TV streaming

This article shows you with an easy workaround for copying 2016 hot Blu-ray releases to NAS so that you can stream to HD 4K TV or Normal def TV for watching.

NAS, with Network Attached Storage in full, is the extender for home sharing. If you have tons of 2016 hot Blu-ray releases like Guardians of the Galaxy, Harry Potter and the Deathly Hallows, How to Train Your Dragon 2, Planes: Fire & Rescue, X-Men: Days of Future Past, etc. and want to copy them to NAS for streaming with your HD 4K TV or Normal def TV for watching on big sceen in your living room, find the all-in-one solution from the following paragraphs.
Copy 2014 hot Blu-ray releases to NAS

To preserve your 2014 hot movie Blu-ray collection on NAS or playback on TV for sharing with your families and friends with ease, you need to convert Blu-ray to NAS compatible format first.

To realize it, a Blu-ray ripping program- like Pavtube BDMagic is highly recommended which can rip and convert Blu-ray/DVD to NAS supported MP4, MKV video effortlessly within a few clicks, so that you can sync and play your DVD, BD files on HD 4K TV or Normal def TV without any limitations. If you are a Mac user, please turn to BDMagic for Mac. Just download it and follow the steps below to learn how to do it.

Put 2016 hot Blu-ray releases onto NAS for playback on HD 4K TV or Normal def TV

Step 1: Run the best Blu-ray to NAS Converter and click disc icon to load your Blu-ray movie files. It programs also enables you to convert Blu-ray, DVD ISO files to NAS drive.

Blu-ray to NAS Converter

Step 2: Choose your desired output format for NAS, like MKV, MP4 and more. Here just set H.264 HD MP4 for example.


Tip: By clicking the "Settings" button, you can modify the video/audio parameters like 1920*1080 (Full HD 1080P video resolution), which can help you get the ripped Blu-ray movies with high quality

Step 3: Hit the Convert button to start converting Blu-ray movies to NAS video.

After a short conversion, click the Open button you will get the ripped Blu-ray files. Make sure the wireless network connection is accessible among the NAS and HD 4K TV or Normal def TV streaming.

Then just enjoy the high quality 2016 hot Blu-ray movies with your families and friends at ease. In addition, you can Get all Blu-rays into NAS and Get all DVD into  NAS for watching.

Related links

Thursday, November 27, 2014

Best Quality Profile Settings for viewing Blu-ray on Galaxy Note Pro 12.2

Want to put Blu-ray onto Galaxy Note Pro 12.2 for watching on the go, but don't know what to do? Get the solution below to rip Blu-ray to Note Pro native video. 

I have some Blu-ray discs like Amour and Ernest & Clementine from the local library in Knokke-Heist. What can I do to make copies of these Blu-ray movies for downloading onto my Galaxy Note Pro 12.2? Then I can watch them when I have the time for or I can take them while traveling for watching on the go.

viewing Blu-ray on Galaxy Note Pro 12.2

Still stick with your Galaxy Note Pro 12.2 for Blu-ray enjoyment? Through hours'searching online, I got know that Galaxy Note Pro 12.2 will not recognize Blu-ray without having to do something. The best way is to convert my Blu-ray to Galaxy Note Pro 12.2 friendly MP4 with a Blu-ray ripping tool I guess.

Well, Pavtube BDMagic is the tool I’ve been used for nearly one year. It should be the app helping me finish the Blu-ray ripping task. With this top Blu-ray to Galaxy Note Pro Converter, I can perfectly convert massive Blu-ray/DVD data as well as ISO/IFO files into common videos that Galaxy Note Pro can deal with. (I choose Pavtube since other products were not able to provide greater resolution for my new Samsung Galaxy Note Pro 12.2.) Plus, with the Blu-ray ripper, I can also backup Blu-ray, DVD movies to your hard drive with the original structures. 

If you are on Mac, turn to BDMagic for Mac. Don’t hesitate to get it now and follow the easy steps below to make your Blu-rays playable anywhere on Galaxy Note Pro 12.2.
How to rip Blu-ray movies to Galaxy Note Pro 12.2 playback format

Step 1: Run the best Blu-ray to Galaxy Note Pro Converter and click Blu-ray disc icon to load your Blu-ray movie files.

Blu-ray to Galaxy Note Pro Converter 

Step 2: Click “Format” bar, here I recommend Samsung >> Samsung Galaxy Note(*.mp4) as target format for your Galaxy Note Pro 12.2 with the best video & audio settings.

Galaxy Note Pro 12.2 best video format 

Tip: By clicking the “Settings” button, you can modify the video/audio parameters like 1920*1080 (Full HD 1080P video resolution), which can help you get the ripped Blu-ray movies with high quality.

Galaxy Note Pro 12.2 best video settings 

Step 3: Select subtitle and audio track language you like from the “Subtitle” and “Audio” options. If you like, you can also check “Only show forced subtitles” to make it possible for playback HD videos with forced subtitles on your Galaxy Note Pro 12.2.


Step 4: Hit the Convert button to start converting Blu-ray movies to Galaxy Note Pro video.

After a short conversion, you will get the ripped Blu-ray files. And then you could transfer Blu-ray movies to Samsung Galaxy Note Pro 12.2 and find the videos for HD playback.

Also have a Galaxy Tab Pro in hand, read how to copy 150 BD movies to Galaxy Tab Pro 12.2. 

Friday, November 21, 2014

2014 Thanksgiving Gifts- 20% OFF Best DVD Ripper for Mac

Thanksgiving Day happens to be just around the corner. It is a time to prepare some gifts to express our thanks to everyone that help, support, love and care for us. What to give at this Thanksgiving holiday?

Thanksgiving Special Offer 2014

Don't hesitate! Take a look at Thanksgiving Special Offer 2014 in which the Mac DVD to Android/Apple/Windows Converter is offered at $28 only with 20% price cut down! This offer is available between the Nov, 20, 2014 and Dec, 10, 2014. Take advantage of the Pavtube 2014 Thanksgiving Promotion Now - Rush to Buy!

What does a DVD to Android/Apple/Windows Converter for Mac do for you?

It rips protected DVDs to free videos that are optimized for playing on all tablets and smartphones. With specific format templates for iPad Mini, iPad 4, iPad 3, Google Nexus 7, Kindle Fire HD, Nook Tablet HD, Samsung Galaxy Note 10.1, etc, the 2014 Thanksgiving DVD movie to Tablets conversion processing is simplified to only several clicks.

More features of the 20% Discount Pavtube DVDAid for Mac:

* Rip movies from protected DVD, DVD ISO, and VIDEO_TS structure;

* Convert DVD to various video format (MP4, AVI, WMV, MKV and more) on Mac

* Extract audio from DVD as MP3, WMA, WAV, etc on Mac

* Fully backup DVD disc for DVD burning

* Keep desired subtitles and audio track

* Convert DVD movies twith perfect A/V sync

* Edit DVD movie with different features including trimming, cropping, merging, splitting, adding watermarks and subtitles

The 2014 Thanksgiving Promotion ends on Dec, 10, 2014. Don't hesitate, just follow the promotion link and have a try, those discounted multimedia software will do a great favor for you. Join more promotion activity at Pavtube Facebook.

Thursday, November 20, 2014

Remove iTunes DRM and Convert iTunes video to Windows Movie Maker for editing

Learn how to get rid of DRM protection and import iTunes music, videos, movies, TV episodes to Windows Movie Maker for editing.

If you often watch iTunes movies or TV shows, you must have marveled at some chapters with shocking images and special shot ways. Have you ever thought to add those fantastic chapters to your own videos by using Windows Movie Maker? 
import iTunes music, videos to Windows Movie Maker

Is it possible to Import iTunes movies to Windows Movie Maker?

Windows Movie Maker supports editing MP3/WMA/WAV music and WMV/AVI/MPG video format, while iTunes offers music in AAC (DRM-protected MP4, non-DRM M4A) and video movie in MOV or DRM-protected M4V. For this reason, iTunes videos cannot be edited in Windows Movie Maker directly.

To import movie/music downloaded from iTunes to Windows Movie Maker, you need to remove DRM protection from iTunes files first and then convert them to Movie Maker supported format. What you need is a powerful DRM removing tool and iTunes M4V Converter.

Here Pavtube ChewTune is highly recommended as a brilliant iTunes DRM removal that can easily strip DRM protection from any DRM protected files purchased from iTunes to Windows Movie Maker editable format. In addition, after removing DRM, you can also share the videos with your family or friends and enjoy the unprotected videos on any device. This program is easy to handle and you can finish the DRM removing process in three simple steps.

Here we provide you the easy way to help you to transfer DRM-free iTunes files and DRM protected files from iTunes to Windows Movie Maker for editing.

Few tips before starting iTunes to Windows Movie Maker conversion:

1. The DRM removing process may mislead your anti-virus software to falsely report virus/worm. Please ignore the report to keep on ripping.

2. This product cannot convert unplayable video (damaged, unauthorized, etc).

3. Allow the audio driver installed during the Pavtube ChewTune installation.

4. Close iTunes before running the Pavtube DRM Removal Converter when converting iTunes M4V movies.

5. It would take as long as the source movie length for the whole iTunes contents to Windows Movie Maker conversion process since Pavtube ChewTune records source DRM files in 1:1 video and audio quality.

How to Remove DRM-protection from Videos and Music to Windows Movie Maker?

Step 1. Run Pavtube ChewTune, drag and drop the source iTunes video and music from local computer to ChewTune. Or hit the “Add Video” button to import your iTunes DRM contents.
iTunes DRM removal 

Step 2. Hit the "Format" bar and select "Adobe Premiere/Sony Vegas > WMV (VC-1) (*.wmv)" as the output video format. AVI is also the choice for editing in Windows Movie Maker.

Learn how to import your DVD and YouTube video into Windows Movie Maker.

Windows Movie Maker Video Format 

Step 3. If you like, you can enter “Settings” option to adjust profile parameters, such as video codec, bitrate, frame rate, size, etc to get better video and audio quality on Windows Movie Maker.

Windows Movie Maker Video Settings 

Step 4. Click the big “Convert” button on software main UI to start iTunes videos and music to WMM conversion. This converter will activate your media player automatically and start to play this video. The player windows cannot be removed or closed.


In the meanwhile, it will start to record this video in WMV real-time. The conversion time is equal to the video length itself; you can do other tasks during the converting the process.

Note: the system volume could turn off temporally during this period; no worries, do not touch it to get perfect DRM removed video.

After the conversion, click "Open output folder" to quick locate the converted video and then add converted movies to Windows Movie Maker. Now you are ready to import and edit DRM-free videos and music from iTune store on Windows Movie Maker. After converting, you can upload converted videos on Vimeo for sharing.

In addition, this DRM Removal Tool can also strip DRM protection from Amazon Instant WMV videos, and Digital copies, convert them to Windows Movie Maker for playback.

Learn more Special offer:

Thursday, November 13, 2014

Rip and put Disney DVD movies to Kindle Fire HD 6 with best settings

This guide explains how you can convert Disney DVD movies for Kindle Fire HD 6, so that you can watch them with kids wherever you go.

Amazon Fire HD 6 starts at an affordable $99. Its small size makes it extremely portable and easy to use in one hand. It's the Amazon Fire HD 6 Kids Edition. One key thing for those of us who commute is that some parents can download a ton of quality TV shows (an less so movies) from Amazon Prime Free Streaming (if you are Prime member) for off line viewing, while if you have collected a number of Disney DVDs for your children, you can consider copying the Disney DVD movies to Kindle Fire HD 6 for your children. This article will teach you how to do this. 
Convert Disney DVD movies for Kindle Fire HD 6

Playing DVD on Kindle Fire HD 6 is a brilliant way of enjoying high-quality movies and making good use of existing DVDs. However, Kindle Fire HD 6 accepts various video formats H.264, MPEG4, WMV, AVI, MOV, 3GP, etc. It cannot play DVD directly. Besides, it is not necessary for us to load DVD to Kindle Fire HD 6. So a DVD to Fire HD 6 ripper is badly needed. 

You can search the related key words on line, and many results would be available. You may be confused about choosing a most suitable tool. Most of DVD ripper freeware, even the widely used HandBrake, have no specific profiles for Kindle Fire HD 6, even no longer read the new encripted DVD discs.

So here I highly recommend you try Pavtube DVDAid(review) which is exactly the perfect bridge between your Disney DVD Kindle Fire HD 6. This program enables you to rip DVD to Kindle Fire HD 6 accepted format on PC with No.1 fast ripping speed while removing all copy protection measures adopted in commercial DVD discs including Disney X-project DRM. The output quality of the target video can be kept the same as original Disney DVD videos on Kindle Fire HD 6. (Get the solution to backup & Rip Disney DVD Movies on Windows 10/Mac Yosemite.)

How to Convert Disney DVD movies to Kindle Fire HD 6" tablet

Step 1: Download and install Pavtube DVDAid(Mac version: DVDAid for Mac) on your computer. Run this perfect DVD Ripper for Kindle Fire HD 6 and then load your Disney DVD movie files into the program through "DVD disc" icon, "DVD Folder" icon or "IFO/ISO" icon.
DVD Ripper for Kindle Fire HD 6

Tip: Before start the conversion, you can select wanted audio track and subtitles language from "Subtitles" and "Audio" option. Interested, you can check "Forced subtitles" to convert DVD to Fire HD 6 for playing with forced subtitles only.

Step 2: Choose the output format. Click "Android -> Amazon Kindle Fire HD H.264 video (*.mp4 )" as the output format. The output video could fit on Amazon Kindle Fire HD 6 perfectly and supports full screen playback. (You can also give best DVD entertainment on InnoTab 3/InnoTab 2 with kids)

Kindle Fire HD 6 best format

Tip: If you wanna get a small output size, you'd better modify the video size as 720*480, bitrate as 1000~ 2000kbps in the Profile Settings interface is just OK.

Step 4: Click the "Convert" button to start the Disney DVD to Kindle Fire HD 6 conversion.

Step 5: Connect your Kindle Fire HD 6 to your computer and copy the file to Videos applicable content folder on your Kindle Fire HD 6 via USB.

Once completed, just open the build-in video player app on your Kindle Fire HD 6, and tap the Disney DVD movie for amazing enjoyment on it with your kids wherever you go. Blu-ray as well as SD/HD movies can be also loaded on to Kindle Fire HD 6 for playing.


Saturday, November 8, 2014

Watch GAME OF THRONES DVD on Big Screen TV via USB drive

Here is a very easy-to-use workflow to help you rip GAME OF THRONES DVD format within a few clicks, so that you can playback DVD movie on on Big Screen TV via USB drive with ease.

"I like Game of Thrones DVD so much that I want to share this amazing DVD with my Big Screen TV on the living room with all of my friends. Then I have the question: Since my TV won't receive DVD movies directly, how could I play GAME OF THRONES DVD on my Big Screen TV for friends?"
Watch GAME OF THRONES DVD on Big Screen TV
Have the similar issue? Don't worry, this article will clarify you. Before you can watch GAME OF THRONES DVD on Big Screen TV, you have to rip the movie from the DVD disc and convert to specific formats for TV. You can use Pavtube BDMagic to finish the DVD to TV conversion easily and fast.

Overall, this program is an all-in-one Blu-ray/DVD copying and ripping software. Various output video formats, such as WMV, MP4, MKV, MOV, VOB, AVI, FLV, etc. are all well supported. Besides, the built-in editor enables you to edit the TV Series videos such as cut the black bars, trim the ads part off, etc. With this tool, it is very easy to rip DVD to play on Big Screen TV with the best quality. The mac version is BDMagic for Mac.

Money saving bundles:
How to convert GAME OF THRONES DVD to Big Screen TV?

Step 1. Run Pavtube BDMagic, and load GAME OF THRONES DVD movie to it. Note to keep internet connected during this period.


DVD to TV Ripper

Step 2. Select output format.

Click "Format" and choose "Common Video -> MPEG-4 Movie(*.mp4)" as image quality will be adequately maintained in this format and it is suitable for playing on TV as well.

You can also get DVD playable on iPad Air, Galaxy Note 4 and Galaxy TabPro 10.1.

Big Screen TV supported format

Step 3. Change target video/audio specs (Optional)

If you are not satisfied with the default video/audio specs, click "Settings" to adjust video seize(pixel), frame rate, bitrate (the higher bitrate, the larger file size and better video quality), or audio settings.

TV MP4 settings

For DVD movie source, there's no need for compressing(It is relatively a small file size). Just keep the video size as original(720*480). And upscaling the video size won't make any difference of your video quality.

Step 4. Start Conversion.

Click the big "Convert" to start converting GAME OF THRONES DVD to Big Screen TV. After conversion, you can click "Open" to find the converted files.

Now transfer your converted DVD video to Big Screen TV using a USB drive.
  • Store 4K Video on Cloud Storage