Tuesday, February 10, 2015

2015 Wonderful movies for watching on Spring Festival

Summary: Looking for great movies for watching on the spring festival? Choose these two top wonderful 2015 movies for sepending your leisure time on theaters.  

Kingsman: The Secret Service (2015)

Kingsman: The Secret Service (2015)
  
Opens Friday
FEBRUARY 13, 2015
R , 2 hr 9 min
Action/Adventure
Comedy

Cast: Colin Firth , Michael Caine , Taron Egerton, Samuel L. Jackson , Mark Strong , Sofia Boutella, Sophie Cookson , Jack Davenport
Director: Matthew Vaughn
Genres: Action, Adventure, Comedy
Distributor: 20th Century Fox

Plot Summary: 
Based upon the acclaimed comic book and directed by Matthew Vaughn (Kick Ass, X-Men First Class), Kingsman: The Secret Service tells the story of a super-secret spy organization that recruits an unrefined but promising street kid into the agency’s ultra-competitive training program just as a global threat emerges from a twisted tech genius. 


Fifty Shades of Grey (2015)

Fifty Shades of Grey (2015)

Opens Friday
FEBRUARY 13, 2015
R , 2 hr 4 min
Drama
Romance 

Cast: Dakota Johnson , Jamie Dornan , Jennifer Ehle , Eloise Mumford , Victor Rasuk , Luke Grimes, Marcia Gay Harden , Rita Ora
Director: Sam Taylor-Johnson
Genres: Drama, Romance
Distributor: Focus Features

Plot Summary : 

When college senior Anastasia Steele (Dakota Johnson) steps in for her sick roommate to interview prominent businessman Christian Grey (Jamie Dornan) for their campus paper, little does she realize the path her life will take. Christian, as enigmatic as he is rich and powerful, finds himself strangely drawn to Ana, and she to him. Though sexually inexperienced, Ana plunges headlong into an affair -- and learns that Christian's true sexual proclivities push the boundaries of pain and pleasure.  


How to Remove DRM from iTunes Movies for Sharing in OneDrive?

Summary: Due to the DRM protection of iTunes movies, people can not upload iTunes movies to OneDrive to share to others, this article will help you out.

OneDrive (formerly SkyDrive) for Mac is the easiest way to access your OneDrive from your Mac. When you install OneDrive, a OneDrive folder is created on your computer. Everything you put in this folder is automatically kept in sync between your computers (Mac or PC) and OneDrive.com, so you can get to your latest files from virtually anywhere. Whenever you add, change or delete files in one location, all the other locations will be updated.

share-itunes-to-onedrive

So is it possible to share iTunes movies to our friends and family for playback by OneDrive without any limitation of authorizing iTunes account? But there is a basic problem should be solved first: how to deal with the DRM protection of iTunes videos? If you still don’t know the method to solve this subject, this article is exactly for you.

Pactube ChewTune is a  professional DRM removal (read reviews) and iTunes movie converter which can help you remove DRM protection and convert iTunes videos with original quality to various formats so that you can share your loved movies or TV shows purchased from iTunes to other people by OneDrive. It is really a wonderful solution to get rid of the limitation of DRM protection and authorizing iTunes account, your friends and family can enjoy the movies and music with you easily at anytime even in different places.

If you have some iTunes rentals, you can also use this professional DRM removal to share your iTunes rented movies to others by OneDrive.

Some users asked:

I am a Vimeo follower, how can I remove DRM from purchased/rented iTunes movies to upload to Vimeo?

I always rent DVDs from Netflix, how to copy and rip Netflix DVD rentals?

Here we will show you how to use this iTunes movie converter to remove the DRM protection from iTunes movie to share with others by OneDrive in Windows.

Free download:


Remove DRM from iTunes Movie to Share with Others by OneDrive

itunes-drm-removal

Firstly, download and install this iTunes movie converter and launch it in your Windows. Follow “Getting Started” in the interface of the software. Import the iTunes movie you want to convert to this iTunes converter.

Secondly, click “Format”box to select an output format to upload iTunes movie to OneDrive. 

Finally, click the “Convert” button in lower right corner to start to convert iTunes DRM movie to share iTunes movie with people in OneDrive.

How to Upload converted iTunes movie to OneDrive

Open OneDrive.com in the browser. You can login with your windows account. Then click “Files” in “Upload” option and import the converted videos.

upload-itunes-to-onedrive

When the uploading finished, the iTunes video is saved in your OneDrive.

process

Choose the videos or files you want to share.

share

Related articles:

Friday, February 6, 2015

Keep My Netflix DVD Rentals Forever to Watch in TV at Ease

This article will give you a tutorial to know how to rip and copy your Netflix DVD rentals to keep in your computer forever to watch at anytime anywhere.

Nowadays, a lot of DVD lovers like to rent DVDs in Netflix - a movie rental company that can send DVDs to home directly without shipping fee. And Netflix gives its customers access to countless hours of television and movie entertainment. 
 
But you may feel sad that Netflix has charged a higher subscription fee recently. If you want to keep some favorite Netflix DVDs forever to stream in TV at anytime, what’s the best way?


 Keep My Netflix DVD Rentals Forever 
The answer is to use a DVD ripper or copier to rip and copy the Netflix DVD Rentals to your computer then watch in TV at first. If you have no idea about this, you must be the reader of this article which is a tutorial of how to rip and copy DVD Rentals to your PC for easy playback later at anytime.

To get the work done,
 Pavtube DVDAid, is a professional DVD ripper to rip Netflix DVD rentals to any video solution. With it, you can make a duplicate copy for your Netflix DVD rentalsconvert DVD to SD/HD formats or even create 3D videos with excellent video/audio quality in fast conversion speed so that you can share moviers on TV, numbers of popular devices like iPad Air, iPhone 6, Galaxy Tab S, Galaxy Note 4, PS4, WD TV, Apple TV and media players such as Roku 3Chromecast, etc. Besides, you can easily customize your own DVD and collections to export desired movies in your own patent. 

Rip and Copy Netflix DVD Rentals to Your Computer for Watching in TV at Anytime?


Step 1. Import Netflix movies

Insert your Netflix rented DVD into your computer’s hard disk and launch this Netflix DVD rentals converter. Then load the DVD by clicking the button on top left corner.


Step 2. Choose output format

Click “Format” bar and select one of the formats you like. Or select a format depending on which device you want to watch the movie in.


There are two options: “Copy the entire disc” and “Directly Copy”. “Copy the entire disc” means copy the whole content of disc with the same structure with the original disc. “Directly Copy” means copy the selected movie title.

Step 3. Rip and copy Netflix DVD rentals to computer

Just click “Convert”button, after a while, it will finish the conversion from Netflix DVD to your computer. Now it means you can own the movie forever. Try to connect your computer to your TV or other devices now and enjoy at anytime!

Reference:

Tuesday, February 3, 2015

Can I Store iTunes Movies to An External Drive to play in LCD TV?

Due to the DRM protection of iTunes movies,people are looking for a tool to break iTunes DRM to move iTunes movies to an external storage drive. This article will show you how to remove DRM from iTunes Movies then move to an external storage drive to play in LCD TV.

move iTunes movies to external drive

Question:How to convert the movies I bought from iTunes to save them in my hard disk drive?

“ I bought a lot of movies in Apple Store and created a library of the movies, I tried to convert the movies into a file to read on my 10TB external hard disk drive to play in LCD TV. But I couldn’t do that. I want also to convert those movies in a format that i can play in the DVD player on my SUV AS when traveling with my kids. Which software is the best DRM removal for iTunes?”

Nowadays, most of the people have pretty large iTunes libraries with over 1,000 albums, multiple full seasons of TV, a lot of feature-length movies and other things. This takes up a lot of hard drive space in your PC. Moving all your iTunes movies to an external hard disk drive then playing them from the external drive become most people’s choice.

It maybe easy for you that drag the iTunes movies to an external drive to save and backup. But when you try to connect your external drive to your LCD TV, DVD player in your car or other media players, you will be annoyed that the movies do not play. That is because all the purchased or rented iTunes movies are DRM protected, you can only play in Apple’s products, like Quicktime Player, iPad, iPhone andApple TV, etc. If you are the one who is looking for a DRM removal tool for iTunes movies to play freely in many kinds of devices from an external hard disk drive, this article will give you a favor.

How to remove DRM protection of iTunes movies and move to your external drive to play in multimedia devices?

Pavtube ChewTune, one of the best and easy-to use DRM removal software. It adopts an unique DRM decrypting technique to remove DRM from all movies purchased from iTunes, Amazon store, Digital Copies (bundled with DVD/Blu-ray discs), etc. for playing in WD TVWindows Media Player, VLC, PS3, Surface Pro, etc. 

Following will tell you how to remove DRM protection from iTunes movies and move to your external hard disk drive. Then you can make free streaming on LCD TV and DVD player in your car.

Step 1. Load an iTunes movie

Download the best and easy-to use DRM removal, install and run it on your Windows. Click the icon on the top left corner to import an iTunes movie.

iTunes DRM removal

Step 2. Choose m4v, mp4 or other output formats

Which device you want to play the movie in or what format the device you own supports? You can choose the output formats easily. Generally, mp4 can be accepted by most of the devices.

formats DRM removal can output
  
Step 3. Remove DRM protection from the movie

Click the convert button on the lower right corner. The converter will start to strip the DRM protection off from the movie. You just need be patient.

If you don’t want to wait for a long time. This smart DRM converter supports acceleration with NVIDIA CUDA and AMD APP technology and batch conversion and auto-shutdown after conversion.

remove DRM from iTunes movie

Step 4. Copy the DRMed iTunes movie to an external drive

As we mentioned above, it is easy for you to connect the external hard disk drive to your computer and copy all the movies to the external drive.This will make all your iTunes movies always available at any time. 

Besides the external drive, you can also store your large amount of iTunes movies and TV shows to a SD card.

Reference:

Thursday, January 29, 2015

How to convert DVD to Nexus 10 for watching DVD movies

Do you want to enjoy DVD movies on Nexus 10? In this article, you'll find how to convert your favorite DVD to Nexus 10 for playback.

DVD is a great way to watch movies on your HDTV at home. If you have a bunch of home videos stored on DVD or some commercial DVD movies, you must want to play it not only on your computer and DVD player, but your own Nexus 10 with a whopping 2560 x 1600 resolution – the same as the 13in MacBook Pro with Retina display.
Nexus 10

Well, if you agree,let's take a look at how to watch DVD films on Nexus 10 tablet. Obviously, DVD discs can’t be played by tablets directly, even if the DVD backup ISO or IFO image files. In fact, as long as you pick up a DVD ripping program, you can easily make it. The most famous is Handbrake. Which is freeware.

But, according to my own experience, this one can’t rip copy-protected DVDs (ie: Disney and other animated discs). Handbrake actually convert MPEG video (including DVD-Video) into an MPEG-4 video file, but only limited to these DVD-like source: VIDEO_TS folder, DVD image or real DVD (CSS will not be supported and must be dealt with externally with third-party software and libraries. So you’ll need to add an intermediate step to get protected DVD movies onto Nexus 10.

If you have kinds of DVD movies for dealing with. I suggest you selecting a professional DVD ripping software. Pavtube DVDAid is highly recommended here. Fast conversion speed, perfect output video quality and optimized Nexus 10 profile is just the reason why it is recommended. (Learm 5 Tips when selecting Reliable DVD Ripper

Now, share my own steps to rip DVD movies to Nexus 10. The mac workflow is here.

Step 1. Install and launch the DVD to Nexus 10 Converter, load movie from DVD disc, DVD folder, or DVD ISO/IFO image.

DVD to Nexus 10 Converter

Step 2. When the DVD disc/folder/ISO is loaded, you can select subtitles and audio track (English, French, German, Spanish…) for each chapter. Expand the DVD folder to check movie chapters.

DVD subtitles

Step 3. Set compatible format for ripping DVD folder/ISO to Google Nexus 10 compatible videos. Click the “Format” bar, and choose “Google Nexus 10 H.264 Video (*.mp4) under “Android” column.

Nexus 10 video format

Step 4. Start converting DVD to Nexus 10 playable videos. Click the “Convert” button at bottom right to get the DVD Ripper works. After conversion you can click the “Open” button to find the converted files.

When DVD movie is converted into H.264 video, you can stream the media file to Google Nexus 10 via USB cable. Hope this guide is really helpful for you to watch DVD movies on Google Nexus 10.

In addition to DVD, you can also enjoy DRM video, Blu-ray and videos on your Nexus 10.

Monday, January 26, 2015

Convert and Import new DVD releases to iTunes for iPad/iPhone/iPod

This article give you the guide on how to convert new DVD releases to iTunes supported video formats for importing to iTunes library and syncing with iPad/iPhone/iPod.

Are you a DVD movie fan? Do you plan to buy some DVD discs like the new released The Judge, The Book of Life, Before I Go to Sleep, My Old Lady, Fury, etc? Ever thought of importing these new DVD releases to your iTunes library for syncing to iPad/iPhone/iPod and watching them anytime anywhere even on your way home after a-whole-day work for relaxation? This article will give you some tips for adding DVD movies to iTunes for iPad/iPhone/iPod playback.
Convert and Import new DVD releases to iTunes

As you know, iTunes could only recognize video files in MP4, MOV, M4V, which means you can't play DVD on iTunes directly. That is to say, no matter you just want to watch DVD movies on your iTunes or wanna sync to your iDevices, you need firstly to convert DVD to iTunes supported format.


To complete the ripping, an easy-to-use DVD to iTunes Ripper is necessary. If you start with the application like DVD Decrypter, things might become even more complicated. It is a free program that allows you to get iTunes compatible MP4 video files from DVD movies, but it will require quite a bit of time and computer knowledge to do this and it only can convert non-commercial DVDs (unprotected DVD).

Well, don't despair, here Pavtube DVDAid is an ideal app for you to remove the strict DVD protection and rip any DVD movies to iTunes (iTunes 11/12 included) video very quickly while retaining great video quality for iPad, iPhone and iPod syncing. Besides, it also can help you to convert DVD to almost any other common video format such as VOB, FLV, WMV or backup DVD keeping the whole movie structure as you need. Mac users can turn to DVDAid for Mac. Now just download it and follow the tutorial below.

Convert DVD movie for importing to iTunes library with high video quality

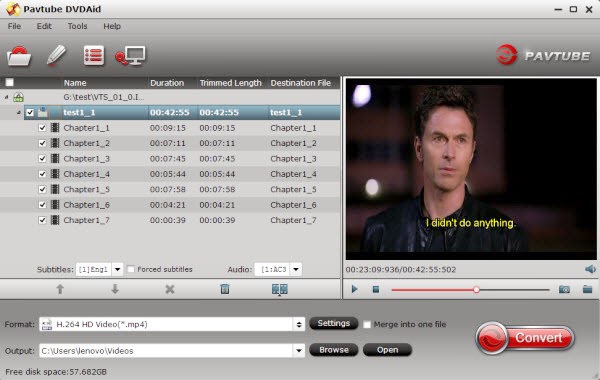
Step 1. Load DVD movies

Place the disc from the DVD-ROM. Launch the DVD to iTunes Converter; click disc button to import DVD movies into the program. Loaded DVD movies can be previewed in the right preview window.

DVD to iTunes Converter

Freely select the subtitles for you DVD movies from the "Subtitles" option for watching DVD movies with preferred subtitles.

Step 2. Decide on output format

Click the drop down box of "Format", through which it is possible to select iTunes highly compatible format like H.264 HD Video(*.mp4), MPEG-4 HD Video(*.mp4) from "HD Video" profile list.

iTunes highly compatible format

If you want to add the DVD movie to iTunes for play on iPhone, iPad, iPod, etc., you can also directly select iPhone, iPad or iPod as the output format to get videos with optimized settings for your iDevices. Also, ripping DVD to Roku 3 and Big Screen TV is so easy.

Tip: If you need, you can also click "Settings" to modify parameters of your output profile to meet your professional needs: bit rate, frame rate, aspect ratio, etc.

iTunes video settings

Step 3: Edit DVD movies (Optional)

You can even use its provided Edit feature to edit your output video by cropping, adding watermarks, trimming and inserting subtitles so on.

Step 4. Start ripping DVD to iTunes

The final step is to tap the Convert button and commence converting DVD movies to iTunes video files.

Step 4. Add DVD movies to iTunes

After the conversion, click on "Open" button to access to the videos you ripped. Open your iTunes and import the DVD to its Movies library by clicking File -> Add File to Library.

After that, you can transfer and watch DVD on iTunes or your iPad, iPhone and iPod freely andsmoothly at full quality anytime anywhere. In addition to new DVD released discs, DVD video_ts folder can be ripped to adding to your iTunes library.

Thursday, January 22, 2015

Rip and stream Disney Blu-ray to WD TV Live Media Player for playback

In order to play Disney Blu-ray movies via WD TV Live media player, you need to rip Blu-ray to WD TV supported video formats. Here is the detailed solution.

WD TV Live is a gorgeous HD media player, and also lets you stream all your personal and Internet media files to your HDTV so that you can enjoy your digital content on the big screen of your HDTV. Want to watch some Disney Blu-ray movies on your HDTV via WD TV Live (Plus, Hub) but only to find that your Blu-ray movies or Blu-ray folders are not directly supported?

Watch Disney Blu-ray movies on WD TV

Don't worry! In this article, you’re going to learn how to convert Disney Blu-ray movie to WD TV Live supported video formats like .MP4, .MKV or .AVI, etc. for watching with ease.


First of all, download and install Pavtube ByteCopy.

By searching widely, and I found many guys recommend Pavtube Blu-ray ripping software-ByteCopy, it will bring the best audio/video for watching on WD TV Live. Read the review and here is the mac version.

It can help rip Blu-ray movies (including protected Disney Blu-ray movies) to WD TV Live supported MP4, AVI, MOV, MKV, etc. so that you can play your Blu-ray movies on HDTV via WD TV Live without any limitations! What’s more, this program comes with a built-in video editor that allows you to edit your Blu-ray movies by trimming, cropping, adjusting video effects, etc. Now download this tool and follow the instructions to convert Disney Blu-ray movies to videos for WD TV Live.

Convert and Stream Disney Blu-ray for playing on WD TV Live Media Player

Step 1. Load Disney Blu-ray files.

Insert your Blu-ray disc to the drive, then launch the Blu-ray to WDTV ripping software and click the “Load Disc” button to have the Disney Blu-ray content imported. You can also add BDMV folder,  Blu-ray ISO files are the source files for converting.

Blu-ray to WDTV ripping software

Note: Check the “Merge into one file” on the main interface; you will get multiple selected titles into one output file. It merges not only the chapter in to a title and file but also merges the titles in to one file.

Step 2. Choose MP4 format.

In the dropdown list of “Format”, there are a mass of video format. You can choose “HD Video -> H.264 HD Video (*.mp4)” directly or choose the desired portable devices which is the best streaming format via WD TV Live Media Player. Also you can rip Blu-ray to play on Smart TV. Just choose according to your own needs.

streaming format via WD TV Live Media Player

Tip:

1. If you want to get output blu-ray video keeping multiple audio tracks, multiple subtitles and with with lossless quality, you can choose “Multi-track Video” > “Lossless/encoded Multi-track MKV(*mkv)” format.

2. You are also allowed to change the video and audio parameters like codec, bitrate, channels, frame rate, etc. You can adjust it according to your demand or keep it default for output.

HD MP4 video settings

Step 3. Convert Disney Blu-ray to MP4.

Click the “Convert” button to start converting Disney Blu-ray to MP4 format. With the technology of CUDA acceleration it will provide you fast conversion speed. Once completed, go to “Open” the generated MP4 files.

Now you can connect to an HDTV using an HDMI cable and access the Internet with either a direct connection to a router or by joining a home network like DLNA, just get your Disney Blu-ray playback on your WD TV Live Media Player with ease.

Read More: