Tuesday, November 12, 2013

Playing DVD Movie on iPhone 5c/5s without Losing Quality

Summary:  By ripping DVD movies to iPhone 5C/5S supported MP4 format, then you can transfer converted DVD movies to iPhone 5C/5S for watching at anytime, anywhere.

Apple announced the release of two new iPhones (iPhone 5C, iPhone 5S) at a live event in Cupertino, California. Both the iPhone 5C and the iPhone 5S have the same screen size as the current iPhone 5. They both also have a 8 megapixel camera.The iPhone 5S runs on the new A7 chip. Apple’s Senior Vice President of Worldwide Marketing Philip Schiller said the 64-bit chip was the “first ever in a phone of any kind”.


And these iPhone 5c/iPhone 5s is also a great media player which supports a lot of media formats including files with MP4, MOV and M4V as video format and AAC, MP3, Apple Lossless, AIFF, and WAV as audio format. Now if you have already had lots of DVD movies, you can rip or convert your DVD collections to iPhone 5c/iPhone 5s for enjoyment, then you can take it everywhere for playing.

In this case, you need to rip DVD to iPhone 5C/5S compatible formats first with the help of a DVD to iPhone 5C/5S RipperAfter many trials, we select this DVD Ripper from Pavtube for that it's capable of removing DVD protection quickly (a few minutes during the importing) and smoothly converting them to MP4 which is preferred by IOS devices without any quality and sync issues. If you are on Mac, turn to DVD Ripper for Mac.

I once used this dvd ripper to convert DVD to iPhone 5C/5S mp4 format. It's a simple one, only need a few steps and the outcome is quite well I think. Download a free trial version and follow the guide as below to convert DVD movies to MPEG-4/H.264 MP4 format for iPhone 5C5S with best quality.

2013 Best Thansgiving Gifts – Pavtube’s Thanksgiving Promotion 2013 is on the road from Nov.7, 2013 to Dec.10, 2013. Now you can get 30% off on both the above two programs now. Never miss!!! 

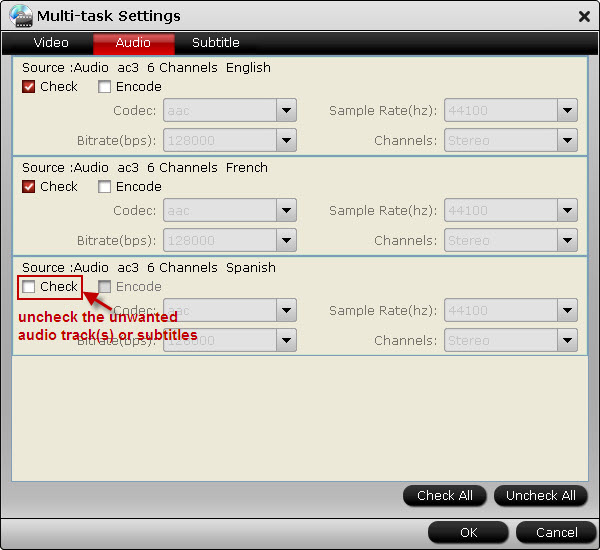
(Tips: If you want to keep multiple audio tracks and subtitle streams when ripping Blu-ray to MKV, MP4 and MOV, you can try to use Pavtube ByteCopy for Windows or Mac.) 

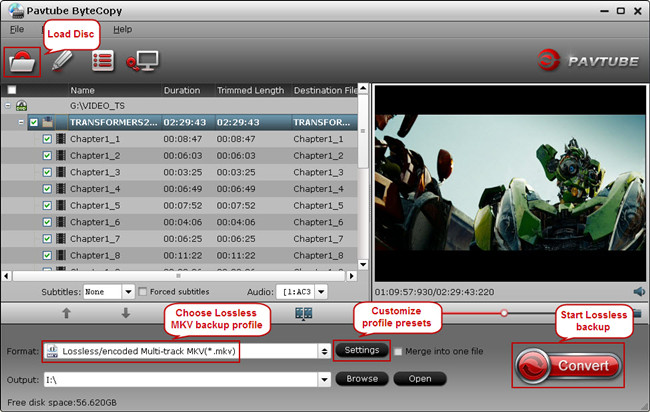
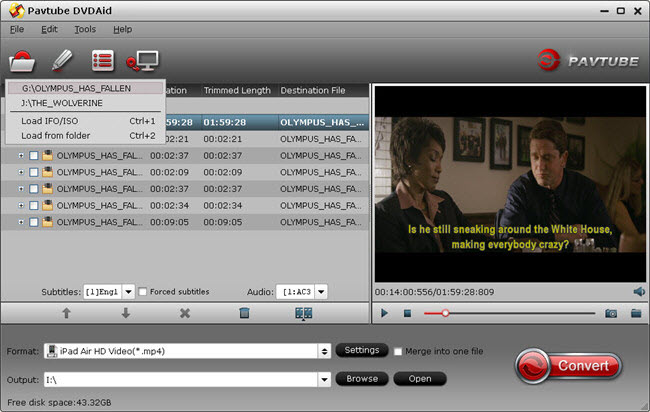
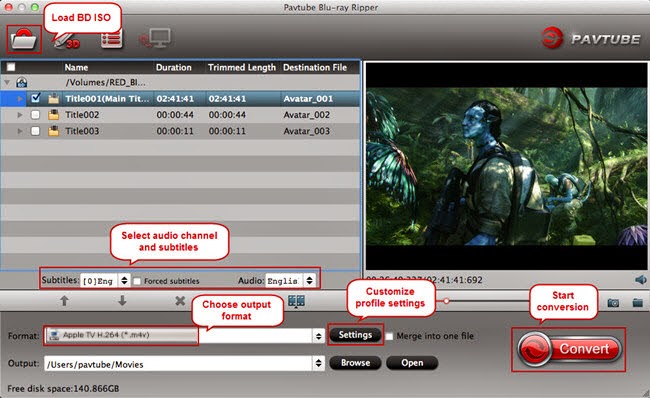
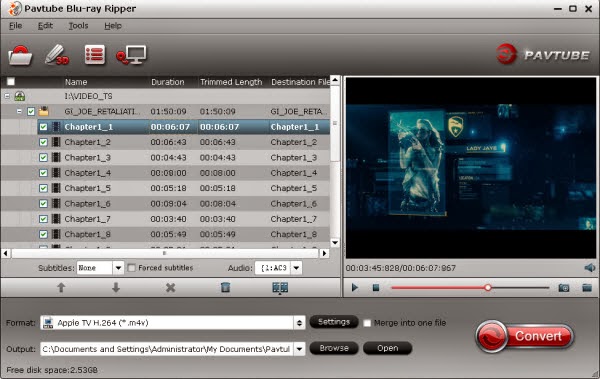
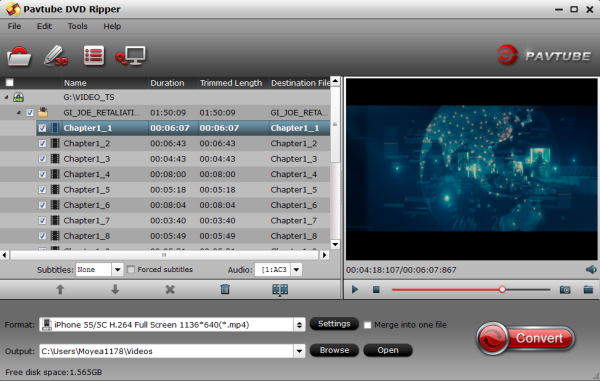
Step 1. Get this DVD to iPhone 5C/5S Converter installed and import DVD.

Click "Import DVD" to load disc from ROM, IFO/ISO or DVD folder. Pavtube DVD Ripper will detect and check the main title automatically; keep it as default unless you also want to convert the tidbits.


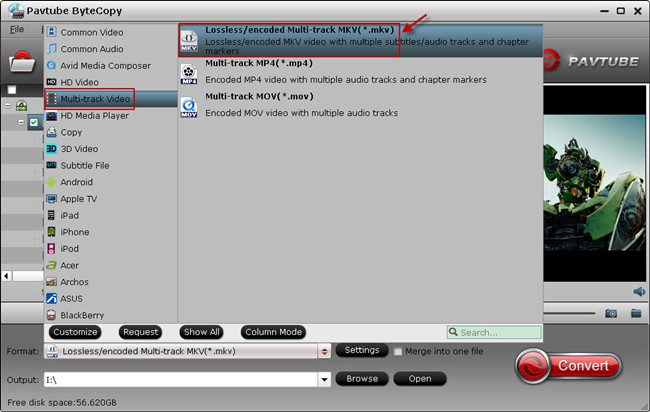
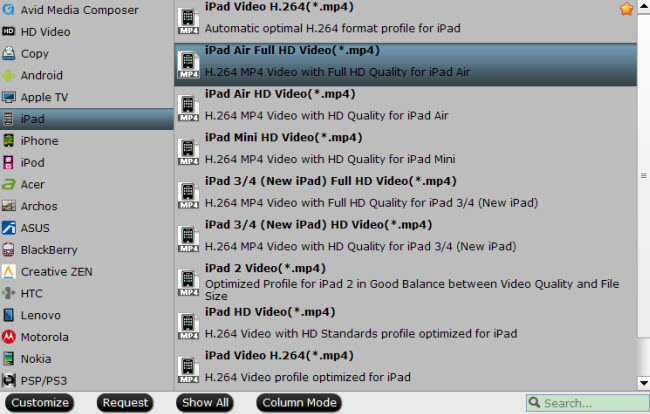
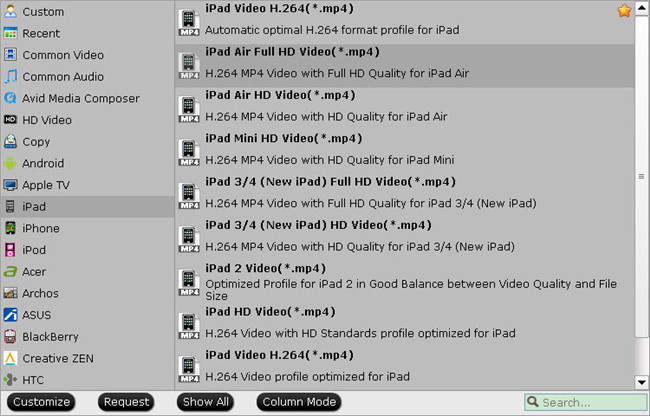
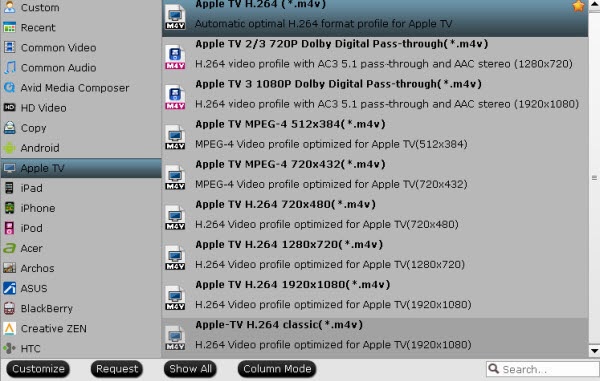
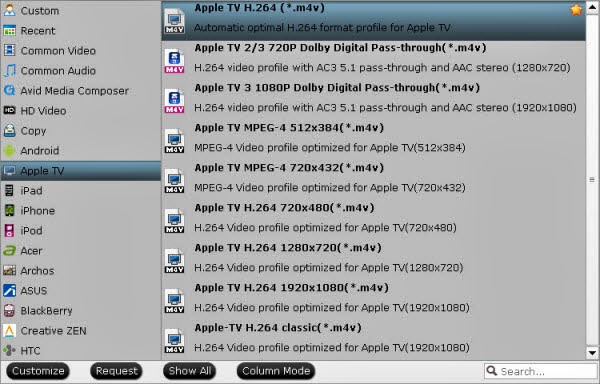
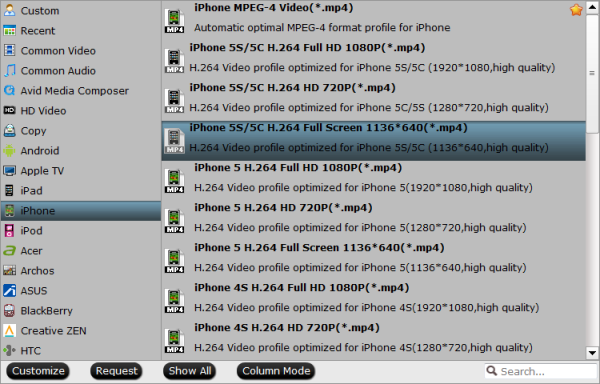
Step 2. Choose iPhone 5C/5S video format.

Click the drop-down list besides “Format”, select iPhone>iPhone 5S/5C H.264 HD 720P (*.mp4) or iPhone 5S/5C H.264 HD Full HD 1080P (*.mp4) or iPhone 5S/5C H.264 Full Screen 1136*640(*.mp4) as the best profile for iPhone 5S/5C. The output videos could fit on your device perfectly. To get the preset, you should also install the Patch in advance, but now only windows version have the patch file.


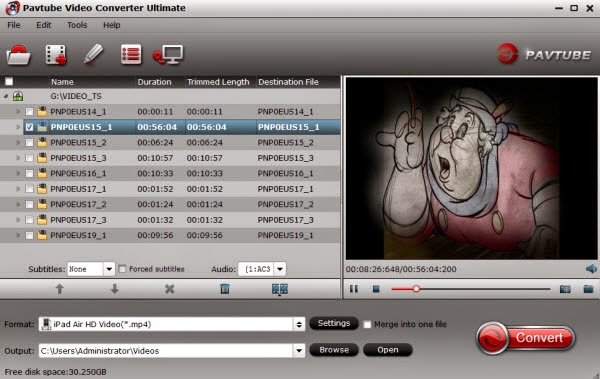
Step 3. Customize outputting video specs. (Optional)

You can click Settings bottom to adjust the output parameters including video codec, size, bitrate, framerate and sample rate(Hz).

Step 4. Start converting DVD to iPhone 5C/5S.

Click the red "Convert" to start converting DVD to MP4 for iPhone 5C/5S. After conversion, you can click "Open output folder" to quick location converted videos.

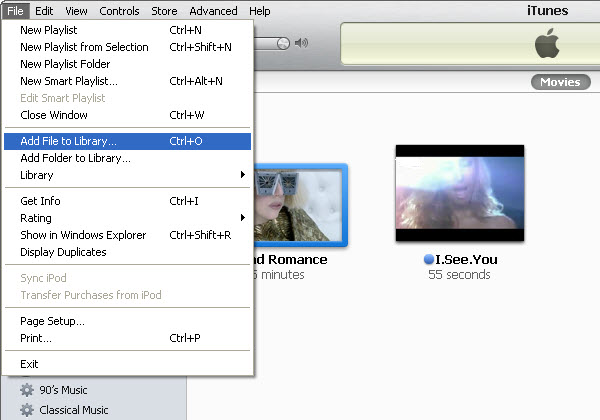
How to sync video, photo, music to iTunes on Windows/Mac?
How to sync media contents from iTunes to iPhone/iPad/iPod?
How to transfer videos, music, photos from PC to iPhone 5S? 

Related Articles: 

How to view MKV with DTS audio on iPhone 5C
Rip and Play DVD ISO/IFO on iPhone 5S/5C
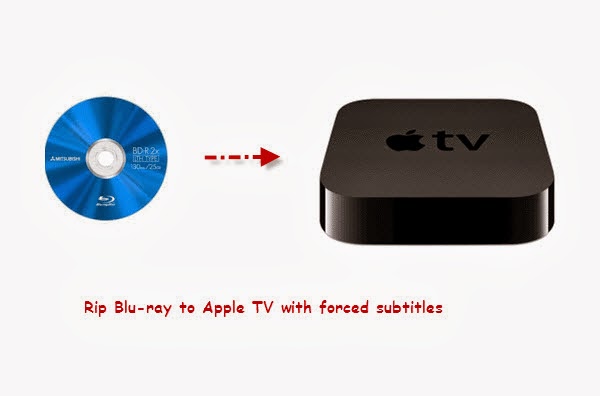
Enjoy 2D/3D Blu-ray movies on iPhone 5S with 3D effect on Mac 
Can I add and play DVD .vob videos on iPhone 5C & iPhone 5S Quickly

Sunday, November 10, 2013

2013 Thanksgiving Day Money-saving: Coupon for Samsung Galaxy series tablet Software Programs

Crazy Discount for Thanksgiving: Thanksgiving always brings us to thoughts of spending time with family and friends. It also gives us opportunity to get Thanksgiving Giveaways and purchase low-cost deals. To express sincere and gratitude to our old and new customers, Pavtube Studio offers "Buy One Get One Free" treats, freebies and up to "66% Off discount" sales during this special festival.

Offers valid from Nov.7 to Dec. 10, 2012. Never miss the chance to join the promotion to get the Crazy Discount for Thanksgiving from Pavtube to backup and copy Blu-ray/DVD and various formats of 1080p/720p videos to your Samsung Galaxy series tablet, Windows devices and iOS devices. Action Now!!!


Why Pick Up Pavtube Software for Samsung Galaxy series tablet

MKV, VOB, MTS, M2TS, TiVo and many other must be converted to .mp4 format before you're able to sync them to your Samsung Galaxy series and other gadgets like Windows 8 tablet and Apple devices. The Pavtube Galaxy Video Converter helps you do the conversion job.

2013 Thanksgiving Day Money-saving: Get Free, Up to 66% off, only $9.9 Gifts


Part 1. Thanksgiving Best Sellers - 20% ~ 30% off

1. Pavtube BDMagic - $34.3 (original $49)
Highlights: full disc copy; Directly Copy only main movie; rip any Blu-ray/DVD to various formats

2. Pavtube DVDAid - $24.5 (original $35)
Highlights: convert standard DVDs to MP4, MKV, AVI, MPEG, MOV, M4V for smartphones, tablets, HD media players and more

3. Pavtube Video Converter - $28 (original $35)
Highlights: transcode videos to virtually any video/audio format for editing and playback

4. Pavtube Video Converter Ultimate - $52 (original $65)
Highlights: combination of a Blu-ray ripper, a DVD ripper and a Video converter to meet your needs for Blu-ray, DVD and video conversion

Part 2. Thanksgiving Giveaway - Free Softwares

1. Pavtube Free DVD Ripper - a fun, easy and fabulous way to rip DVDs to various video formats with fast speed. Support adding SRT, ASS, SSA subtitles.

2. Pavtube Free Video DVD Converter Ultimate - provides with full Blu-ray, DVD and video solutions for your ultimate multimedia entertainment needs.

Part 3. Buy One Get One Free

1. Buy MTS/M2TS Converter – handle AVCHD MTS/M2TS footages in an easy way
Free Get FLV/F4V Converter - convert any YouTube or Hulu videos (FLV/F4V) for portable devices

2. Bug MXF Converter - encode MXF clips for editing and playback
Free Get MKV Converter – convert MKV media contents to Android, Windows and iOS devices

3. Bug HD Video Converter - get your camera videos and TiVo recordings onto editors and players
Free Get DVD Creator - burn any kind of video sources to playable DVD

Part 4. Thanksgiving Hot Deals - Only $9.9

1. Pavtube MKV Converter - select wanted subs/audio/video track from MKV to be kept in the output files
2. Pavtube FLV/F4V Converter – convert, trim, crop FLV or F4V to other formats
3. Pavtube TOD Converter - fast convert, compress, and edit TODs from JVC camcorders for any portable devices
4. Pavtube MOD Converter – stream, convert and edit MOD recordings shot by camcorders(JVC, Panasonic, Sony)

Part 5. Sharing at your Facebook page - Get more discount

1. 20% off ByteCopy (Windows/Mac)
2. 20% off MXF MultiMixer
3. 20% off iMixMXF

Click "Share on Facebook" button, insert "#PavtubeThanks2013", choose "Public", and click "Share Link". You will get another 20% coupon. The discounted link will be sent to your Facebook "Inbox" or "Other" within 24 hours on work days.

If don't receive message from strangers, please don't forget to contact us for the discounted link via faq@pavtube.com.


More Pavtube Thanksgiving Special Deals are available on Pavtube Thanksgiving page. Share this activity at your Facebook page and more discounts you can get.

Part 6. Hot Bundle Deals - Save Up to $35

ByteCopy($42) + Video Converter Ultimate($65) = Only $79.9, Save $27.1  
ByteCopy($42) + DVD Creater($35) = Only $44.9, Save $32.1  
ByteCopy($42) + Vidpie($29) = Only $54.9, Save $16.1 
ByteCopy($42) + MXF MultiMixer($45) = Only $69.9, Save $16.1 
Video Converter Ultimate($65) + Vidpie($29) = Only $74.9, Save $19.1 
Video Converter Ultimate($65) + DVD Creater($35) = Only $64.9, Save $35.1 
BDMagic($49) + Vidpie($29) = Only $49.9, Save $28.1 
BDMagic($49) + DVD Creator($35) = Only $49.9, Save $28.1 
DVDAid($35) + Vidpie($29) = Only $49.9, Save $14.1 
DVDAid($35) + DVD Creator($35) = Only $35.9, Save $34.1 

Friday, November 8, 2013

Rip and Store Blu-ray movies to external hard drive for Roku 3

If you are wondering how to backup Blu-ray movies to external hard drive for streaming to Roku 3, this article shows you exactly how to make it work.

For anyone new to the Roku world, I would recommend the Roku 3 over any other previous models mainly on it being so much faster to operate. The streaming superstar. With up to 1080p HD video and extended-range, dual-band wireless performance, the Roku 3 takes streaming to the next level. You can freely enjoy your own media on Roku 3.


Now I want to rip and store movies on an external hard drive and then plug my external hard drive in my Roku 3 and use Roksbox app. So Google ”Best Blu-ray Ripping Software” to backup my Blu-ray movies to external hard drive for Roku 3 playback initially. Then I find these links from google:

I tried MakeMKV but had issues. Had been using Leawo that was a Giveaway of the Day several months back. Lost the free license when upgraded from Win7 to Win 8. Preliminary tests with PavTube went smoothly. With this top Blu-ray to MKV Converter - Pavtube ByteCopy, I can easily lossless copy your Blu-ray collections to MKV with all subtitles and original audio track for future usage like disc burning. Meanwhile, this app equips with all features other BD ripping tools do so that I can rip your BD/DVD movies to any other video and audio format you like and do simple video editing here. (Top Blu-ray Copying & Ripping Review)

To help others who has the similar issures with preparing Blu-ray videos for playback on Roku 3? Here I will share a workaround to backup Blu-ray to MKV on external hard drive.

Step 1. Load Blu-ray movie.

Get ready to insert your Blu-ray disc to disc drive, click this "Load Disc" button to browser to disc drive and import the disc. Or you could load BD folder and BD ISO from computer hard drive to this best Blu-ray to MKV Converter.


Step 2. Choose suitable output format.

Pavtubr ByteCopy offers an special category for users who would like to keep multiple audio tracks and subtitles in saved Lossless MKV file. Just select Multi-track Video > Lossless/encoded Multi-track MKV(*.MKV) for output. In this way the original audio tracks are streamed without transcoding from source BD Disc to saved MKV file.


Step 3. Adjust profile presets (Optional).

You are allowed to customize profile presets as you like, you could remove unwanted audio track in Audio tab under Settings menu, and uncheck subtitles you do not need in Subtitles tab.


Step 4. Start ripping.

Save all your settings, and back to ByteCopy main interface, hit the "Convert" button to start backuping Blu-ray movies to external hard drive. When the lossless backup completes, you would get a single large MKV file saved in output file destination. And you could stream copied  MKV movie to your Roku 3 for watching.

Read more:

Tuesday, November 5, 2013

How to play 1080P/720P HD Videos and Movies on iPad Air

Follow this simple tutorial to learn how to convert and play 1080P/720P HD Videos and Movies in MKV, AVI, VOB, WMV, MPG, Tivo, MTS, M4V, Flash format on iPad Air without format limitations.
The iPad Air is the company's new flagship full-sized tablet. Apple billed it as the thinnest, lightest and most powerful iPad yet. The new model packs the same 9.7-inch retina screen into an enclosure that is 20 percent thinner on the sides and the bezel and whose weight has dropped to 1 pound from 1.4 pounds. It sports a top-of-the-line A7 processor.


With those features mentioned, you will have great video experience for watching videos on iPad Air. However, if you have a glance on the main spec of iPad Air, it's easy to find that IOS handset's video format is limited as other tablets. Thus, if you wanna watch more 1080p/720p movies on your iPad Air, first you need to convert the videos like MKV, AVI, VOB, WMV, MPG, Tivo, MTS, M4V, Flash etc. to iPad Air compatible video formats like the H.264 encoded MP4 and then transfer them to your device for playback.

In order to successfully play MKV, AVI, VOB, WMV, MPG, Tivo, MTS, M4V, Flash and more video files on iPad Air, you can just get Pavtube Video Converter for iPad Air, an ideal tool to convert almost any video to iPad Air highly compatible video files. Supporting multithreading and batch conversion, this program works perfectly on converting standard video formats and HD video formats to all regular video formats like MP4, MOV, MKV, FLV, AVI, WMV, MPG, ASF, etc. with smart video editing features. The audio/video synchronization is very good, the size of the subtitles too. The time it takes to convert in this software is almost half that in other.

The equivalent Mac version is Pavtube iMedia Converter for Mac. Just download the right version and follow the below guide.

(All the programs above are 20% off now at Pavtube Halloween Huge Discount).

How to Convert MKV, AVI, VOB, WMV, MPG, Tivo, MTS, M4V, Flash to iPad Air supported video files

Note: The quick start guide below uses Video Converter Windows screenshots. The way to encode video files to iPad Air on Mac is almost the same. Just make sure you get the right version according to your computer operating system.

1. Install and Launch the best iPad Air Video Converter, click "Add Video" icon to import source Video files. Batch conversion is supported so that you can add multiple files to convert at a time.


Step 2. Choose a proper format for iPad Air.

Click "Format" drop-down list and choose "iPad>iPad Air Full HD Video(*.mp4)" as the compatible MP4 preset with best video quality. Or you can choose other presets if you don't need full size videos. To get this profile, you need to download profile patch for your new iPad Air at first. It is available on Windows platform, if you are Mac users, you can refer to the profile settings.


Step 3. Customize video specs for iPad Air (Optional).

You could also click the "Settings" to adjust the video and audio parameters of output files.

In the Video Settings, you can select Encoder, Frame Rate, Resolution (you could define it yourself according to your iPad Air tablet) and Bitrate for your movie.

In the Audio Settings, you can select Encoder, Channels, Bitrate and Sample Rate for your movie.

Step 4. Start Videos to iPad Air Conversion.

You can hit the big red "Convert" to start converting 1080P/720P HD Videos and Movies to MP4 with best video settings for iPad Air. After the conversion, click "Open output folder" in the conversion window, or "Open" in main interface to quick locate the converted video.

Now, you can transfer MKV, AVI, VOB, WMV, MPG, Tivo, MTS, M4V, Flash videos to iPad Air for smooth playback without any problem. Enjoy your digital life!

Related Articles:

Monday, November 4, 2013

DVD to iPad Air : Copy/Transfer DVD Movies For Playback on iPad Air

This simple tutorial mainly shows you how to convert and rip DVDs to iPad Air supported video formats so that you can play DVD movies on Apple iPad Air anytime, anywhere.
Apple finally released the fifth-generation tablet iPad Air alongside the iPad Mini 2 with Retian Display on October 22, 2013, just weeks after the sensational iPhone 5S and iPhone 5C launch event. This time iPad Air is slimmer and narrower than its brothers, while remaining the existing 9.7-inch screen size. With that in mind, it is tempting to get this glamorous gadget for watching DVD movies and videos on its HD retina display.

However, iPad Air doesn't have a built-in DVD-ROM or DVD player. If you have some DVD movie collections and want to enjoy DVD movies on the iPad Air, you need to convert DVD to iPad Air accepted videos on computer as your first move along with some help from third-party softwares. To help those who wanna get DVD movies off of DVDs and onto iPad Air for playback, below, I would throw a quick tutorial up.

As mentioned above, in order to download and put DVD movies to iPad Air, we need use a 3rd-party tool to rip DVD movies to iPad Air compatible video formats such as MP4, AVI etc. DVD Ripping software varies. You may confused about choosing a suitable tool. If so, I recommend you try Pavtube DVD to iPad Air Converter (Alternative Mac version of DVD to iPad Air Converter). It is easy to use for editing and conversion and makes great quality copies of my DVDs.

To be honest, Pavtube DVD Ripper can help you rip and convert all the DVD discs even DVD ISO/IFO image files. Besides, the audio/video synchronization is very good, the size of the subtitles too. If you have any requirements of outputting 3D (Anaglyph, T/P, SBS) or keeping multiple audio tracks/subtitles, you are suggested to try this Blu-ray/DVD to iPad Air Converter Pro. Below is how.

A Simple guide: How to convert DVD movies to iPad Air compatible video formats

Note: The quick start guide below uses DVD Ripper Windows screenshots. The way to rip DVD movies to iPad Air on Mac is almost the same. Just make sure you get the right version according to your computer operating system.

1. Run this Pavtube DVD Ripper as the best DVD to iPad Air Converter; load disc.

Click the top left icon, you can choose to import DVD from ROM, DVD folder or DVD ISO/IFO. It will check the main title by default; moreover, ISO files could also be recognized automatically so that you no longer need to run virtual drive to mount it.


2. Choose format.

Click "Format" drop-down list and choose "iPad>iPad Air Full HD Video(*.mp4)" as the compatible MP4 preset with best video quality. Or you can choose other presets if you don't need full size videos. To get the customized profile, you'll need to download a patch here;


3. Start Conversion.

You can hit the big red "Convert" to start converting DVD to iPad Air MP4 with best video settings. After the conversion, click "Open output folder" in the conversion window, or "Open" in main interface to quick locate the converted video.

After getting the converted movies files, you can transfer them to new iPad Air via iTunes. If you don't know how to put and play movie onto new iPad Air , just follow the steps to realize it:

1) Make sure you have install iTunes. If not, you can free download iTunes here at first. And launch the iTunes.
2) Connect iPad Air to Mac/PC.
3) Choose "File –> Add File to Library…"
4) Drag the .mp4 file you want to the iPad Air icon

So there you have it. Prette simple. Now, you can enjoy and view DVD movies on iPad Air anytime everywhere for great digital fun.

Additonal Tips:

If your movie isn't already in one of the iPad Air supported formats or it's still on a DVD or a Blu-ray, you can get the Video Converter Ultimate or the iMedia Converter Mac) which can help you convert Blu-ray/DVD/ISO/IFO and various formats of 720p/1080p HD videos in MKV, AVI, TiVo, VOB, MPG, MTS, etc. to your iPad Air, iPhone 5C, iPhone 5S, iPad 3, iPod 5, Apple TV 3 and other iOS/Android/Windows 8 tablets/phones for smoothly playing.

Related Articles:

Sunday, October 27, 2013

Mac solution: Get Blu-ray movies to Apple TV 3 for wathing

This article shows you the complete guide and easy solution to convert and import Blu-ray movies to Apple TV 3 or future Apple TV 4 on your Mac (including  Mountain Lion 10.8).


Hello. I am in the process of purchasing a Blu Ray drive to use with my desktop Mac and will be purchasing a software program for converting my Blu Rays . I wish to play them on my Apple TV3 and the future AppleTV4. Will these blu rays be stored in the Home Video of ITunes ? Also when do I need to have external hard drive storage for my collections.? I have a 10.8 Mountain Lion 27" IMac. Thanks and looking forward to getting started. 


2013 Halloween is coming and you may have got some horror blu-ray movies like Insidious,The Omen,The Cabin in the Woods,The Evil Dead,Battle Royale,Candyman,Nosferatu,a Symphony of Horror,Psycho, Antichrist, etc. So how to get these blu-ray collection onto Apple TV 3 for watching as the above user asked.

As you know, Blu-ray disc or even the decrypted Blu-ray rips can’t be supported by Apple TV 3. The best solution is to rip and convert Blu-ray to iTunes compatible format then sync to ATV 3 for playback without any limit. Follow the guide below rip Blu-rays to Full HD 1080p MP4 files  for viewing on Apple TV 3 on Mac.

System Requirements for ripping Blu-ray to iTunes and streaming  to Apple TV on Mac

* Mac OS X 10.5/10.6/10.7/10.8
* Compatible Blu-ray Disc Drive
* Pavtube BDMagic for Mac (now is 30% off at Pavtube Halloween promotion)
* 2.4 Ghz Intel Core 2 Duo or faster processor
* At least 2 GB of RAM
* iTunes 10.6 or later
* A video driver that supports HDCP for Windows PC
* A display that supports HDCP with a screen resolution of 1280 x 800 or higher
* Apple TV 3rd generation

Step-by-step guide for ripping Blu-ray movies for Apple TV 3 on Mac

1. Make sure your Blu-ray Disc drive is well connected with computer, and put a source Blu-ray Disc to the BD drive. Mac is lacking of Blu-ray support and you need to add an external BD drive that is compatible with Mac.

2. Have BDMagic installed on your computer. And free download Pavtube Blu-ray Ripper for Mac.


If you are windows users, read my old post how to rip Blu-ray to Apple TV.

3. Run the 30% off Mac Blu-ray to Apple TV 3 Converter. Press "Load Disc" icon to import Blu-ray movie. The software requires network connection to decrypt Blu-ray so keep your network wired.

4. Select main movie from file list, and set subtitles and audio language for export.

5. Set iTunes/Apple TV 3 compatible format from the drop-down list of "Format". Choose "Apple TV H.264 (*.m4v)" works well in iTunes/Apple TV 3. Both encode Blu-rays to H.264 MP4 with higher bit rate and exports better quality than iTunes movie downloads.


6. Press "Convert" to get Blu-ray Ripper start compressing Blu-ray to Apple TV 3 friendly videos.

7. When conversion completes, press "Open" to find compressed .m4v movie and add it to iTunes movie store. Open up iTunes and follow "File>> Add file to Library…" to sync ripped Blu-ray movie to iTunes.


Now you can enjoy the Blu-ray movie with iTunes freely and stream the Blu-ray movie to Apple TV 3.

Apple TV 3 Related Articles:

Watch 2014 FIFA World Cup matches on iPad, iPhone, and other portable devices 
How to Watch Instructional DVDs on iPhone/iPad/iPod? 
No 5.1 Audio When Connecting Apple TV to Surround Sound System? Solved! 
Ripping Blu-Ray on iMac and Stream 1080p on Apple TV 3 with Dolby 5.1

Wednesday, October 16, 2013

Rip your Blu-ray collection for Apple TV with forced subtitles

Want to make Blu-ray portable on Apple devices with preserving forced subtitles? This article mainly introduces the way to put Blu-ray on Apple TV with forced subtitles.
We like surfing, email, ebay, remote work, reading, watching movies on our IOS devices iPad2, iPad3, iPad mini, and also on Apple TV. Now I have Blu-Ray which I wanted to view via my AppleTV and store on my media drives. I hope to be able to set Forced subtitles, and write directly out to Apple TV format. Is there any way?

Indeed, you can not play Blu-rays directly on your Apple devices like Apple TV. To make Blu-ray portable with Apple TV, the answer is to rip Blu-ray to Apple TV compatible videos so you can transfer them for smoothly playback.


What's more, some Blu-ray contains the unknown language like Avatar and you cannot understand it without subtitles. So how to keep the subtitles for full Blu-ray enjoyment on Apple TV? In this case, Pavtube BDMagic is the ideal software to you. It will help to rip and convert Blu-ray to Apple TV friendly MP4 format with fast speed and high video quality. Moreover, you can choose the desired subtitle for output and select forced subtitles for some unknown languages. Now let's go to learn how to do it.


How to convert Blu-ray to for Apple TV with forced subtitles?

Get your Blu-ray drive ready and insert Blu-ray you need to the drive. And keep networked when ripping Blu-ray.

Tips: If you are running on Mac, please try BDMagic for Mac.

Step 1. Load Blu-ray to Blu-ray to Apple TV Converter.

Run the best Blu-ray to Apple TV Converter, click "Load file" button to select the inserted Blu-ray and import it for transferring to iTunes. It will take only few seconds to rip Blu-ray. Then the software will recognize the actual main title of Blu-ray and pick it automatically. You do not need to look for the main title manually.

Press the selected main title you can preview the whole Blu-ray movies on the preview window on the right, which works like a media player.


Step 2. Check forced subtitles for output.

Because Blu-ray always contains multiple subtitle and audio tracks, you can go to choose the desired subtitle and audio on the interface for output.

Beside subtitles option, "Forced subtitle" is optional and uncheck by default. Go to check "Forced subtitles" for output. Take note that it will output forced subtitles only if it is checked.

Step 3. Choose Apple TV compatible format.

Choose "Format" dropdown list and go to "Apple TV" options to find "Apple TV H.264 (*.m4v)". This format is best for playing on Apple TV.


Tips: For some advances users, you can go to adjust video and audio parameters like bitrate, resolution, channels, etc. Click "Settings" button you can go to check and change them as you like.

Step 4. Convert Blu-ray to Apple TV.

Before conversion you can go to "Browse" your computer to find the folder for output files. Then click "Convert" button to get Blu-ray to Apple TV conversion started. After a while, you can find the generated file for Apple TV quickly via "Open" button. In this way, you can enjoy your favorite Blu-ray with forced subtitles on your Apple TV wherever you are.

Related articles: