Friday, November 3, 2017

Roku/Plex Not Passthrough DTS-HD MA Audio

The condition is that you have an audio receiver that supports for DTS-HD MA audio, to get the best audio quality, you may wish that both Roku/Plex would passthrough that audio codec to your receiver. However, the condition is that neither Roku not recognize that audio codec, and therefore force the Plex Media Server to transcode the DTS-HD MA to PCM audio format.

Roku supported audio formats

After searching for Roku supported file formats, we can see that Roku can handle various type of audio formats including AAC, MP3, WMA, FLAC, PCM, AC3/EAC3, DTS, ALAC. Unfortunately, the 7.1 surround sound including Dolby Digital DTS-HD MA and TrueHD is not supported by Roku. Therefore, when you try to stream the DTS-HD MA on Roku via Plex, the Plex Media Server will try to transocode the DTS-HD MA audio to PCM audio.

Transcode DTS-HD MA to Roku Dolby Digital AC3

Since you can't direct passthrough DTS-HD MA via Roku/Plex and also unwilling to let Plex to transcode the audio codec to PCM. You can still keep the 5.1 surround sound by converting DTS-HD MA to Roku compatible Dolby Digital AC3 or DTS audio. Here, you can get the job easily done by downloading Pavtube Video Converter. The program has perfect importing support for the 7.1 surround sound DTS-HD MA and also TrueHD audio. Thanks to its batch conversion mode, you can batch import multiple audio into the application at one time for conversion to save your precious time.

Related article: Stream Divx Xvid AVI to Roku | Stream H.265 4K to Roku | Stream Media to TV via Roku

With this powerful yet simple to use application, you can easily generate both Roku and Plex compatible 5.1 surround sound Dolby Digital (AC3) or DTS audio with perfect quality and super fast encoding speed. To get the best audio quality, you can flexibly adjust output audio profile setting including audio bit rate, sample rate, channels, etc according to your own needs.

Pavtube Video Converter is available on available on Windows 10, 8.1, 8 and 7, it is also accompanied by an up-to-date Mac version - Pavtube Video Converter for Mac to assist you to perform the conversion on macOS High Sierra, macOS Sierra, Mac OS X El Capitan, Mac OS X Yosemite and Mac OS X Mavericks.

Step by Step to Transcode DTS-HD MA for Roku/Plex Passthrough

Step 1: Load DTS-HD MA audio into the application.

Download the free trial version of the program. Launch it on your computer. Click "File" menu and select "Add Video/Audio" or click the "Add Video" button on the top tool bar to import the DTS-HD MA audio files into the program.

Load DTS-HD MA audio

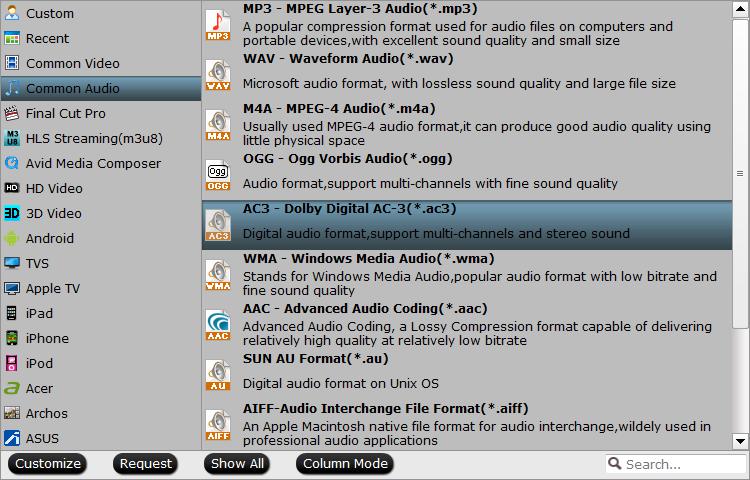
Step 2: Define the output format.

Clicking the Format bar, from its drop-down list, select Roku/Plex supported passthrough 5.1 surround sound format "AC3 - Dolby Digital AC-3 (*.ac3)" under "Common Audio" main category.

Output Roku/Plex supported AC3 audio formats

Tips: Click "Settings" on the main interface to open "Profile Settings" window, here, you can flexibly adjust the output audio profile parameters including audio codec, bit rate, sample rate, channels, etc as you like to get better output audio quality.

Step 3: Start the final conversion process.

After setting is completed, hit the "Convert" button at the right bottom of the main interface to begin the conversion process from DTS-HD MA to Roku/Plex passthrough Dolby Digital AC3 format.

After the conversion, you can click "Open output folder" to popup output directory with the converted audio files to passthrough to audio receivers from Roku via Plex.

Friday, October 27, 2017

Workflow of DJI Zenmuse X7 4K Video with Avid

DJI just made another huge splash in the industry with the official announcement of the brand new Zenmuse X7 for the DJI Inspire 2 drone aiming to redefine aerial imaging technology once again. The device is capable of capturing DCI 4K at 30 fps, and UHD 4K at 60 fps in Cinema-DNG format; it also supports DCI and UHD 4K in ProRes and H.265/H.264. For those people who wish to make creative editorial with DJI Zenmuse X7 4K video, Avid Media Composer can be your professional choice. The following article will show you how to get a smooth workflow of Zenmuse X7 4K video with Avid Media Composer.

Can Avid handle all DJI Zenmuse X7 4K video?

From Avid Media Composer supported file formats, we can see this professional editing software only supports to handle the DCI and UHD 4K H.264 video recorded with DJI Zenmuse X7 4K video, however, you will fail to direct import other 4K video including Prores, H.265 and Cinema-DNG format into Avid Media Composer. In addition, as Avid's system requirements for 4K editing at quite high. You should have a dual 10 core Xeon system as an "entry level" 4K editing suite and ideally a faster computer for more 4K editing. It would be much ideal for you to compress 4K to 1080p for smooth editing.

Transcode DJI Zenmse X7 4K for Avid Media Composer

To fix the codec incompatible issue, you can download a third-party video conversion app called Pavtube Video Converter for Mac to decode the unsupported 4K codec including H.265/Prores/Cinema-DNG to Avid Media Composer most favorable 1080p DNxHD codec. The program supports batch conversion mode, so that you can load multiple DJI Zenmuse X7 4K video into the application for conversion at one time.

Besides that, you can also flexibly adjust output profile parameters such as video codec, resolution, bit rate, frame rate, audio codec, bit rate, sample rate, channels, etc as you like to get better output video and audio quality.

For Windows users, please switch to download Pavtube Video Converter to complete the conversion on Windows 10/8.1/8/7.

How to Transcode and Compress Zenmuse X7 4K to 1080P DNxHD for Avid?

Step 1: Import DJI Zenmuse X7 4K videos.

From "File" drop-down option, select "add Video/Audio"to add DJI Zenmuse X7 4K Prores/H.264/H.265/Cinema-DNG 4K files into the program.

Load DJI Zenmuse X7 4K video

Step 2: Choose output file format.

From "Format" drop-down option, choose Avid Media Composer best editing codec by selecting "Avid Media Composer..." > "Avid DNxHD(*.mov)".

Output Avid best favorable DNxHD codec

Step 3: Start the conversion process.

After all the settings is over, go back to the main interface and hit right-bottom "Convert" button to start to convert Zenmuse X7 4K video to Avid Media Composer best compatible 1080p DNxHD Codec editing format.

When the conversion is completed, launch Avid Media Composer on your Mac computer to import converted video to Avid Media Composer for smooth editing workflow on either fast or slow computer.

Friday, October 20, 2017

Import Canon XF400/XF405 4K Video to Avid Media Composer

Canon's new XF400 and XF405 UHD 4K camcorders supports to record 4K video at up to 60p in MP4 format with MPEG-4 AVC/H.264 compression codec. When the shooting work is completed, for Avid Media Composer users, you may come the need to load the Canon XF400/XF405 4K video into Avid for some professional post editing workflow. Have more interest, just read on...

Can Avid handle 4K resolution video?

Avid's has enhanced the ability to edit at resolutions up to 4K to Media Composer 8.31. But all previous version, including version 8, can only edit at up to HD resolutions. In addition, Avid's system requirements for 4K editing at quite high. You should have a dual 10 core Xeon system as an "entry level" 4K editing suite and ideally a faster computer for more 4K editing.

Best workflow of XF400/XF405 4K with Avid Media Composer

For users who are still using Avid Media Composer 7/8 or previous version which can't handle 4K resolution video or if your computer doesn't meet the standards to edit 4K video, we highly recommended you to compress XF400/XF405 to Avid Media Composer most favorable 1080p DNxHD codec.

Here, you can get the job easily done by downloading Pavtube Video Converter for Mac, which has perfect importing support for the 4K H.264 video produced by Canon XF400/XF405 video. Thanks to its batch conversion mode, you can import multiple Canon XF400/XF405 4K video into the application at one time for conversion to save your precious time. With the program, you can efficiently produce Avid Media Composer most favorable 1080p DNxHD codec with perfect quality and super fast encoding speed.

For Mac users, please switch to download Pavtube Video Converter to complete the conversion on Windows 10/8.1/8/7.

Step by Step to Transcoded Canon XF400/XF405 4K to DNxHD for Avid Editing

Step 1: Import Canon XF400/XF405 4K videos.

From "File" drop-down option, select "add Video/Audio"to add Canon XF400/XF405 4K H.264 MP4 video files into the program.

Load Canon XF400/XF405 video

Step 2: Choose output file format.

From "Format" drop-down option, choose Avid Media Composer best editing codec by selecting "Avid Media Composer..." > "Avid DNxHD(*.mov)".

Output Avid Media Composer best compatible editing codec

Step 3: Start the conversion process.

After all the settings is over, go back to the main interface and hit right-bottom "Convert" button to start to convert Canon XF400/XF405 4K video to Avid Media Composer best compatible DNxHD Codec editing format.

When the conversion is completed, launch Avid Media Composer on your Mac computer to import converted video to Avid Media Composer for smooth editing workflow on either fast or slow computer.

Friday, October 13, 2017

Play H.265 on iPhone 8/8 Plus

For movie enthusiasts who have just got the new iPhone 8/8 Plus, one of the great exciting feature or function offered by those new smartphone is that Apple has included H.265/HEVC playback support on them. A lot of Apple fans may wonder is it possible to play all H.265/HEVC video shot with iPhone 8/8 Plus, downloaded from online sites or recorded with cameras. Have more interest, just read on...

Which H.265 source can be played on iPhone 8/8 Plus?

The fact is that you will have no problem to play H.265/HEVC video shot with the built-in camera app of iPhone 8/8 Plus. However, as for H.265/HEVC video comes from other sources such as downloaded from 4K streaming sites or shot with Samsung/DJI camera, you will even fail to transfer them to iPhone 8/8 Plus, not to mention to view them with the built-in video player app on iPhone 8/8 Plus. The main reason is that currently iTunes lacks the ability to sync H.265/HEVC video to iPhone.

Convert H.265 for iPhone 8/8 Plus viewing

Since you can sync H.265 files to iPhone 8/8 Plus via iTunes, therefore, to get H.265 files from other sources played on iPhone 8/8 Plus, the most effective solution is transcoding H.265 to H.264 for syning from iTunes to iPhone 8/8 Plus. Here, you can get the job easily done with our best H.265 Decoder software, Pavtube Video Converter, which can assist you to complete the following jobs:
- 6x faster H.264 codec encoding speed under the Nvidia CUDA or AMP APP technology
- Support for both 4K/HD H.265 codec wrapped with either MP4 or MKV container format
- Batch load multiple H.265 video for conversion at one time
- Customize output profile parameters to get better output video and audio quality
- Further edit H.265 video to reduce video length, crop black borders, adding watermark, etc

For Mac users, please go to download Pavtube Video Converter for Mac to perform the conversion on macOS High Sierra, macOS Sierra, Mac OS X El Capitan, Mac OS X Yosemite, Mac OS X Mavericks.

Step by Step to Decode H.265 to H.264 for iPhone 8/8 Plus Viewing

Step 1: Add H265 HEVC Files.

Load HEVC files via "File" > "Load Video/Audio" or "Load from Folder" button or just drag and drop H265 files to this top H.265 Converter application.

Add H265 HEVC Files

Step 2: Choose H264 as Output Format.

Clicking the Format bar, from its drop-down list, select one of your desired H.264 file format to output. Here, we highly recommend you to choose the "H.264 HD Video(*.mp4)" under "HD Video" main category.

Output H.264 HD format

Step 3: Start to Convert HEVC to H264.

Press "Convert" button and this H265 video converter will begin to HEVC/H265 to H264 on computer. After the HEVC to H264 conversion is over, you can eventually transfer HEVC to iPhone 8/8 Plus/6s/SE/6/5s via iTunes for smooth playback.