Friday, January 26, 2018

Import/Edit DJI Osmo+ 4K to Avid

The Osmo+ features a 4K camera capable of capturing DCI 4K (4096 x 2160) resolution at 24/25 fps, Ultra HD 4K (3840 x 2160) at up to 30 fps in either MP4 or MOV container file format with MPEG-4 AVC/H.264 compression codec. Wish to load DJI Osmo+ 4K to Avid Media Composer for some professional post editing workflow after the shooting stage, but have no idea how to get a high quality and high performance editing workflow, just read on...

Can Avid Media Composer handle 4K video?

Only the Media Composer 8.31 can edit 4K resolutions. It also means that you will get no success to edit 4K video with the previous version. In addition, Avid's system requirements for 4K editing are quite high. You should have a dual 10 core Xeon system as an "entry level" 4K editing suite and a faster computer for more 4K editing. For those people who wish to get the best editing workflow of 4K with Avid, it would be much ideal for you to use Avid's own 4K codec - DNxHR, which can perfectly handle 4K file sizes. Alternatively, you can choose to edit with the Proxy modes, which helps to drop your footage to a resolution which your system can cope with.

Best workflow of Osmo+ 4K with Avid Media Composer

The computer that you currently may not meet the high requirements for Avid Media Composer to edit 4K resolution video. And it seems impossible for you to buy a powerful computer immediately, therefore, the best solution is to compress 4K to 1080p with small file resolution so that you can get a smooth post editing workflow even if your computer is a little old or slow. Here, we highly recommend you to use the DNxHD codec, a lossy high-definition video post-production codec developed by Avid for creating mastering-quality media with reduced storage and bandwidth requirements.

Transcode and compress Osmo+ 4K to Avid 1080p DNxHD codec

If you are looking for a powerful yet simple to use application, we highly recommend you to download Pavtube Video Converter for Mac, a powerful 4K Video Converter with perfect importing support for Osmo+ 4K H.264 MOV and MP4 files. The program supports batch conversion mode, so that you can load multiple Osmo+ 4K video into the application for conversion at one time. With just few clicks, you can then efficiently transcode Osmo+ 4K to Avid Media Composer most favorable 1080p DNxHD codec with remarkable quality and fast conversion speed.

For your great convenience, Pavtube Video Converter for Mac also accompanied with an up-to-date Windows version - Pavtube Video Converter for Windows 10/8.1/8/7.

Step by Step to Convert and Compress Panasonic GH5 4K to Avid Media Composer

Step 1: Load Osmo+ 4K video.

Download the free trial version of the program. Launch it on your computer. Click "File" menu and select "Add Video/Audio" or click the "Add Video" button on the top tool bar to import Panasonic GH5 4K video files into the program.

Load DJI Osmo+ 4K

Step 2: Define the output format.

Clicking the Format bar, from its drop-down list, select Avid Media Composer best compatible editing codec "Avid DNxHD(*.mov)" under "Avid Media Composer" main category.
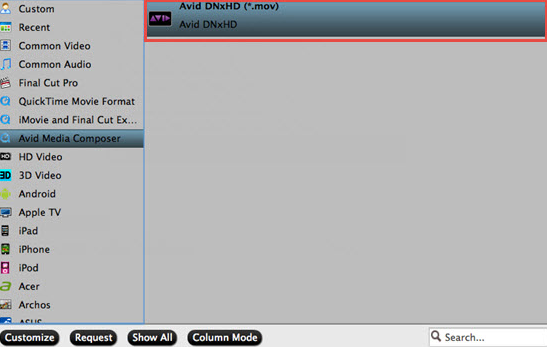
Define the output format

Step 3: Compress 4K to 1080p.

Click "Settings" on the main interface to open "Profile Settings" window, from "Size(pix)" drop-down list, choose "1980*1020" or "1020*720" to compress 4K to 1080p or 720p for smooth editing workflow with Avid on old or slow computer.

Step 4: Begin the conversion process.

After all setting is completed, hit the "Convert" button at the right bottom of the main interface to begin the conversion process from Osmo+ 4K to Avid Media Composer 1080p DNxHD codec.

When the conversion is finished, click "Open Output Folder" icon on the main interface to open the folder with generated files. Then you can get a smooth workflow of Osmo+ 4K with Avid Media Composer.

Thursday, January 18, 2018

Burn Final Cut Pro Project to DVD

Have shot many great video with your camera, camcorder, after loading them into Final Cut Pro for some professional post-production workflow, to better share the completed project with your friends or family members, you may come the idea to burn the Final Cut Pro project to DVD disc. The following article will show you the simple steps to burn DVD disc from Final Cut Pro project with the right DVD disc burning software.

Right software to burn Final Cut Pro project to DVD disc

Pavtube DVD Creator is an ideal tool to burn Final Cut Pro video files to DVD with ease. It features a simple wizard-style interface with powerful editing features. Apart from Final Cut Project, it can also import other common video formats such as MKV, AVI, MP4 WMV, MOV, MTS, Tivo, etc.

To assist you to create a delicate DVD disc with great look, the program offers rich menu features including changing the changing the DVD menu template/style, menu text, display aspect ratio and background for the DVD menu. You can also set the chapter mark and playback mode.

Related article: Burn Canon HD Video to DVD | Burn iTunes Video to DVD | Burn Halloweens Video to DVD

Apart from the menu customization options, you can also edit your source Final Cut Pro project by trimming, cropping, adding watermark, settings effect, adjusting volume and replacing audio. The program offers quick disc burning, you can fast burn playable DVD from DVD folder and ISO image within few clicks. After downloading the right DVD disc burning application, the next import step is burning Final Cut Pro projects to DVD disc, we will illustrate the detailed steps with the following 2 parts:

Part 1: Export Finished Video Project from Final Cut Pro

Part 2: Burn Final Cut Pro video to DVD Disc on Mac

Part 1: Export Finished Video Project from Final Cut Pro

The procedure that should be followed to export or edit the video by using the FCP software is listed below:
1. Download the Final Cut Pro form the Mac App Store.
2. After downloading and installing the software, open the software and drag and drop the videos over the list pane of the software in the sequence you want to organize them in you movie.
3. Perform the addition setting adjustments as per your need and desire. The software offers a wide range of video adjustments that will help you to build a better movie.
4. Lastly, save Final Cut Pro file to your hard drive by "File > Export> QuickTime Movie...to export your FCP project to MOV files on your Mac and enjoy it with the family and friends. If you have already saved it to .fcp file, open it with FCP and re-save the videos as QuickTime MOV files. If your DVD player supports playing VOB, you can convert Final Cut Pro exported video to VOB with a video converter, rather then burning FCP to DVD disc.

Part 2: Burn Final Cut Pro Video to DVD Disc on Mac

For those people who wish to share the Final Cut Project on home DVD Player with friends or family members, you can follow the simple steps below to create DVD disc from Final Cut Pro project files.

Step 1: Insert a blank DVD disc into your computer optical drive.

Insert a blank DVD-R (DVD+R, DVD+RW, DVD-RW) into the DVD-ROM drive of your computer.

Step 2: Add Final Cut Project video into the program.

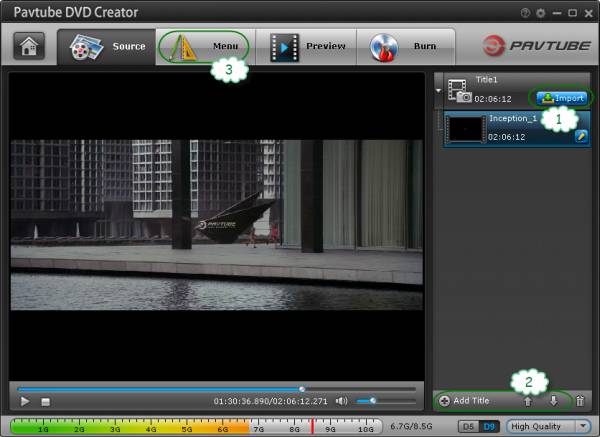
Run the DVD Creator software, import Final Cut Project exported QuickTime MOV video into it for burning DVD disc project.

Add Final Cut Project video

Step 3: Customize DVD menu.

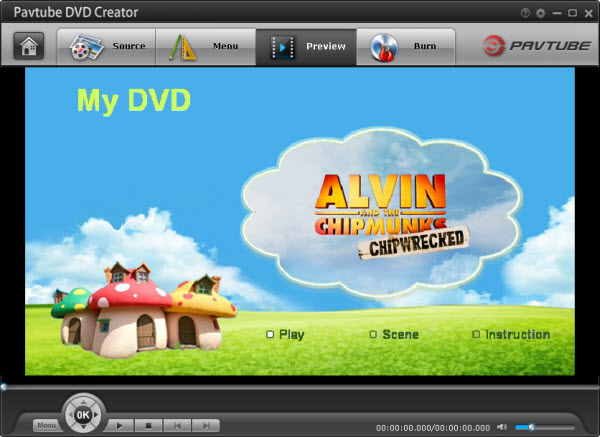
Switch to the menu pane, double click a DVD menu beneath the Menu Template to apply it to your DVD. You can customize the background video/image, background music, text, title thumbnail and more for your DVD menu. You can also choose the DVD quality at the bottom of the software, higher quality requires bigger DVD disc volume.

Customize DVD menu

Step 4: Start M2TS video to DVD disc burning process.

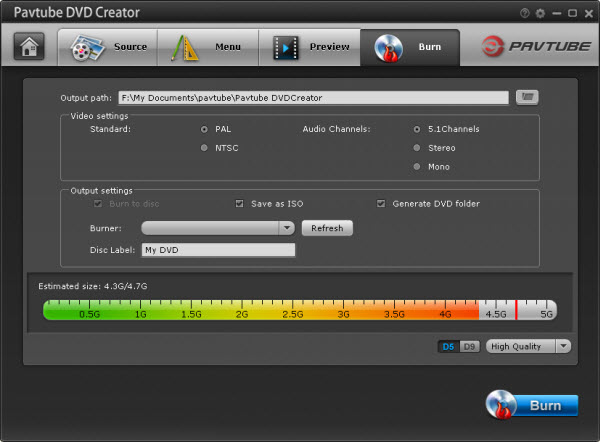
Click the "Burn" button to start burning Halloween videos to DVD. You can burn Final Cut Porject video to DVD disc, save as ISO file or Generate to DVD Folder.

Start Final Cut Project video to DVD disc burning process

Thursday, January 11, 2018

Import Mavic Pro Platinum 4K to Cyberlink PowerDirector

Great improvements of DJI Mavic Pro Platinum

Based on Mavic Pro, the DJI Mavic Pro Platinum has been improved greatly. The newly designed 8331 quick-release folding propeller and the latest FOC sinusoidal driver ESC make the aircraft much more aerodynamic, power-efficient, and lower 60 percent noise during takeoff and landing. The flight time has been extended to 30 minutes, which means half an hour's fun of flying at a high speed, and shooting smooth 4K UHD videos within 7km control range.

Import and edit Mavic Pro Platinum 4K with Cyberlink PowerDirector

The DJI Mavic Pro Platinum shots both DCI (4096x2160) and UHD 4K (3840x2160) wrapper in either MOV or MP4 container with MPEG-4 AVC/H.264 compression codec. When the shooting is completed, you may wish to load the Mavic Pro Platinum Pro 4K video to Cyberlink PowerDirector for some professional post editing work, how about the editing workflow?

After searching for Cyberlink PowerDirector supported file formats, we find that almost all the latest versions of this consumer-level video editing software including Cyberlink PowerDirector 16/15/14/13 have offered native importing support for the MPEG-4 AVC/H.264 format shot with DJI Mavic Pro Platinum. As for 4K resolution editing, although Cyberlink claims that PowerDirector 13 and 14 version has added support for end-to-end editing of 4K Ultra HD video format with a resolution of 4096 x 2160. However, a lot of people find that it is very choppy to playback 4K video on the timeline of Cyberlink PowerDirector, this is due to the immense processing power required to play 4K.

Compress Mavic Pro Platinum Pro 4K for Cyberlink PowerDirector smooth editing

To fix the 4K video editing choppy issue, you can either choose to buy a new and more powerful computer that meet the minimum requirements to edit 4K video, but that isn't always possible or compress 4K to 1080p in smaller file resolution for Cyberlink PowerDirector high performance editing on underpowered computer.

Here, you can get the job easily done with our best 4K Video Compressor - Pavtube Video Converter. The program has perfect importing support for the 4K H.264 MP4/MOV video shot with DJI Mavic Pro Platinum camera. Thanks to its batch conversion mode, you can load multiple 4K video into the application for conversion at one time.

With the application, you can easily compress Mavic Pro Platinum 4K video to Cyberlink PowerDirector supported HD editing format such as H.264 HD with the resolution of 1080p or 720p.

Edit Mavic Pro Platinum 4K with built-in editing options

Before loading the Mavic Pro Platinum 4K into Cyberlink PowerDirector, you can first complete some simple editing tasks with the built-in editing options offered by the application. You can trim or cut video to remove unwanted parts or segments, crop video to get off the black edges or unwanted size area, add video/image/transparent text watermark, apply special rendering effect, insert external srt/ass/ssa subtitle to video, etc.

Step by Step to Compress Mavic Pro Platinum 4K Video to 1080p for Cyberlink PowerDirector

Step 1: Input DJI Mavic Pro Platinum 4K video.

Download the free trial version of the program. Launch it on your computer. Click "File" menu and select "Add Video/Audio" or click the "Add Video" button on the top tool bar to import source DJI Mavic Pro Platinum 4K video into the program.

Input DJI Mavic Pro Platinum 4K video

Step 2: Define the output format.

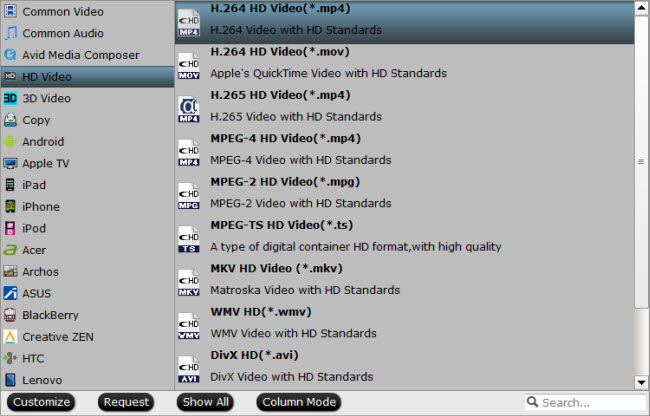
Clicking the Format bar, from its drop-down list, select one of Cyberlink PowerDirector most compatible HD file formats "H.264 HD Video(*.mp4)" under "HD Video" main category.

Output Cyberlink PowerDirector most supported HD file formats

Step 3: Compress 4K to 1080p.

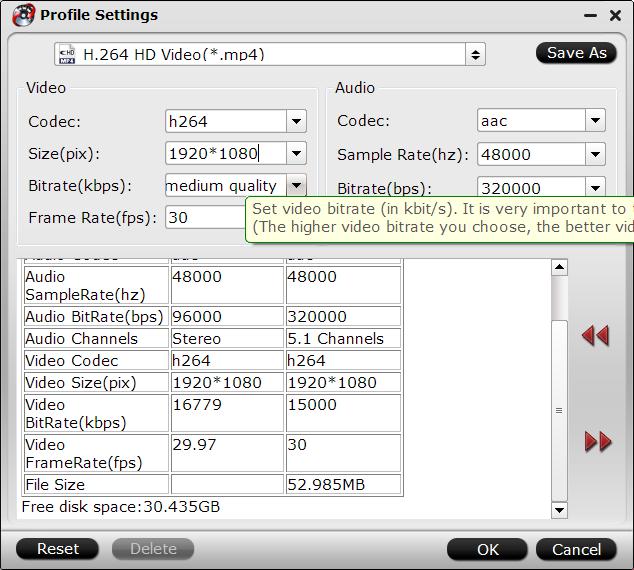
Click "Settings" on the main interface to open "Profile Settings" window, from "Size(pix)" drop-down list, select "1920*1080" or "1080*720" as the final resolution for output video.

Compress 4K to 1080p

Step 3: Edit DJI Mavic Pro Platinum 4K video.

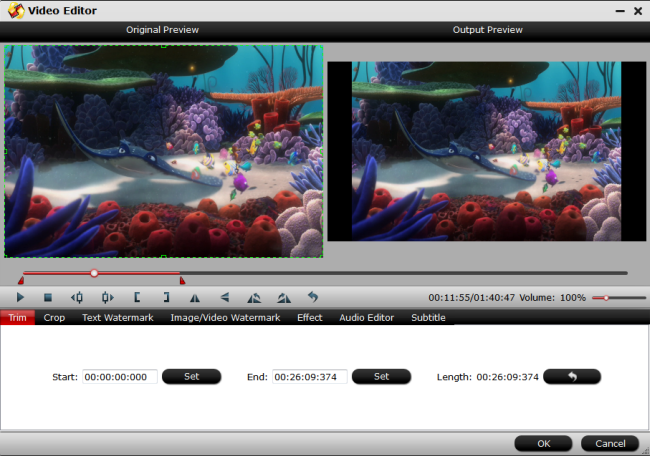
On the top tool bar on the main interface, click the pencil like icon to open "Video Editor" window, you can trim Blu-ray movies to remove the unwanted parts by setting the start and end time, crop to remove the black borders or unwanted area by dragging the dash line around the video frame, flip video, add text/image/video watermark, change video picture effect, replace/remove audio in video, add external subtitles, etc.

Edit DJI Mavic Pro Platinum 4K video

Step 4: Begin the conversion process.

After all setting is completed, hit the "Convert" button at the right bottom of the main interface to begin the conversion and compressing process from Mavic Pro Platinum 4K to Cyberlink PowerDirector supported HD file format.

When the conversion is finished, click "Open Output Folder" icon on the main interface to open the folder with generated files. Then feel free to load the compatible Mavic Pro Platinum HD  video into Cyberlink PowerDirector for professional post editing workflow.

Friday, January 5, 2018

Play M2TS with Windows Media Player

Windows Media Player library doesn't recognize M2TS files

"The .m2ts files are not recognized by Media Player. The folder that holds the files has already been added to the Media Library under Videos, but when I browse to the Video Library and select that folder it says: "There are no items in this library yet - Windows Media Player is searching for media files in the background. Also if I open directly the .m2ts file Media Player plays the file."

Can Windows Media Player playback M2TS files?

From Windows Media Player supported file formats, we can see that Windows Media Player 12 has included playback support for M2TS files, however, the M2TS files should be encoded with MPEG-2 codec. It also means that if your M2TS files are encoded with other codec, Windows Media Player will fail to open that. The following part will share you 3 workable solutions to fix Windows Media Player M2TS file playback issue.

Solutions to fix Windows Media Player M2TS file playback

Solution 1: Downloading and installing M2TS codec pack

The K-Lite Codec Pack is a free collection of codecs and related tools. M2TS Codecs are needed for encoding and decoding for playing M2TS audio and video on Windows Media Player and so on. The very user-friendly installation is fully customizable, which means that you can install only those components that you want.

There are multiple versions of the K-Lite Codec Pack: The Standard version contains everything what is needed to play all the commonly used formats. The Full version contains even more codecs and also has encoding support.

Solution 2: Play M2TS files with WMP free alternative

There are many free popular media player applications such as VLC, SMPlayer, 5K Player, etc for you to freely play M2TS files.

Solution 3: Convert M2TS files to WMV

If the free M2TS codec can't solve your problem or you insist on playing M2TS files on Windows Media Player, then the most effective solution is transcoding M2TS files to Windows Media Player supported file formats with our powerful M2TS Converter - Pavtube Video Converter. The program has perfect importing support for M2TS files encoded with various different compression codec. Thanks to its batch conversion mode, you can load multiple M2TS files into the application for conversion at one time.

The application can assist you to easily transcode M2TS to Windows Media Player most compatible WMV file format so that you can directly watch the converted files on Windows Media Player without installing any third-party codec.

Besides M2TS files, you can also use this application to convert other unsupported file formats such as MP4, AVI, Tivo, MXF, H.265, MKV, AVI, AVCHD, FLV, etc for Windows Media Player viewing.

Step by Step to Convert M2TS Files for Windows Media Player Viewing

Step 1: Load M2TS files into the application.

Download the free trial version of the program. Launch it on your computer. Click "File" menu and select "Add Video/Audio" or click the "Add Video" button on the top tool bar to import source M2TS files into the program.

Load M2TS files into the application

Step 2: Define the output format.

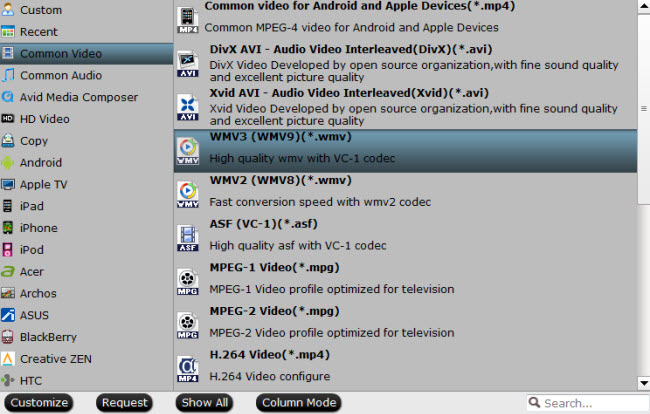
Clicking the Format bar, from its drop-down list, select Windows Media Player best supported WMV files under "Common Video" main category. The program can assist you to produce 3 different WMV file types to satisfy your different entertainment need.

Output fast conversion speed WMV2(WMV8) file

Output fast conversion speed WMV2(WMV8) file

Output high quality WMV3 (WMV9) file

Output high quality WMV3 (WMV9) file

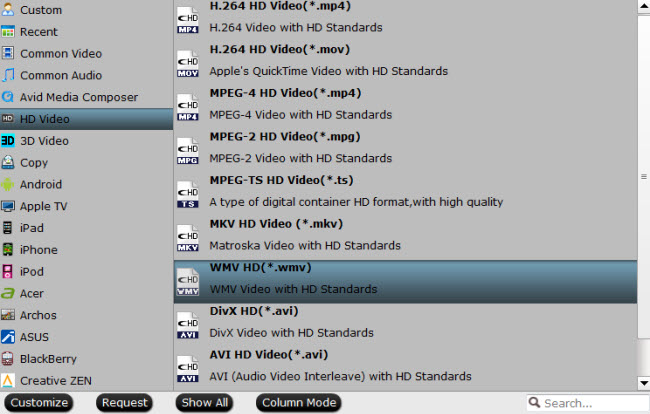
Output high definition WMV HD file format

Output high definition WMV HD file format

Step 3: Begin the conversion process.

After all setting is completed, hit the "Convert" button at the right bottom of the main interface to begin the conversion process from M2TS to Windows Media Player supported WMV file format.

When the conversion is finished, click "Open Output Folder" icon on the main interface to open the folder with generated files. Then you will have no problem to play the converted M2TS files with Windows Media Player.