At Times you need HandBrake Alternative software to achieve better SD/HD video and DVD/Blu-ray conversion on Mac OS X 10.11 El Capitan, and iMedia Converter for Mac is best recommended HandBrake Alternative for on Mac OS X 10.11 El Capitan.
Read the Software review>> Pavtube Softwares Comparison | Pavtube DVDAid vs AnyDVD | ByteCopy & MakeMKV | Best Video Converter Ultimate Reviews...
Learn more >> The most powerful software of comparative
Handbrake is a open source video transcoder, which is wildly used by Mac OS users. It supports to transcode video and audio from nearly any format to MP4, MKV, AVI on iMac abd MacBook. With Handbrake, you can convert Videos, DVD, Blu-ray on Mac OS X for viewing on your iPad, iPhone, iPod touch easily.
Following with this detailed HandBrake Mac Tutorial, you will learn how to rip DVD, Blu-ray and transcode videos on Mac OS X with Handbrake.
Step 1: Download and Install Handbrake
Firstly, you should download and install Handbrake for Mac on your Mac OS X.
Note: Here, we can see that HandBrake for Mac OS X 10.6-10.10 is for 64 bit Intel.
Step 2: Load source video to HandBrake and set Destination and Output
Click the “Source” button on the main interface to add video, DVD or decrypted Blu-ray to the program. In the Destination section you can set the output folder by clicking Browse button. One thing you need to decide is what format (MP4, MKV, AVI, OGM) Output setting section also has 3 options you can choose: Large File Size, Web optimized and iPod 5G support.
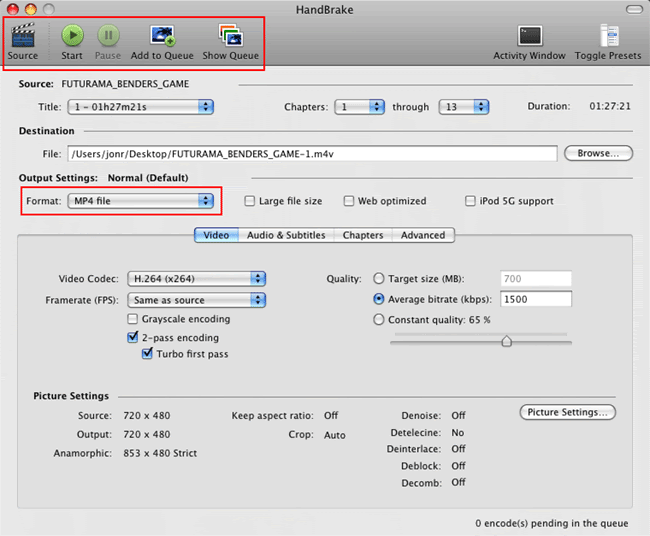
Note: Handbrake supports to input multiple file formats, but it can only convert them one by one, if you want to transcode many videos, please make sure you have enough time to do it.
Step 3: Adjust video and audio settings
You can adjust video filter, video, audio subtitles, chapters, etc to make the output videos more suitable. You should pay attention that when you select the birate, the higher bitrate you choose, the bigger size the output file will be, and the better quality you will get.
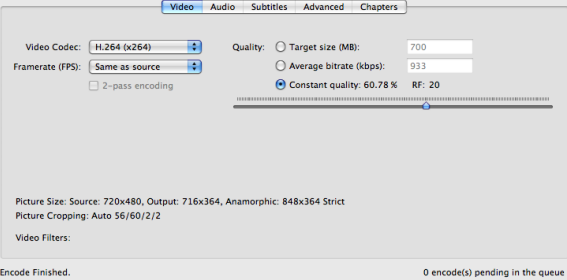
Step 4: Start to convert video with Handbrake on Mac OS X
Click on the Start button on the left top of Mac version HandBrake. The encoding time will depend on several variables including: the duration of the video file, the speed of your Mac computer and which Mac OS, Mac OS X Tiger, Leopard, or Mac OS X Snow Leopard. What other activity your computer is currently doing, the codec you selected (H264 or MP4).
Conclusion of this Handbrake Tutorial for Mac:
This is basic HandBrake Tutorial for Mac OS X users, for details explanation, you need to cast an eye on HandBrake official site. And as a free transcoding software, you may come across with unexpected issues when using HandBrake on your Mac from time to time. Handbrake has some limitations. For instance, it can load multiple video and copy protected DVD, but it does not support the encrypted Blu-ray disc. It only can be used to transcode a Blu-ray disc that the protection is first removed using a third party application. It does not support batch conversion and shut-down automatically after conversion. And the most severe problem is HandBrake just supports Mac OS X 10.6 - 10.10. The newest Mac OS X 10.11 El Capitan system is not supported by HandBrake.
Therefore, it is better to find some HandBrake Mac version Alternative software to fill all the limitations that Handbrake lacks, such as backing up encryption Blu-ray, ripping DVD to iTunes, copying Blu-ray and DVD on Mac OS X El Capitan. Pavtube iMedia Converter for Mac is the recommended HandBrake Alternative. It is all in one solution for you to convert SD/HD videoS, rip DVD/Blu-ray to various formats on Mac OS X from 10.6 to 10.11 El Capitan. You can use the batch conversion functions to transcoding multiple files at a time. The versatile and distinctive editing functions can help you create elegant videos.
Free download and install


Other Download:
- Pavtube old official address: http://www.pavtube.cn/imedia-converter-mac/
- Cnet Download: http://download.cnet.com/Pavtube-iMedia-Converter/3000-2194_4-76177788.html
How to use HandBrake Mac Alternative on Mac OS X El Capitan?
Step 1. Load your Blu-ray
Run Pavtube iMedia Converter for Mac on Mac OS X El Capitan, load your Blu-ray disc, folder, ISO image files by clicking the "File" icon.
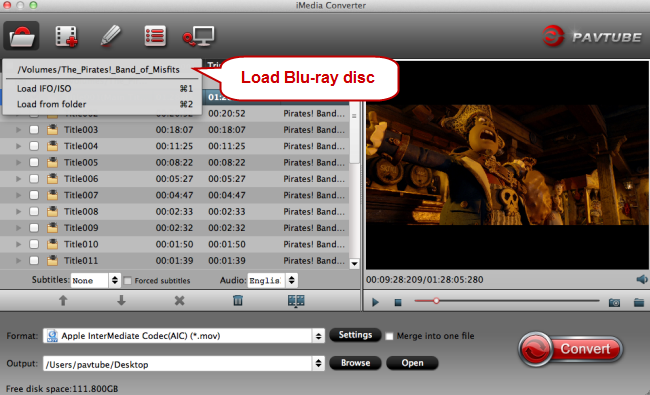
Step 2. Choose target format
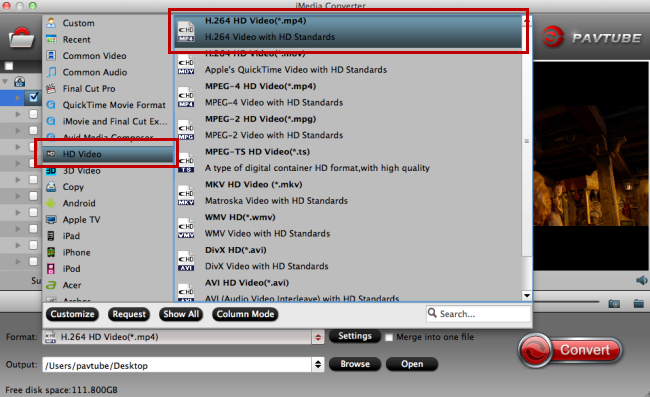
Click the format bar to choose "HD Video" and "H.264 HD Video (*.mp4)".
Step 3. Start conversion
After everything is OK, click the big button "Convert" to start conversion on Mac OS X El Capitan. After conversion, you'll get your desired MP4 movie in output folder.
That is easy to use HandBrake Mac Alternative to convert videos on Mac OS X El Capitan. Just try.
If want more detailed video conversion steps, read this article: How to Convert Videos on Mac OS X El Capitan with Pavtube iMedia Converter for Mac?
Read More:
Good News! To thanks for your continuous support, Pavtube Official Website and Pavtube Facebook are now holding the biggest sale for this summer with fantastic 50% off discounts and giveaway. Pay less to get powerful Blu-ray/DVD/Video Converter to build your own home media center on this summer!
Giveaway: First Five customers can share this post, email us your order numer and the snapshot to win one more FREE license, no product limit!
Related Article:
Read the Software review>> Pavtube Softwares Comparison | Pavtube DVDAid vs AnyDVD | ByteCopy & MakeMKV | Best Video Converter Ultimate Reviews...
Learn more >> The most powerful software of comparative
Handbrake is a open source video transcoder, which is wildly used by Mac OS users. It supports to transcode video and audio from nearly any format to MP4, MKV, AVI on iMac abd MacBook. With Handbrake, you can convert Videos, DVD, Blu-ray on Mac OS X for viewing on your iPad, iPhone, iPod touch easily.
Following with this detailed HandBrake Mac Tutorial, you will learn how to rip DVD, Blu-ray and transcode videos on Mac OS X with Handbrake.
Step 1: Download and Install Handbrake
Firstly, you should download and install Handbrake for Mac on your Mac OS X.
Note: Here, we can see that HandBrake for Mac OS X 10.6-10.10 is for 64 bit Intel.
Step 2: Load source video to HandBrake and set Destination and Output
Click the “Source” button on the main interface to add video, DVD or decrypted Blu-ray to the program. In the Destination section you can set the output folder by clicking Browse button. One thing you need to decide is what format (MP4, MKV, AVI, OGM) Output setting section also has 3 options you can choose: Large File Size, Web optimized and iPod 5G support.
Note: Handbrake supports to input multiple file formats, but it can only convert them one by one, if you want to transcode many videos, please make sure you have enough time to do it.
Step 3: Adjust video and audio settings
You can adjust video filter, video, audio subtitles, chapters, etc to make the output videos more suitable. You should pay attention that when you select the birate, the higher bitrate you choose, the bigger size the output file will be, and the better quality you will get.
Step 4: Start to convert video with Handbrake on Mac OS X
Click on the Start button on the left top of Mac version HandBrake. The encoding time will depend on several variables including: the duration of the video file, the speed of your Mac computer and which Mac OS, Mac OS X Tiger, Leopard, or Mac OS X Snow Leopard. What other activity your computer is currently doing, the codec you selected (H264 or MP4).
Conclusion of this Handbrake Tutorial for Mac:
This is basic HandBrake Tutorial for Mac OS X users, for details explanation, you need to cast an eye on HandBrake official site. And as a free transcoding software, you may come across with unexpected issues when using HandBrake on your Mac from time to time. Handbrake has some limitations. For instance, it can load multiple video and copy protected DVD, but it does not support the encrypted Blu-ray disc. It only can be used to transcode a Blu-ray disc that the protection is first removed using a third party application. It does not support batch conversion and shut-down automatically after conversion. And the most severe problem is HandBrake just supports Mac OS X 10.6 - 10.10. The newest Mac OS X 10.11 El Capitan system is not supported by HandBrake.
Therefore, it is better to find some HandBrake Mac version Alternative software to fill all the limitations that Handbrake lacks, such as backing up encryption Blu-ray, ripping DVD to iTunes, copying Blu-ray and DVD on Mac OS X El Capitan. Pavtube iMedia Converter for Mac is the recommended HandBrake Alternative. It is all in one solution for you to convert SD/HD videoS, rip DVD/Blu-ray to various formats on Mac OS X from 10.6 to 10.11 El Capitan. You can use the batch conversion functions to transcoding multiple files at a time. The versatile and distinctive editing functions can help you create elegant videos.
Free download and install
Other Download:
- Pavtube old official address: http://www.pavtube.cn/imedia-converter-mac/
- Cnet Download: http://download.cnet.com/Pavtube-iMedia-Converter/3000-2194_4-76177788.html
How to use HandBrake Mac Alternative on Mac OS X El Capitan?
Step 1. Load your Blu-ray
Run Pavtube iMedia Converter for Mac on Mac OS X El Capitan, load your Blu-ray disc, folder, ISO image files by clicking the "File" icon.
Step 2. Choose target format
Click the format bar to choose "HD Video" and "H.264 HD Video (*.mp4)".
Step 3. Start conversion
After everything is OK, click the big button "Convert" to start conversion on Mac OS X El Capitan. After conversion, you'll get your desired MP4 movie in output folder.
That is easy to use HandBrake Mac Alternative to convert videos on Mac OS X El Capitan. Just try.
If want more detailed video conversion steps, read this article: How to Convert Videos on Mac OS X El Capitan with Pavtube iMedia Converter for Mac?
Read More:
Good News! To thanks for your continuous support, Pavtube Official Website and Pavtube Facebook are now holding the biggest sale for this summer with fantastic 50% off discounts and giveaway. Pay less to get powerful Blu-ray/DVD/Video Converter to build your own home media center on this summer!
Giveaway: First Five customers can share this post, email us your order numer and the snapshot to win one more FREE license, no product limit!
Related Article:
- How to Copy 3D Blu-ray to Samsung Galaxy S5 for ZEISS VR One?
- Copy DVD to Samsung Galaxy S8 for Watching on the go
- Samsung Galaxy S8/S8 Edge Supported Files
- Rip Blu-ray to Galaxy On8/On7/On7 Pro/On5/On5 Pro
- Play Supported/Unsupported movies on Galaxy Tab S?
- Copy DVD to Plex For Samsung Samsung TV Streaming
- Supported Files of Samsung Galaxy A3/5/6/7/8/9
- View DVD on Galaxy J7 through Gear VR
- How to Play Video on Galaxy On8/On7/On7 Pro/On5/On5 Pro?
- Copy Blu-ray to Samsung Portable SSD T3
- Copy Blu-ray to Samsung Galaxy Tab S3 9.7/8.0
- Rip Blu-ray to Portable hard drive for Samsung audio video unit
- Put DVD Movies to Samsung Galaxy Tab S2 for Playback
- Put DVD Collection To Samsung Galaxy S6 Edge+ For Playing
- Top Blu-ray to Samsung Galaxy Converter – Rip Blu-ray to Galaxy S7/S6/Note 5/Note 4
- Make 3D Movies For Your Samsung Gear VR With Old Movie Library And Blu-Ray/DVD Disc