It’s time to free your films from the Blu-ray disc so they’ll be watchable in the player-free future. Have you considered ripping your Blu-ray movies off the disc to extend your viewing options to your phone, tablet, Roku box, game console, and more? Then trying to put your Blu-ray rips to media server. A media server is a program, such as iTunes, Plex, or Windows Media Center, that enables you to "broadcast" your videos to other computers and media extenders. A media extender, in turn, is just a device, like an Apple TV 4, the Xbox 360 that lets you view video from your media server on your TV. So once you convert your movie library to digital files, you can store those Blu-ray rips on a media server and stream them anytime, from anywhere. Create Copies of Blu-Rays to Place on Media ServerTo turn a real-world Blu-ray into a digital file for putting Blu-ray collection to media server, you need to copy the contents of a Blu-ray to your computer, and then convert those contents to a media-server-friendly format. In order for this to work, obviously, you need a Blu-ray RipperPavtube BDMagic is a top-selling Blu-ray-ripping utility that can remove the AACS or similar built-in protections that prevent straight-up copying. It can convert Blu-ray to mobile-or-home-theater-friendly format so that you can stream Blu-ray rips via media server on HD TV through media extender. Supported Output File Types: H.265/HEVC, H.264/MPEG-4, DivX, XviD, MKV, MP4, AVI, MPEG, WMV, FLV, SWF, F4V, MOV, 3GP, 3G2, VOB, TS, DV, MPEG-2 HD Video (*.mpg), MPEG- TS Video(*.ts), Quick Time HD Video (*.mov), WMV HD Video (*.wmv), Audio-Video Interleaved HD Video (*.avi)Supported Output Devices Supported: Apple TV 4, iPad Air, iPad 4, iPad Pro, iPhone 6S, BlackBerry Priv, Samsung Galaxy Note 5, Nexus 6P, Surface Pro 4, etc.Free download and install: 
 Other Download:- Pavtube old official address: http://www.pavtube.cn/blu-ray-ripper/- Cnet Download: http://download.cnet.com/Pavtube-BDMagic/3000-7970_4-75922877.htmlStep 1: Add Blu-ray moviesClick “File” to import Blu-ray movies to the software. You can also add Blu-ray Folder, Blu-ray IFO File,Blu-ray ISO Image File to convert.
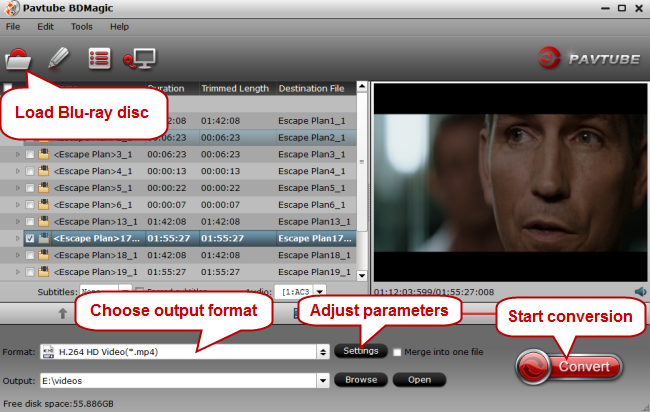 Step 2: Choose output formatWhen you open the “Format” drop-down list, you can see many output format choices. Considering the most compatibility, HD MP4 is recommended here for its high video quality.
 Tip: In “Settings”, you can preview the output video parameters and size. In addition, you can change the specs in the corresponding box.
  Step 3: Start to convert Blu-ray to media serverHit big red “Convert” to start to rip Blu-ray to media server friendly format. Once the process ends, open the output folder to locate the Blu-ray rips.Get streaming Blu-ray rips via Media ServerOnce the videos are converted you can then add the Blu-ray rips to your media server's library. With some DLNA servers that's as easy as placing them in a specific directory. I searched some guides on how to add movies to your media server so I won’t rehash that setup process here.How to add media to iTunes?Add Movies to Plex Server To Set Up Home TheaterRip Blu-ray to WD Media Server for TV (This article contains the detailed steps to add movies to WD Media Server)Once loaded Blu-ray rips into your media server, you should be ready to watch your own private movie collection on your TV whenever you want. Enjoy!Related Articles:
 You can't enjoy what you can't find when your digital life is spread across multiple computers, hard drives and flash drives. With Seagate 3TB Central shared storage, it's simple to back up all your media to one location on your network and enjoy the convenience of a shared digital library that is compatible with both Macs and PCs. Backing DVD discs to Seagate 3TB Central Shared Storage can make you access your movies from computers, game consoles, Smart TVs and other connected devices throughout the home. When you prepare to backup DVD to Seagate 3TB Central Shared Storage, you need a tool to get the movie’s data onto your hard drive, and then some way to convert that data into a more-usable file size. I’m aware of only one way to get the movie data off a DVD disc, and that’s via an app called Pavtube DVDAid.<see other choices>- Rip DVD to H.265, MP4, MKV, MOV, M3U8, AVI, FLV, etc.- Convert DVD to optimized preset for iPhone, iPad, PS4, Surface Pro 4, Android tablet, etc.- 1:1 backup DVD with original video structure - Directly backup main title of DVD- Adjust A/V codec, size, bitrate, etc and display aspect ratio.Free download and install: Other Download:- Pavtube old official address: http://www.pavtube.cn/dvd_ripper/- Cnet Download: http://download.cnet.com/Pavtube-DVDAid/3000-7970_4-76158510.htmlSteps to Backup DVD to Seagate 3TB Central Shared StorageStep 1: Import DVD videoInstall and launch the DVD ripper on your computer. Insert DVD disc into your DVD drive. Click “file” to load source movie from disc.
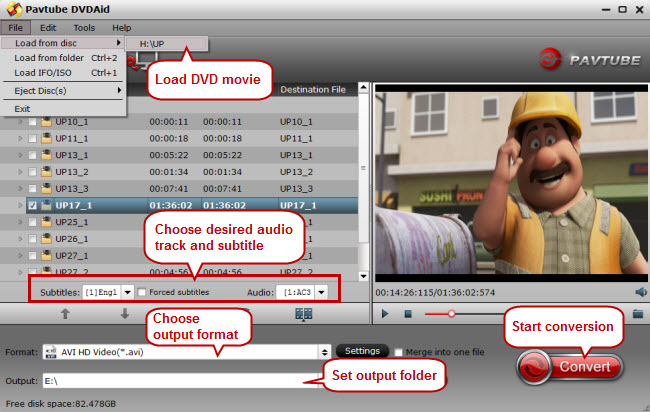 Step 2: Choose output formatMove down your mouse, hit the “format” list to choose output format. Here you have many common video format and HD video format and preset. You can simply choose HD H.264 MP4 as the target format which has the most compatibility.Step 3: Start to create digital version of DVDSwitch back to the main interface, click the big button "Convert" on bottom-right corner to start conversion. When the process is over, you can find the converted files by clicking the "Open output folder" on the main interface of the program. Connect Seagate Central to your Wi-Fi router to organize all your DVD movies on one device that you can access from anywhere.Related Articles:
 Question 1: “I have a dvd of a short film I made and need to upload it to vimeo on my mac. Any suggestions on how to do this? Thanks for your time.”
Question 2: ”I have a film that I made in dvd and I would like to put upload it to vimeo. How can I do that on a Mac?”
Vimeo gives you the chance to show your life but not gives you all the broad entrance. Just like the questions above unveiled, you can upload DVD to Vimeo directly. Why? Simple saying, Vimeo can’t accept DVD, DVD Folder, DVD ISO/IFO, any of the format due to the incompatible format and DVD copy protection.
If you're a Vimeo fan and love to upload your favorite DVD movies to Vimeo for sharing with your family and friends, you have to convert DVD to Vimeo friendly video formats in the first place. Here you will learn the fastest way to get DVD videos uploaded to Vimeo.
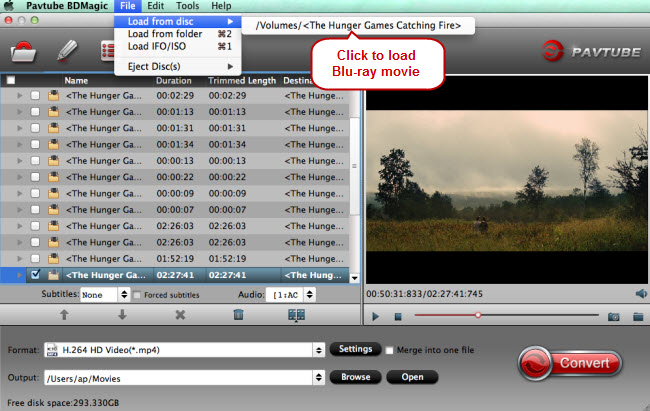
Do a search for a software called Pavtube BDMagic for Mac. It can convert the files that are on the DVD to Vimeo supported regular video file (H.264 or .MOV file, etc). It also allows you to add external srt.ass.ssa subtitle to original DVD video so that your DVD videos uploaded Vimeo will be cooler. It can trim DVD to a clip and crop the unwanted area in DVD video before you convert DVD to Vimeo friendly format. It enables you to reset video size and bitrate to get smaller DVD videos for Vimeo in case your DVD video is too large and your bandwidth is not so fast. <review>
Free download and install:
Question 1: “I have a dvd of a short film I made and need to upload it to vimeo on my mac. Any suggestions on how to do this? Thanks for your time.”
Question 2: ”I have a film that I made in dvd and I would like to put upload it to vimeo. How can I do that on a Mac?”
Vimeo gives you the chance to show your life but not gives you all the broad entrance. Just like the questions above unveiled, you can upload DVD to Vimeo directly. Why? Simple saying, Vimeo can’t accept DVD, DVD Folder, DVD ISO/IFO, any of the format due to the incompatible format and DVD copy protection.
If you're a Vimeo fan and love to upload your favorite DVD movies to Vimeo for sharing with your family and friends, you have to convert DVD to Vimeo friendly video formats in the first place. Here you will learn the fastest way to get DVD videos uploaded to Vimeo.
Do a search for a software called Pavtube BDMagic for Mac. It can convert the files that are on the DVD to Vimeo supported regular video file (H.264 or .MOV file, etc). It also allows you to add external srt.ass.ssa subtitle to original DVD video so that your DVD videos uploaded Vimeo will be cooler. It can trim DVD to a clip and crop the unwanted area in DVD video before you convert DVD to Vimeo friendly format. It enables you to reset video size and bitrate to get smaller DVD videos for Vimeo in case your DVD video is too large and your bandwidth is not so fast. <review>
Free download and install:

 Other Download:
- Pavtube old official address: http://www.pavtube.cn/blu-ray-ripper-mac/
- Cnet Download: http://download.cnet.com/Pavtube-BDMagic/3000-7970_4-76177782.html
How to Convert and Upload DVD to Vimeo Easily?
Step 1. Import DVD movies
Launch the program and click Load DVD to add DVD folders, ISO files or IFO files. All added files will be displayed on the left item bar and you can preview them in the right Preview window as the picture below shows. This program will automatically select the main title by taking the tick in front of it.
Other Download:
- Pavtube old official address: http://www.pavtube.cn/blu-ray-ripper-mac/
- Cnet Download: http://download.cnet.com/Pavtube-BDMagic/3000-7970_4-76177782.html
How to Convert and Upload DVD to Vimeo Easily?
Step 1. Import DVD movies
Launch the program and click Load DVD to add DVD folders, ISO files or IFO files. All added files will be displayed on the left item bar and you can preview them in the right Preview window as the picture below shows. This program will automatically select the main title by taking the tick in front of it.
 Step 2: Choose Vimeo supported format
You can simply choose H.264 HD MP4 form "HD Video" in “Format”which can give wide compatibility with Vimeo.
Tip: 1. Open “Settings” window, you can preview the output videosize here. You can decrease the outptut video size by adjust video bitrate and size.
2. Click “Edit”, you can find the “Trim” function. Here you can trim DVD video clip to upload to Vimeo.
Step 3. Start ripping DVD to Vimeo
After the above two steps, go back to the main interface and click the "Convert" button to begin converting DVD movies to Vimeo highly compatible MP4 video files. When the conversion is done, click "Open" to locate the ripped videos and upload them to Vimeo with ease!
How to Load Ripped DVD Video to Vimeo
1.To upload videos on Vimeo, you must first be a member of the website. There are two membership options to choose from, paid and free. Logging in through Facebook is also possible. Once you've successfully set up your account, you should be ready to upload.
2.Logged into your account, go to the My Videos Tab and upload videos from there. Or look for where it says Upload in order to add videos directly.
3.Click on 'Choose a Video to Upload' button and browse through the video file on your hard drive. Vimeo also supports mobile uploads, uploads using the desktop app, or uploads via Dropbox.
4. Wait for the file to be completely transferred into Vimeo's server. Check the status bar on your screen.
5.Once it is done, you can check on the My Videos tab again to see if the video you just added shows up there. That indicates that the upload was successful.
Now, it is the time to share your Vimeo sharing with your friends.
Related Articles:
Step 2: Choose Vimeo supported format
You can simply choose H.264 HD MP4 form "HD Video" in “Format”which can give wide compatibility with Vimeo.
Tip: 1. Open “Settings” window, you can preview the output videosize here. You can decrease the outptut video size by adjust video bitrate and size.
2. Click “Edit”, you can find the “Trim” function. Here you can trim DVD video clip to upload to Vimeo.
Step 3. Start ripping DVD to Vimeo
After the above two steps, go back to the main interface and click the "Convert" button to begin converting DVD movies to Vimeo highly compatible MP4 video files. When the conversion is done, click "Open" to locate the ripped videos and upload them to Vimeo with ease!
How to Load Ripped DVD Video to Vimeo
1.To upload videos on Vimeo, you must first be a member of the website. There are two membership options to choose from, paid and free. Logging in through Facebook is also possible. Once you've successfully set up your account, you should be ready to upload.
2.Logged into your account, go to the My Videos Tab and upload videos from there. Or look for where it says Upload in order to add videos directly.
3.Click on 'Choose a Video to Upload' button and browse through the video file on your hard drive. Vimeo also supports mobile uploads, uploads using the desktop app, or uploads via Dropbox.
4. Wait for the file to be completely transferred into Vimeo's server. Check the status bar on your screen.
5.Once it is done, you can check on the My Videos tab again to see if the video you just added shows up there. That indicates that the upload was successful.
Now, it is the time to share your Vimeo sharing with your friends.
Related Articles:
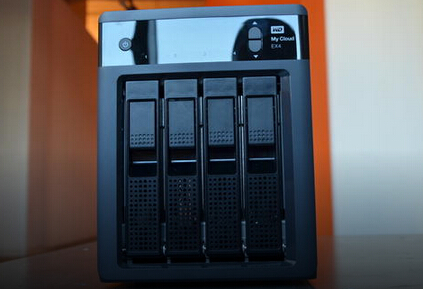 The WD My Cloud EX4 Diskless offers data redundancy, Windows Server integration, and an excellent set of personal cloud features. It makes you stream videos to connected TVs, media players, gaming consoles, and other DLNA/UPnP devices. For those who have large DVD libraries and love to enjoy DVD movies on HD TV but worry about the scratch, ripping and backing up DVD to WD My Cloud EX4 Diskless for HD TV playback is no doubt a good idea. In this way, you can stream your DVD movies on HD TV via WD My Cloud EX4 Diskless without using DVD discs any longer. Hot Search: Stream Blu-ray via WD My Cloud | Rip Blu-ray to WD Media Server for TVThis is not hard work under the help of DVD Ripper<DVD Ripper Software vs. DVD Copy Software>. Here I strongly recommend Pavtube BDMagic to help you rip and backup DVD to WD My Cloud EX4 Diskless for HD TV playback. It has the enough function that make me love it:
- Remove copy protection from DVD disc
- Shift format to digital version
- Output MP4, MKV, MOV, AVI, etc
- Has optimized preset for LG/Samsung/Sony/Panasonic TV
- Trim & crop DVD video
- Split & merge DVD video
- Adjust A/V codec, bitrate, size.
- Adjust display aspect ratio
- Add subtitle to DVD video
- Batch convert DVD video to WD My Cloud EX4 Diskless
- GPU acceleration
Free download and install: Other Download:- Pavtube old official address: http://www.pavtube.cn/dvd_ripper/- Cnet Download: http://download.cnet.com/Pavtube-DVDAid/3000-7970_4-76158510.htmlSteps to Copy DVD to WD My Cloud EX4 Diskless for HD TV PlaybackStep 1. Load DVD moviesInsert your DVD disc into a DVD drive, run the program on your computer, on the main interface click "File" > "Load from disc" to import the DVD disc to the program. Please keep in mind that the app supports to convert multiple DVDs to WD My Cloud EX4 Diskless at a time. Step 2: Set output formatH.264 MP4 format is the most compatible video format for any brand TV. Of course, for better DVD video playback on TV, you can choose the preset in “TVS” profile. Tips 1. Click “Settings” on the interface and you can adjust the parameters including size, bitrate, frame rate, etc. to get a high quality of output files or a smaller files size. You can preview the size at the below chart.Keep in mind the file size and video quality is based more on bitrate than resolution which means bitrate higher results in big file size, and lower visible quality loss, and vice versa. 2. Open "Video Editor" window and switch to the "Trim" tab, you can drag the slider bars to include the segment you want to remain, click the left square bracket to set start point, and click the right square bracket to set end point when previewing the video or directly input specific values to "Start" and "End" box.
 3. Open "Video Editor" window, switch to and click "Crop" tab, click the
  icon on the right-bottom to swtich to the advanced mode, then you can choose the output aspect ratio such as 16:10, 16:9, 5:4, 4:3 and 2:1 from the drop-down list of "Display Aspect Ration".
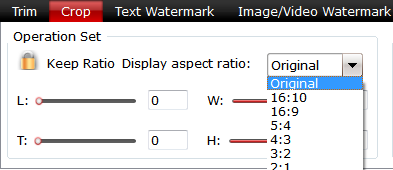 4. Click the "Subtitle" tab in "Video Editor" window, check "Enable", then you will be able to add external SRT/ASS/SSA subtitle files to the video as hard subtitles.(Difference between soft subtitles and hard subtitles)
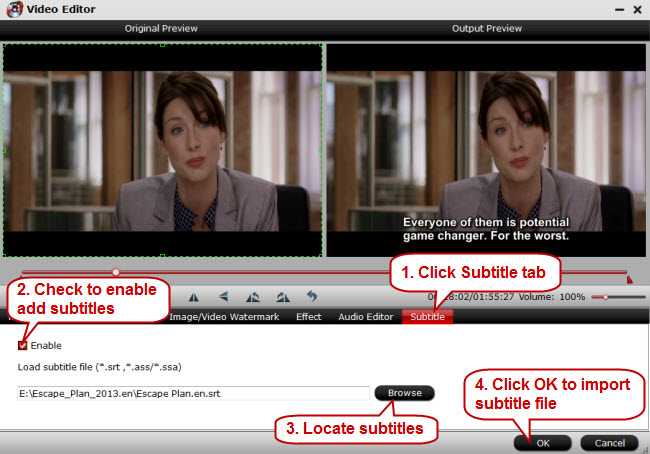 Step 3: Start to convert DVD to WD My Cloud EX4 Diskless for HD TV Switch back to the main interface, click the big button "Convert" on bottom-right corner to start conversion. When the process is over, you can find the converted files by clicking the "Open output folder" on the main interface of the program. Now, you can access your ripped DVD movies on HD TV with Plex app via WD My Cloud EX4 Diskless. Related Articles:
 Samsung announced the new ultraportable here at CES 2016, also debuting a new 15.5-inch Notebook 9 with a super-slim bezel and fast-charging technology. Samsung Notebook 9 weighs just 1.85 pounds and is 0.5 inches thin, making it more than a pound lighter than the Air. With this super-light body and a full 1920 x 1080p display, Samsung Notebook 9 is no doubt a ideal media player for movie fan. However, when it comes to watching movies, you still can’t beat DVD. Many we loved movies often exist in discs, like The 33. You can’t watch The 33 DVD on Samsung Notebook 9 directly because Samsung Notebook 9 has no DVD drive. You need to extract The 33 content from DVD discs and convert The 33 movie to Samsung Notebook 9 supported format. To reach the goal, you need a DVD Ripper. Learn >> DVD Ripper Software vs. DVD Copy Software: Which One To ChooseHere, Pavtube DVDAid is strongly recommended to help you rip The 33 DVD to Samsung Notebook 9 compatible video/audio format. This DVD ripper software can circumvent copy protection and shift The 33 DVD to MP4 for Samsung Notebook 9 with original video quality. Other Features of Pavtube DVDAid
- Adjust video size, bitrate.
- Adjust audio channel, codec.
- Adjust display aspect ratio.
- Crop black area of The 33 DVD movie
- Insert external srt.ssa.ass subtitle to The 33 DVD
- Batch conversion
When you inset The 33 DVD to Pavtube DVDAid, the DVD to Samsung Notebook 9 converter can detect the movie and automatically choose the main title of The 33 to convert to Samsung Notebook 9 supported format. It also offer optimized preset for Samsung tablets and smartphones equipped with most compatible A/V parameters.Learn >> 5 Tips You Should Keep in Mind While Selecting Reliable DVD RipperFree download and install: Other Download:- Pavtube old official address: http://www.pavtube.cn/dvd_ripper/- Cnet Download: http://download.cnet.com/Pavtube-DVDAid/3000-7970_4-76158510.htmlHow to Copy The 33 DVD to Samsung Notebook 9?Step 1. Load DVD discInsert your DVD disc into a DVD drive, run The 33 DVD to Samsung Notebook 9 converter on your computer, on the main interface click "File" > "Load from disc" to import the The 33 DVD disc to the program. Step 2: Set output formatPavtube DVDAid offers many optimized video format for different devices. Just click “Format” bar to find “Samsung” profile. Here, you can choose “Samsung Galaxy Tab H.264 (*.mp4)” as the best video format for Samsung Notebook 9.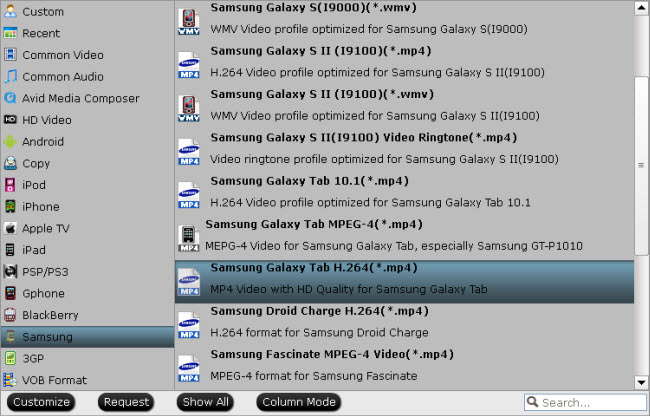 Tips: 1. you can click “Settings” on the interface to adjust the parameters including size, bitrate, frame rate, etc. to get a high quality of output files or a smaller files size.Keep in mind the file size and video quality is based more on bitrate than resolution which means bitrate higher results in big file size, and lower visible quality loss, and vice versa. You can preview the size at the below chart.
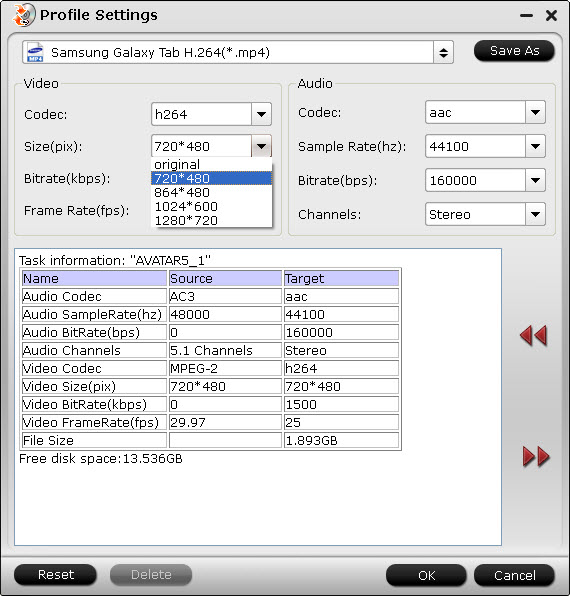 2. Open "Video Editor" window, switch to and click "Crop" tab, click the icon on the right-bottom to swtich to the advanced mode, then you can choose the output aspect ratio such as 16:10, 16:9, 5:4, 4:3 and 2:1 from the drop-down list of "Display Aspect Ration".Step 3: Start ripping The 33 DVD to Samsung Notebook 9Switch back to the main interface, click the big button "Convert" on bottom-right corner to start The 33 DVD to Samsung Notebook 9 conversion process. When the process is over, you can find the converted files by clicking the "Open output folder" on the main interface of the program. Finally, what you need to do is to transfer The 33 DVD backup to Samsung Notebook 9. Then you can enjoy the movies on Notebook 9 anytime you want. Related Articles:
Plex on Amazon Fire TV doesn't play MKV? Here will show you a MKV to Amazon Fire TV converter to convert MKV to H.264 MP4 to play on Fire TV via Plex.
 Question: ”Dear Plex-community, I installed the Plex-Server on my Sinology DS212j-NAS and a amazon Fire TV in order to watch my media on TV. Thing is, it will *only* play .mp4-files. When trying to play another format (i.e. .mkv) I get the following error-message: "It is not possible to play this video as no connection to the required Server could be found. I am far from being an IT-expert, but to me this error-message doesn't make sense as the connection to the server is definetly established. So I guess there is another problem with respect to the file-format... You may be my last resort of help! I hope that this pretty basic information is sufficient. Thanks in advance! ”- from forums.plex.tv
Learn more >> The most powerful software of comparative
Answers:
Solution 1: Changing the following settings on the Amazon Fire TV Plex App maybe allow you to play mkv files.
Plex > Options > Settings > Device media profile > Media profile > Select "Force Direct Play".
Then uncheck all the "Device supports *" options.
However, the feedback unveils that this method get MKV files to play on Fire TV via Plex but no sound....(amazon fire stick). Because if you force it to Direct Play, and it is an MKV with AC3 audio, you won't get sound. You can direct play MKV's with AAC audio though. Honestly your best bet if you can't transcode, is to use an External player with the app, or as was previously suggested re-encode all your content to MP4 with AAC audio.
Solution 2: That error message could definitely be improved, but your NAS cannot transcode which it would need to do to play the formats/codecs the fire TV does not support natively via HLS streaming. Here is more info on NAS and which has a compatibility list of NASs that plex can be installed which includes details on which can transcode or not:
https://support.plex.tv/hc/en-us/sections/200286217-NAS-Devices
Solution 3: Simply convert your MKV files to mp4 with h264 video and AAC audio with a video converter so that you can play with Plex on Amazon Fire TV.
How to Convert MKV to H.264 MP4 with AAC Audio for Fire TV and Plex?
Pavtube Video Converter Ultimate is the utility for you. With it, you can fast convert MKV to H.264 MP4 that can be easily played with Plex in Amazon Fire TV. Besides convert MKV to Amaon Fire TV, it also helps to convert AVI, MOV, WMV, RMVB, MTS, MXF, FLV, VOB, SWF etc to Amazon Fire TV supported video format. Moreover, no loss of quality will occur after the conversion. Some helpful edition functions are also available including trim and crop, merge and split, add special effects, subtitle edition, etc. <review>
Free download and install
Other Download:
- Pavtube old official address: http://www.pavtube.cn/blu-ray-video-converter-ultimate/
- Cnet Download: http://download.cnet.com/Pavtube-Video-Converter-Ultimate/3000-2194_4-75938564.html
Step 1: Add MKV Files
Launch the MKV to Amazon Fire TV Converter. Click the "Files" or "Add Video/Audio" button to load MKV videos for converting.
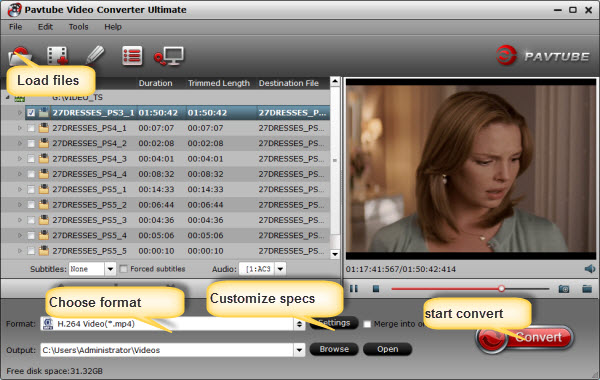 Step 2: Choose output format
Click Format bar and choose MP4 from HD Video, which can be recognized by Amazon Fire TV perfectly.
Tip: Simply click Settings bar and you can tweak the settings to your satisfaction and even save it as preset. You can reset the output video and make sure the output audio codec to AAC.
Step 3: Start to convert MKV to Amazon Fire TV for Plex
Click the “Convert” button to start video conversion. After the conversion, you can get the converted videos by clicking the Open button.
Afterwards, you can stream and play MKV videos on Amazon Fire TV via Plex easily with HD quality.
Related Articles:
Step 2: Choose output format
Click Format bar and choose MP4 from HD Video, which can be recognized by Amazon Fire TV perfectly.
Tip: Simply click Settings bar and you can tweak the settings to your satisfaction and even save it as preset. You can reset the output video and make sure the output audio codec to AAC.
Step 3: Start to convert MKV to Amazon Fire TV for Plex
Click the “Convert” button to start video conversion. After the conversion, you can get the converted videos by clicking the Open button.
Afterwards, you can stream and play MKV videos on Amazon Fire TV via Plex easily with HD quality.
Related Articles:
 Commercial pre-recorded DVD discs are typically protected with some form of copy protection. This feature prevents people from copying DVD and broadcast DVD in other multimedia players without DVD-ROM. When you want more media streaming options on DVD, you need to remove DVD copy protection and turn it to a digital format. AVI has become the most popular container file format used for watching video on the PC. AVI files can hold different types of video and audio streams inside, and with the help of DivX video compression technology, they can display incredible video quality while maintaining a small file size. DVD to AVI software comes with a variety of options to make your DVD collection more mobile in AVI format. Let’s look at which are the top DVD to AVI converters in 2016. # 1: Pavtube Video Converter UltimateSummary: This software is not only easy to use; it also provides the best options for AVI video output. With all of the editing options to make the final product exactly how you want it, we enjoyed using this product. Its options and simplicity make it a great choice if you want to learn how to convert DVD to AVI. This product is definitely top of the line when you need a DVD digitized into the AVI format for your smartphone or PS3. Pros: This DVD ripper has the most AVI formats available: HD AVI, SD AVI, DivX AVI, XviD AVI, H.264 AVI and 3D AVI. Cons: The manufacturer doesn't provide a telephone number for support questions. # 2: Aiseesoft DVD RipperSummary: This application is a great choice for converting your mountain of DVDs to an AVI format. Benefits of converting your discs include creating backups, increasing mobility and taking advantage of various video-editing options. Aiseesoft’s application enables all of these and more. The interface is straightforward and simple to use; we were able to easily figure out what to do and where to find things without resorting to any kind of technical support or help files. Pros: The manufacturer offers a lot of support through tutorials and contact information.Cons: The output formats are contained in one long list which is difficult to sort through. # 3: ImTOO DVD RipperSummary: The ImTOO DVD Ripper is a useful DVD to AVI converter if you want a way to preserve your movies in a digital format. By using this application, you can not only make a second copy of all your favorite movies, but you can watch them on different platforms. Though it doesn’t have as many editing options as some of the other DVD to AVI rippers, it does have a comprehensive list of available AVI formats. Pros: There are a lot of AVI formats available with this application. Cons: This application is very slow when converting DVD to AVI. # 4: Any DVD Converter UltimateSummary: The DVD to AVI converter Any DVD Converter is a useful application for digitizing your DVDs. This makes them easier to store and more readably watchable on mobile devices. Made by ADC, this application doesn’t boast as many AVI output options as some of the other converters, but is very reliable when it comes to editing options and speed of conversion. As far as ripping DVD to AVI, Any DVD Converter is a good choice. Pros: This application is great when you need to make multiple segments from one movie. Cons: There aren’t very many pre-programmed AVI format settings. # 5: DVD to AVI SuiteSummary: The DVD to AVI Suite from this article is an intuitive DVD to AVI converter. While it has only a few available AVI formats, the conversion speed is fairly quick and the quality is good. The suite contains two programs: the DVD converter and the AVI converter. While the AVI software was useful, we found that the DVD to AVI ripper portion of the software had more of the features we were looking for. Pros: The conversion rate is speedy when working with the pre-programmed profiles. Cons: There are only a handful of AVI formats available.Use a DVD to AVI converter to utilize your movie collection to the fullest extent. This is the easiest way to digitize your collection and make it more readily available when you are on the go. Related Articles: