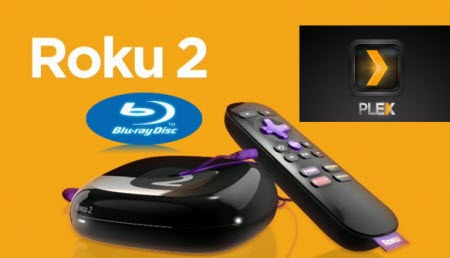
The Roku 2 is really a great combination of on-demand media and easy access to your own extensive media library that made Roku's case, not to mention an attractive price tag. Read Top 5 Media server. Most Roku users have met the same situations:
When you attempt to stream your Blu-ray movies to Roku 2 through Plex Media Server for enjoyment, you may failed and because the Roku 2 only supports H.264 MKV and MP4/M4V video, meaning that's the only media recognized over USB and Plex' Direct Play. In this article, we will show you a quick-start guide on ripping Blu-ray to Roku 2 compatible video formats with high output quality.
 To get Blu-ray movies ready for Roku 2 via plex playback, a Blu-ray ripping tool is needed. Here Pavtube BDMagic is recommended to help you convert Blu-ray to Roku 2 supported video formats with easy operation and high output quality. Besides Blu-ray, you can also use it to rip DVD to playback on Roku 3/Roku 2/Roku. The Windows version is compatible with Windows 2003/XP/Vista/Windows 7/Windows 8/Windows 8.1/Windows 10. Read the review.
If you're using a Mac, please turn to Pavtube BDMagic for Mac, which can help you transfer Blu-ray movies to Roku 2 on any Mac OS X(Yosemite and Mavericks included). Download it right now and start enjoying your Blu-ray movies with full HD quality on Roku 2 through Plex Media Server!
How to Rip and Copy Blu-ray Movies to Roku 2 via Plex Effortlessly
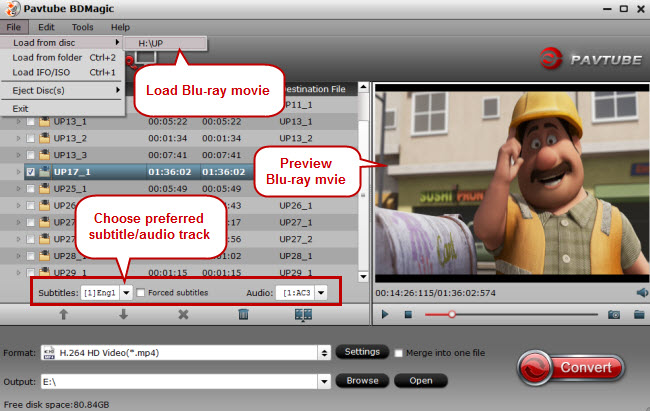
Step 1. Insert the Blu-ray disc you want to convert into your BD drive and click "Load Blu-ray" icon to import the Blu-ray movies. When the files are loaded, you can select the subtitle and audio track as you like.
To get Blu-ray movies ready for Roku 2 via plex playback, a Blu-ray ripping tool is needed. Here Pavtube BDMagic is recommended to help you convert Blu-ray to Roku 2 supported video formats with easy operation and high output quality. Besides Blu-ray, you can also use it to rip DVD to playback on Roku 3/Roku 2/Roku. The Windows version is compatible with Windows 2003/XP/Vista/Windows 7/Windows 8/Windows 8.1/Windows 10. Read the review.
If you're using a Mac, please turn to Pavtube BDMagic for Mac, which can help you transfer Blu-ray movies to Roku 2 on any Mac OS X(Yosemite and Mavericks included). Download it right now and start enjoying your Blu-ray movies with full HD quality on Roku 2 through Plex Media Server!
How to Rip and Copy Blu-ray Movies to Roku 2 via Plex Effortlessly
Step 1. Insert the Blu-ray disc you want to convert into your BD drive and click "Load Blu-ray" icon to import the Blu-ray movies. When the files are loaded, you can select the subtitle and audio track as you like.
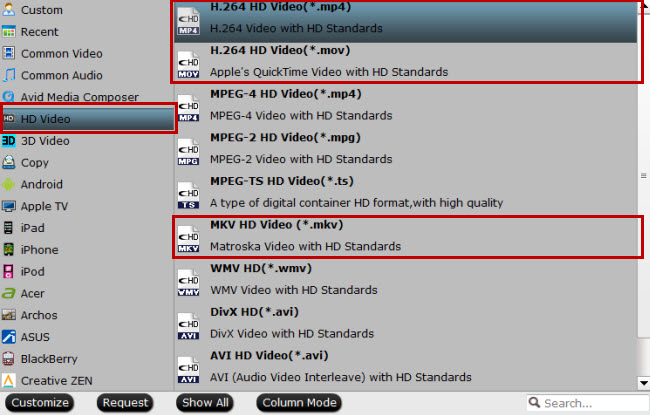
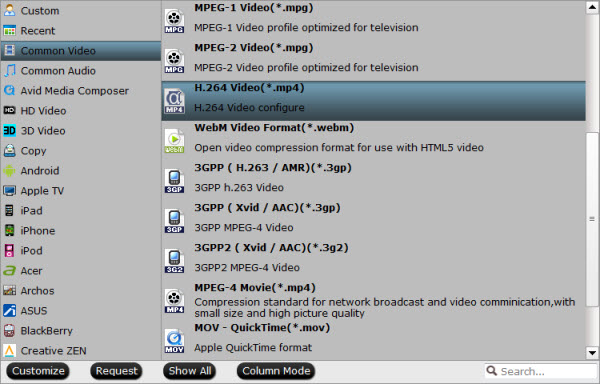
 Step 2. Click Format bar, here I suggest you choose HD Video > H.264 HD Video(*.mp4). Of course you can choose other output formats like MKV from the output format list as long as they are compatible with the Roku media player/Plex. Also you can rip Blu-ray to Amazon Fire TV via Plex.
 Tip:
a. If you like to tweak a little, in the settings, you are allowed to change the frame rate, resolution, bitrate and other specifications of the videos, if the tech terms look taunting to you, proceed to the next step. After that, you can click on “Save as” to rename the profile, such as “Roku or Plex (*.mp4)”. Next time, you can easily find it in “Custom” category.
b. Before conversion, you may want to trim the unnecessary parts from the movie.
Step 3. Click Convert to rip Blu-ray movie to MP4/MKV for Roku 2. After the conversion, drag a converted movie to log in Plex server and add them to the library of Plex. Then set up Plex channel run on Roku 2, you can freely watch Blu-ray with Roku 2!
Read More on Roku Column:
Source: http://bd-dvd-copying-ripping.blogspot.com/2015/06/stream-blu-ray-to-roku-2-via-plex.html
Tip:
a. If you like to tweak a little, in the settings, you are allowed to change the frame rate, resolution, bitrate and other specifications of the videos, if the tech terms look taunting to you, proceed to the next step. After that, you can click on “Save as” to rename the profile, such as “Roku or Plex (*.mp4)”. Next time, you can easily find it in “Custom” category.
b. Before conversion, you may want to trim the unnecessary parts from the movie.
Step 3. Click Convert to rip Blu-ray movie to MP4/MKV for Roku 2. After the conversion, drag a converted movie to log in Plex server and add them to the library of Plex. Then set up Plex channel run on Roku 2, you can freely watch Blu-ray with Roku 2!
Read More on Roku Column:
Source: http://bd-dvd-copying-ripping.blogspot.com/2015/06/stream-blu-ray-to-roku-2-via-plex.html
On too many sites, there are similar questions about playing (3D) and Blu-ray disc on Sony Vaio Laptop without BD drive. For example: Q 1: “ I took my Sony VAIO vpcea46fm to get the hard drive replaced. Well when I got it back it won't play blu-rays. I guess they had put the wrong driver in it because it only plays CDs and DVDs. So any help would be great, or should I just send the 55 dollars to siny and get a restore disc. Please help. Thanks.” Q 2: “ My Sony Vaio with a Blue-ray Disc player will not play a Blue-ray disc. What am I doing wrong?” 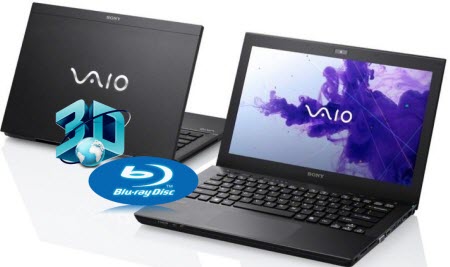 Why you faild to play blu-ray or 3D Blu-rays with Sony Vaio? What are the reasons of blu ray won’t play on Sony Vaio? In order to watch 3D Blu-ray and Blu-ray discs on Sony VAIO, you must have three things: 1) a Blu-ray disc drive, 2) a Blu-ray movie, and 3) Blu-ray Player Software (Need decrypting (3D) Blu-ray function). It is this third one – software – that causes the majority of problems for Blu-ray users. The free player like Windows Media Player, VLC Player, etc don’t have Blu-ray decrypting function and not support playing Blu-ray movies. So this Top 3D Blu-ray Ripper for Sony VAIO laptop from Pavtube will be the best solution for you. Pavtube ByteCopycan convert latest Blu-ray and DVD movies to any other formats like MP4, MOV , M4V, AVI, WMV, MPG, MKV, etc or MP4/MOV with multi-track audios for playback and it is also able to encode Blu-ray movies and DVDs to MKV container format with preserving chapter markers, multiple audio tracks and subtitles. Plus, you can create 3D video from your 2D/3D Blu-ray and standard DVD discs. Read the Top 3D Blu-ray Ripper review. Note: The mac version is Pavtube ByteCopy for Mac. Follow the following steps to Play (3D) Blu-ray discs Sony VAIO Laptop without BD driveStep 1: Run this Pavtube ByteCopy, load Blu-ray discs, Blu-ray folder, Blu-ray ISO image files or 3D Blu-ray movies. This program will help you analysis ISO files automatically so that there's no need to run virtual drive to mount ISO image files any more.
 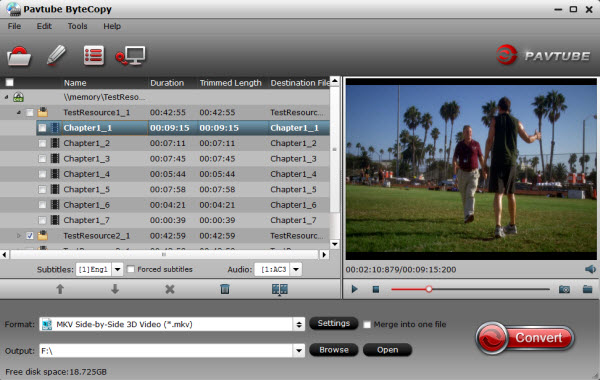 Step 2: Click the "Format" menu for Sony VAIO Laptop, here you are suggested to choose "MKV Side-by-Side 3D Video (*.mkv)" or the "MP4 Side-by-Side 3D Video (*.mp4)" as the best output formats for Sony VAIO Laptop with 3D effects. Or you can only choose “H.264 HD MP4 (*. mp4)” for the commen Blu-ray movies.
 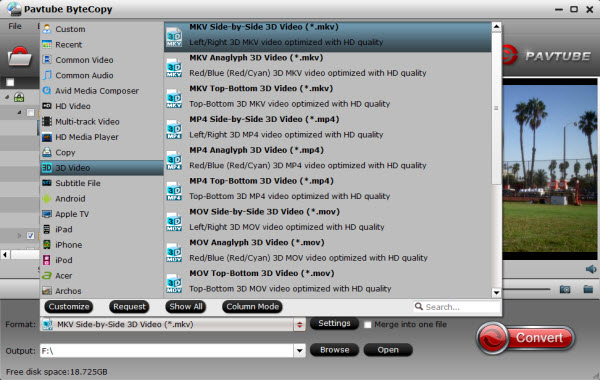 Step 3: If you like, modify profile settings such as video size, bitrate, frame rate, etc to get optimized video and audio playback.Step 4: Return to the Blu-ray to Sony VAIO Converter main interface, and hit the "Convert" button to start encoding (3D) Blu-ray for Sony VAIO. Once it finishes, open output folder, locate the created MP4 or MKV file and you can transfer to your Sony VAIO. And Pavtube ByteCopy can also convert 3D Blu-ray to 3D SBS MP4 for watching on 3D devices, and backup your 3D Blu-ray movies with keeping multiple audio tracks and subtitles in lossless mkv format. Now, you can enjoy your 3D or Blu-ray movies on Sony Vaio Laptop without BD drive. Have Fun! Read More:
Q: “ Ripping DVDs with Kodi? Just wondering if there's an addon that will allow me to rip a dvd to my library with Kodi. It's not all that hard to rip a DVD and put the video on my server, but if I could find an easy to use DVD ripper addon, it would be great to be able to do it from within Kodi (XBMC).”
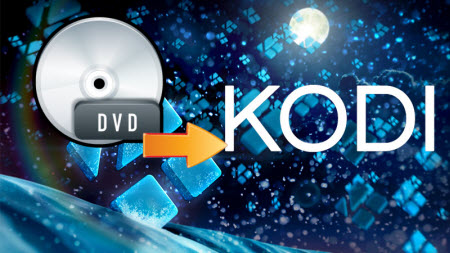 Kodi has its supported video formats like MPEG-1, MPEG-2, H.263, MPEG-4 SP and ASP, MPEG-4 AVC (H.264), H.265 (as from Kodi 14) HuffYUV, Indeo, MJPEG, RealVideo, RMVB, Sorenson, WMV, Cinepak, but DVD is not one of them. You need transfer DVD to Kodi accepted files like MKV, and then stream movies to play with Kodi via network. BTW, Pavtube DVDAid
(
review)
is the tool I used to save all my DVD to MKV.
I searched widely, and many guys recommend Pavtube DVD ripping software, it will bring the best audio / video for watching on Kodi. Unlike some free DVD ripping tools like Handbrake and MakeMKV, Pavtube DVDAid is an easy-to-use yet professional software to help you to solve the issue by giving us the ability to store our purchased physical DVD discs to Kodi(XBMC) for smoothly playback in HTPC on Windows. For those who're using a Mac OS X machine, please try its Pavtube DVDAid for Mac.
Main features:
Best DVD ripping software on the market
Rip DVD to Kodi supported file formats
Rip and convert DVD movies to MP4/AVI/MKV/WMV,etc with high quality.
Makes 1:1 copy of original DVD Disc without quality loss with all audio streams, subtitle tracks, extras, etc.
With CUDA/AMD GPU acceleration, and you will take short time of converting and get hours of enjoyments.
It’s simple to use and well worth the investment.
Support latest DVD
Features with adding *.srt and *.ass subtitle
Hot Search: MOV to Kodi | MP4 to Kodi| M2TS to Kodi | WMV to Kodi
Note: Today, we're just going to show you the simplest steps to convert DVD to XBMC Kodi file.
Step 1: Launch DVD Ripper, click "File" to import DVD file into the program.
One of the great things about this DVD to XBMC Kodi file converter is the fact that it can be used to convert multiple files at a time. You can add multiple DVD files to the conversion queue.
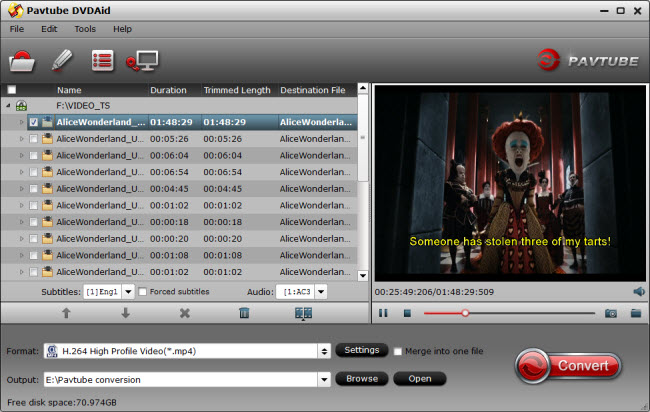 Step 2: Select MKV/MP4 as the output format
Click "Output Format" option to reveal the format drop-down list. In the "Format" > "Common Video" column, find "MKV(Matroska) Video (*.mkv)" or "H.264 Video(*.mp4)" or H.264 High Profile Video(*.mp4) and choose it as the output format for using on Kodi (xbmc) and playback on android tablet.
Step 2: Select MKV/MP4 as the output format
Click "Output Format" option to reveal the format drop-down list. In the "Format" > "Common Video" column, find "MKV(Matroska) Video (*.mkv)" or "H.264 Video(*.mp4)" or H.264 High Profile Video(*.mp4) and choose it as the output format for using on Kodi (xbmc) and playback on android tablet.
 Step 3: Click on "Convert" on the lower right corner to launch the ripping process of DVD to XBMC Kodi. Wait for all the DVD files to be converted.
The two status bars show estimated time about the process. If you plan on walking away from the computer for sleep, tick the "Shut down computer when conversion completed" option. Default is unchecking.
After the conversion complete, simply put the movie from DVD onto XBMC for play back. Enjoy the movie!
If you want to backup your Blu-ray/DVD without quality loss AC3 5.1 audio for HTPC Media center, you can use Pavtube ByteCopy and refer to this guide.
Read More:
Step 3: Click on "Convert" on the lower right corner to launch the ripping process of DVD to XBMC Kodi. Wait for all the DVD files to be converted.
The two status bars show estimated time about the process. If you plan on walking away from the computer for sleep, tick the "Shut down computer when conversion completed" option. Default is unchecking.
After the conversion complete, simply put the movie from DVD onto XBMC for play back. Enjoy the movie!
If you want to backup your Blu-ray/DVD without quality loss AC3 5.1 audio for HTPC Media center, you can use Pavtube ByteCopy and refer to this guide.
Read More:
This tutorial will guide you through adding your DVDs to Windows Media Center (include Windows 7/8/8.1/10 and so on), with this top ISO Converter, you will not have any problems at anytime.
“ How does one play ISO image files in Windows Media Center? I just finished building my HTPC, and have begun configuing WMC, and adding updates and the like to my system. I decided so test out Slysoft's AnyDVDHD (and thier CloneDVD software), and have backed up several disks, but am uncertain of the best set-up for viewing these in WMC. Any guidance here would be greatly appreciated. Thanks.”
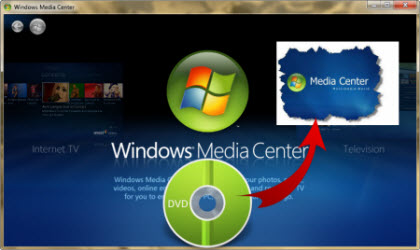 With Windows Media Center, you can catch broadcast and internet TV shows on your big screen, sync media to your windows phone or Zune, set up your Xbox 360 as a media center extender for enjoying all your home entertainment. Apart from this, how about making full advantage of media center by watching ISO files in Windows Media Center?
To view your ISO movie on Windows Media Center, here is an easier way: that is to convert your ISO movies to WMC best supported video format. Here, Pavtube ISO to WMC Converter is the best tool for you. Overall, this program can help you extract DVD movies to Windows Media Center playable format. It is professional and easy to use for editing and conversion and makes great quality copies of DVDs. The synchronization of audio and video and super fast conversion speed are also wonderful. The Mac version is ISO to WMC Converter for Mac.
Free download this top ISO to WMC Converter:
With Windows Media Center, you can catch broadcast and internet TV shows on your big screen, sync media to your windows phone or Zune, set up your Xbox 360 as a media center extender for enjoying all your home entertainment. Apart from this, how about making full advantage of media center by watching ISO files in Windows Media Center?
To view your ISO movie on Windows Media Center, here is an easier way: that is to convert your ISO movies to WMC best supported video format. Here, Pavtube ISO to WMC Converter is the best tool for you. Overall, this program can help you extract DVD movies to Windows Media Center playable format. It is professional and easy to use for editing and conversion and makes great quality copies of DVDs. The synchronization of audio and video and super fast conversion speed are also wonderful. The Mac version is ISO to WMC Converter for Mac.
Free download this top ISO to WMC Converter:

 Step 1: Run the best ISO Converter from Pavtube, and load ISO files to it. You can also load DVD discs.
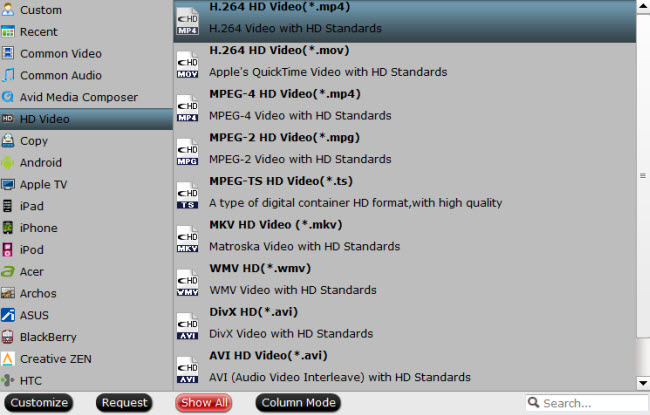
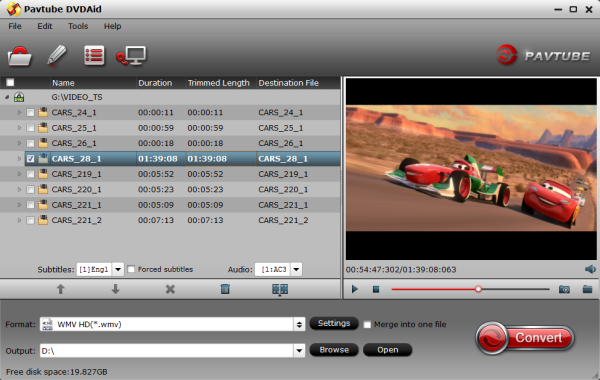 Step 2: Select an optimized video format for output. There are hundreds of profiles under “Format” menu, but you would always find the right one as output format. For example, choose MP4 as showed below. The format is designed for users that wanna get ISO files to Windows Media Center.
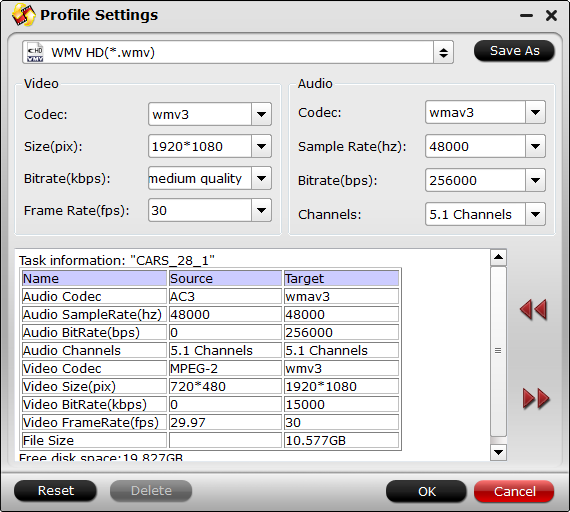
 Tip: PavtubeDVDAid let users control/customize output file quality. To improve video quality, simply click "Settings" and set video bitrate up.
 Step 3: Start ripping ISO to MP4 video for Windows Media Center.
Click "Convert" button to rip ISO to Windows Media Center, once the ripping task is finished by Pavtube DVDAid, you can click "Open" button at the bottom of the main interface to get the output MP4 file for adding to Windows Media Center for playing and sharing with your family.
With this top ISO to WMC Converter, you can get any ISO files for enjoying on your Windows Media Center for Windows 2003/XP/Vista/Windows 7/Windows 8/Windows 8.1/Windows 10.
Read More:
Step 3: Start ripping ISO to MP4 video for Windows Media Center.
Click "Convert" button to rip ISO to Windows Media Center, once the ripping task is finished by Pavtube DVDAid, you can click "Open" button at the bottom of the main interface to get the output MP4 file for adding to Windows Media Center for playing and sharing with your family.
With this top ISO to WMC Converter, you can get any ISO files for enjoying on your Windows Media Center for Windows 2003/XP/Vista/Windows 7/Windows 8/Windows 8.1/Windows 10.
Read More:
This is our Customer Review:
“ If I rip a blu ray with Byte Copy, can I then convert it to an MKV with DTS 5.1 in Byte Copy?
Oh and one more thing, I would still like to do all this while finding a way to convert the video with Lossless 5.1 DTS Audio to an MKV file to save space for when I stream on Plex on my in home network. “
 Do you have met the same situations when backup blu-ray movies to Plex Server? This guide introduces the Blu-ray to MKV ripping workflow for watching on Plex with DTS 5.1 sound in all audio streams:
How to rip Blu-ray to MKV with DTS 5.1 for all audio streams via Plex
If you want to rip commercial Blu-ray Discs and with DTS 5.1 audio output, then Pavtube ByteCopy will be your first choice which does a great job in quick decrypting the protected Blu-ray discs within a few clicks and help you backup Blu-ray movies into lossless MKV files with desired HD video quality, audio streams and subtitles. what's more, it saves 7.1 surround audio from original disks. If you’re Mac users, you can turn to Pavtube ByteCopy for Mac. Now, you can get the 50% off discount from Pavtube Easter Gifts 2015.
More money-saving Trip:
ByteCopy($42) + Video Converter Ultimate($65) = Only $79.9, Save $27.1
Now, start to convert Blu-ray to MKV with DTS 5.1 for all audio streams.
Step 1. Load Blu-ray movie.
Get ready to insert your Blu-ray disc to disc drive, click this “Load Disc” button to browser to disc drive and import the disc. Or you could load BD folder and BD ISO from computer hard drive to this best Blu-ray to MKV Converter.
Do you have met the same situations when backup blu-ray movies to Plex Server? This guide introduces the Blu-ray to MKV ripping workflow for watching on Plex with DTS 5.1 sound in all audio streams:
How to rip Blu-ray to MKV with DTS 5.1 for all audio streams via Plex
If you want to rip commercial Blu-ray Discs and with DTS 5.1 audio output, then Pavtube ByteCopy will be your first choice which does a great job in quick decrypting the protected Blu-ray discs within a few clicks and help you backup Blu-ray movies into lossless MKV files with desired HD video quality, audio streams and subtitles. what's more, it saves 7.1 surround audio from original disks. If you’re Mac users, you can turn to Pavtube ByteCopy for Mac. Now, you can get the 50% off discount from Pavtube Easter Gifts 2015.
More money-saving Trip:
ByteCopy($42) + Video Converter Ultimate($65) = Only $79.9, Save $27.1
Now, start to convert Blu-ray to MKV with DTS 5.1 for all audio streams.
Step 1. Load Blu-ray movie.
Get ready to insert your Blu-ray disc to disc drive, click this “Load Disc” button to browser to disc drive and import the disc. Or you could load BD folder and BD ISO from computer hard drive to this best Blu-ray to MKV Converter.
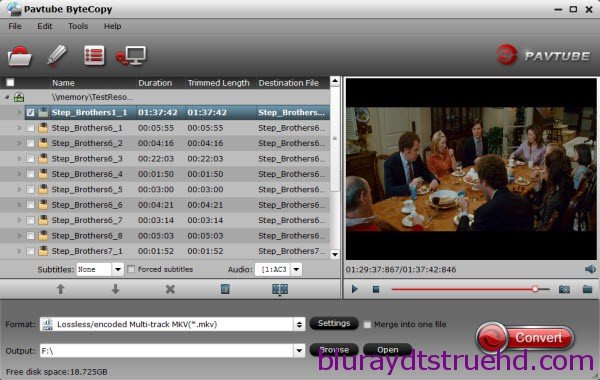 Step 2. Choose suitable output format.
Pavtubr ByteCopy offers an special category for users who would like to keep multiple audio tracks including DTS 5.1 audio in saved Lossless MKV file.
To pass-through original TrueHD/Dolby Digital/DTS/PCM audio, just select Multi-track Video > Lossless/encoded Multi-track MKV(*.MKV) for output. In this way the original audio tracks are streamed without transcoding from source BD Disc to saved MKV file.
Step 2. Choose suitable output format.
Pavtubr ByteCopy offers an special category for users who would like to keep multiple audio tracks including DTS 5.1 audio in saved Lossless MKV file.
To pass-through original TrueHD/Dolby Digital/DTS/PCM audio, just select Multi-track Video > Lossless/encoded Multi-track MKV(*.MKV) for output. In this way the original audio tracks are streamed without transcoding from source BD Disc to saved MKV file.
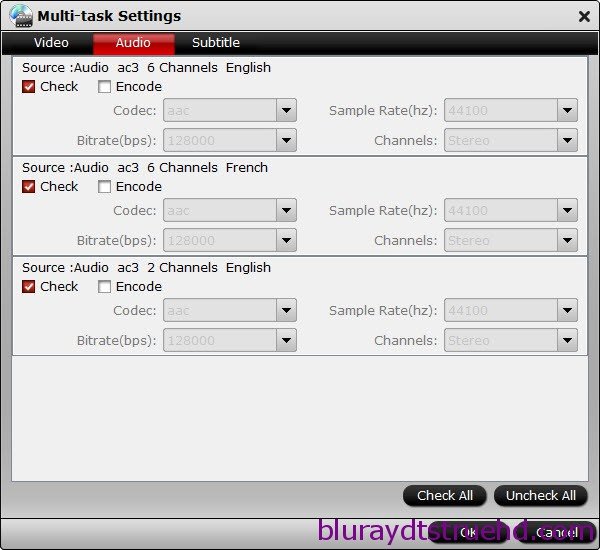
 Step 3. Adjust profile presets (Optional).
You are allowed to customize profile presets as you like, you could remove unwanted audio track in Audio tab under Settings menu, and uncheck subtitles you do not need in Subtitles tab.
Step 3. Adjust profile presets (Optional).
You are allowed to customize profile presets as you like, you could remove unwanted audio track in Audio tab under Settings menu, and uncheck subtitles you do not need in Subtitles tab.
 Step 4. Start ripping Blu-ray to lossless MKV format.
Save all your settings, and back to ByteCopy main interface, hit the “Convert” button to start converting. When the lossless backup completes, you would get a single large MKV file saved in output file destination. And you could play copied Blu-ray MKV movie on your Plex with DTS 5.1 audio preserved.
Read More:
Step 4. Start ripping Blu-ray to lossless MKV format.
Save all your settings, and back to ByteCopy main interface, hit the “Convert” button to start converting. When the lossless backup completes, you would get a single large MKV file saved in output file destination. And you could play copied Blu-ray MKV movie on your Plex with DTS 5.1 audio preserved.
Read More:
Summary: Did you know you can also play DVD on Roku? Here is a simple guide on ripping DVDs for streaming over Plex to Roku 3 with supported formats.
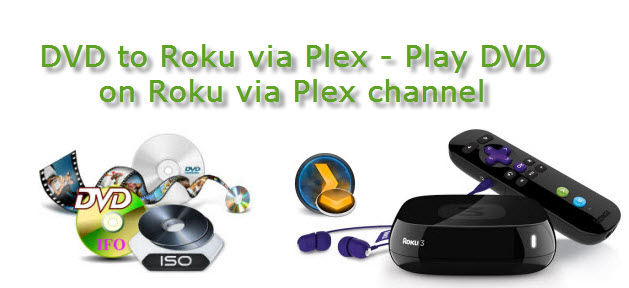 Roku is another popular streaming player, besides Apple TV and Chromecast. It supports 1800+ streaming channels including YouTube, Netflix, HBO GO, Hulu plus, PBS, Pandora, etc. and 200,000+ movies and TV episodes. Mostly you may use the Roku as a top-up box for your Plex media center. But you may want to know how to play DVD-like sources? Because Roku only support MKV (H.264), MP4 (H.264), MOV (H.264), WMV (VC-1, firmware 3.1 only). Is there any way to workaround to fix the issue? Sure, we have a great tutorial for you, guaranteed to play DVD movies on Roku thru Plex.
You may opt for some free DVD rippers like HandBrake to rip DVD to Roku compatible formats. But such kind of DVD rippers isn't suit for copy protected DVD movies or latest DVD released, like Night at the Museum: Secret of the Tomb, The Red Ten, Transformers 4. If you want to effortlessly rip any regular and badly encrypted DVDs to Roku, Pavtube DVDAid is a good option. After downloading and installing, you can rip and stream DVD to Roku in several simple steps. (For Mac users, Pavtube DVDAid for Mac is the way to go. Follow the guide for Mac).
Pavtube DVDAid More Features:
Edit the videos before conversion, such as trim, crop, add subtitles, video effect, etc.
Convert DVD to many other mobile devices and editing software like iPad Air 2, iPad mini 3, ATV 3, iPhone 6/6 Plus, Nexus 10, Galaxy Tab 3, S5, Note 3, Sony Vegas and more.
Add srt, ass, ssa subtitles to your movies.
Backup DVD main movie to VOB format with original quality.
How to Rip DVD movies to Roku for Playing via Plex
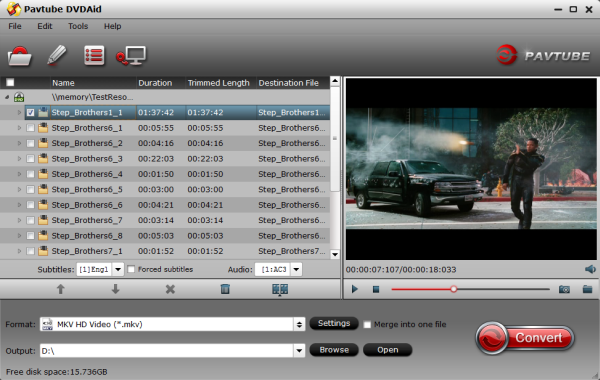
STEP 1: Load DVD files to the converter
Click the disc button to load DVD movies to the program. The detailed information of your DVD movie will be displayed. You can then preview them and choose the chapters you want to rip.
Roku is another popular streaming player, besides Apple TV and Chromecast. It supports 1800+ streaming channels including YouTube, Netflix, HBO GO, Hulu plus, PBS, Pandora, etc. and 200,000+ movies and TV episodes. Mostly you may use the Roku as a top-up box for your Plex media center. But you may want to know how to play DVD-like sources? Because Roku only support MKV (H.264), MP4 (H.264), MOV (H.264), WMV (VC-1, firmware 3.1 only). Is there any way to workaround to fix the issue? Sure, we have a great tutorial for you, guaranteed to play DVD movies on Roku thru Plex.
You may opt for some free DVD rippers like HandBrake to rip DVD to Roku compatible formats. But such kind of DVD rippers isn't suit for copy protected DVD movies or latest DVD released, like Night at the Museum: Secret of the Tomb, The Red Ten, Transformers 4. If you want to effortlessly rip any regular and badly encrypted DVDs to Roku, Pavtube DVDAid is a good option. After downloading and installing, you can rip and stream DVD to Roku in several simple steps. (For Mac users, Pavtube DVDAid for Mac is the way to go. Follow the guide for Mac).
Pavtube DVDAid More Features:
Edit the videos before conversion, such as trim, crop, add subtitles, video effect, etc.
Convert DVD to many other mobile devices and editing software like iPad Air 2, iPad mini 3, ATV 3, iPhone 6/6 Plus, Nexus 10, Galaxy Tab 3, S5, Note 3, Sony Vegas and more.
Add srt, ass, ssa subtitles to your movies.
Backup DVD main movie to VOB format with original quality.
How to Rip DVD movies to Roku for Playing via Plex
STEP 1: Load DVD files to the converter
Click the disc button to load DVD movies to the program. The detailed information of your DVD movie will be displayed. You can then preview them and choose the chapters you want to rip.
 STEP 2: Select output format
Click Format > Common Video and set output video format as H.264 Video (*.mp4). The reason mp4 is the target format is that by packing the videos in mp4, the file size will be reasonable small and the video quality remains.
STEP 2: Select output format
Click Format > Common Video and set output video format as H.264 Video (*.mp4). The reason mp4 is the target format is that by packing the videos in mp4, the file size will be reasonable small and the video quality remains.
 STEP 3: Edit the DVD files(optional)
The DVD to Roku Converter comes with the editing functions enables you to customize your own videos in the following ways:
A. Crop - Crop the video frame size for better visual effects on the player.
B. Trim - Split the video clips to choose your favorite part of the DVD movies.
C. Effects - You can change the video parameters like brightness, saturation, contrast and more...
STEP 4: Start to convert DVD to Roku supported format
After all preparations, click the Convert button to rip your DVD movie to Roku. When the conversion completes, click Open to get the converted MP4 files and play them with Roku via Plex for freely.
Find More Tips from Roku Column:
STEP 3: Edit the DVD files(optional)
The DVD to Roku Converter comes with the editing functions enables you to customize your own videos in the following ways:
A. Crop - Crop the video frame size for better visual effects on the player.
B. Trim - Split the video clips to choose your favorite part of the DVD movies.
C. Effects - You can change the video parameters like brightness, saturation, contrast and more...
STEP 4: Start to convert DVD to Roku supported format
After all preparations, click the Convert button to rip your DVD movie to Roku. When the conversion completes, click Open to get the converted MP4 files and play them with Roku via Plex for freely.
Find More Tips from Roku Column: